Traefik Enterprise Edition on Docker Enterprise Edition
Traefik Enteprise Edition (TraefikEE) is a production-grade, distributed, and highly-available routing solution built on top of Traefik.
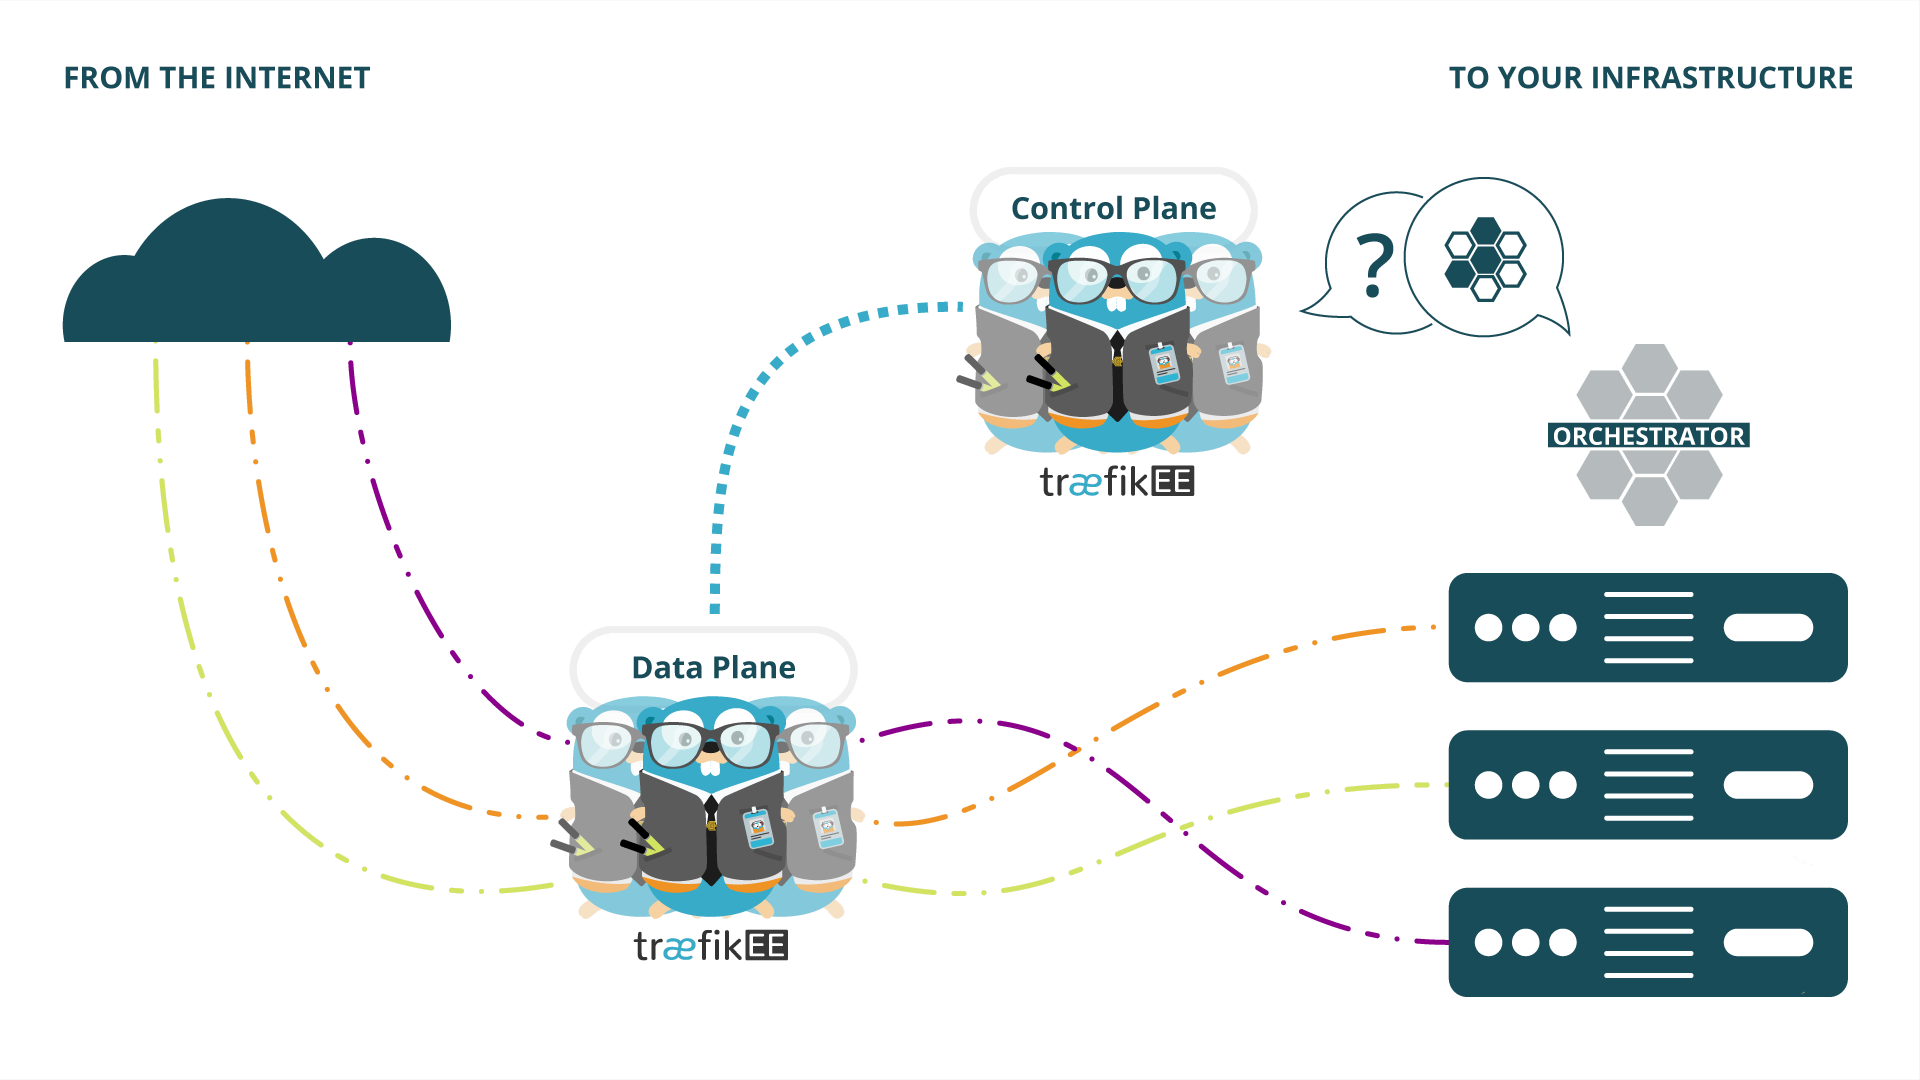
If you want to learn more about TraefikEE, please refer to the page "Concepts" of the documentation.
Prerequisites
This solution guide was tested with the following elements:
- Docker Enterprise Version: 18.09.3-ee
- UCP: 3.4.1
- Docker running in Swarm mode OR in Kubernetes 1.11.7-docker-1
- TraefikEE v1.0, with the command-line tool
traefikeectl - A valid TraefikEE license stored in the environment variable
$TRAEFIKEE_LICENSE_KEY
External Access
Address
TraefikEE takes advantage of the Routing Mesh with Swarm (or the Node Ports with Kubernetes).
In order to reach TraefikEE from the outside, you have to configure either:
- DNS record(s) to at least one Docker EE worker node
- An external load-balancer distributing requests to your Docker EE worker nodes
Ports
It is strongly advised to expose the IANA HTTP (80) and HTTPS (443) ports on the Docker EE worker nodes.
However, the default installation of UCP is already using the port 443 of the worker nodes, as explained in the Docker's UCP documentation
Based on your future needs, you have to choose one the following scenarios:
- If you plan to to use Let's Encrypt with TraefikEE:
- Please refer to this Docker EE solutions guide: How to change UCP Controller Port?,
- Use the ports
80and443for external access to TraefikEE.
- If you don't need Let's Encrypt, or cannot change UCP ports:
- Consider using 2 available ports on the Docker EE worker nodes: Let's say
9080and9443 - Configure your external Load-Balancer to do the port fowarding
80<->9080and443<->9443
- Consider using 2 available ports on the Docker EE worker nodes: Let's say
Let's Encrypt and port 443
Port 443 is mandatory if you plan to use Let's Encrypt:
Choose your Orchestrator
Depending on your context, you can use TraefikEE either with Swarm or with Kubernetes.
With Swarm
Installation
Installation is a Swarm One Line Installation, specifying the HTTP/HTTPS public ports (chosen earlier in the "Ports" section) as options:
traefikeectl install \
  --swarm \
  --dashboard \
  --licensekey="${TRAEFIKEE_LICENSE_KEY}" \
  --swarm.http=9080 \
  --swarm.https=9443 \
  --clustername=traefikee-swarm
traefikeectl install options
You can learn more about the command-line options used
on the traefikeectl install Reference Guide
Installation on Worker Nodes
The TraefikEE control plane requires an access to the swarm API. By default, it uses the docker daemon socket mounted inside the container, restraining the deployment of the control plane to the swarm managers only.
Fortunately, DockerEE comes with the universal control plane which exposes securely the Swarm API. TraefikEE is able to leverage this to have its control plane executed only on workers nodes.
Deploying an UCP Client Bundle
The TraefikEE control plane will use a UCP client bundle deployed in the cluster as a swarm secret.
docker secret create ucp-bundle ./ucp-bundle-traefik.zipInstallation
To perform this installation, you need to:
- Update the placement constraints of the control nodes
- Link the UCP client bundle to the control nodes
- Update the command flags used to start TraefikEE
- Remove the bind mount of the docker socket
The following snippet describes the changes you need to apply to your compose files (bootrap-node.yml and control-node.yml on a multi node control plane, or single-control-node.yml on a single node control plane).
Those changes are both applicable in a one-line installation or a manual installation.
---
version: '3.7'

# Declare the secret containing the ucp-bundle
secrets:
  [...]
  ucp-bundle:
    name: ucp-bundle
    external: true

services:
  bootstrap-node: # or control-node, depending of your setup
  # [...]
  # Define a placement constraint on swarm workers only
  deploy:
    placement:
      constraints:
        - node.role == worker
  # [...]
  # Mount the ucp bundle secret inside the container
  secrets:
    - ucp-bundle
    - [...]
  volumes:
    # Remove the bind mount of the docker socket
    # - /var/run/docker.sock:/var/run/docker.sock
  command:
    # [...]
    # Indicate to TraefikEE to use the UCP bundle
    - "--swarmmode.ucpbundle=/run/secrets/ucp-bundle"
    # [...]
Then perform a manual installation either in single control node mode or multi control node mode.
One-line installation
In this specific case, it is not possible to run the one-line installation using traefikeectl.
You will have to do a manual installation.
Once the cluster is installed however, you can use traefikeectl connect and use it to manage your cluster.
Once the installation is finished, enable the UCP mode on TraefikEE by using the --docker.ucpbundle
option on the deploy command.
traefikeectl deploy \
  --clustername=traefikee-swarm \
  --docker.swarmmode \
--docker.ucpbundle=/run/secrets/ucp-bundledocker exec -ti <control-node-container id> /traefikee \
deploy \
--docker.swarmmode \
--docker.ucpbundle=/run/secrets/ucp-bundleConfiguration
Once the installation is finished:
-
You can manage the cluster with
traefikeectl:traefikeectl list-nodes --clustername=traefikee-swarm traefikeectl logs --clustername=traefikee-swarm ... -
Deploy a customized routing configuration to create the entrypoints. Please note that TraefikEE uses the
80and443ports internally, hence these values for the entrypoints:traefikeectl deploy --clustername=traefikee-swarm \ --docker.swarmmode \ --entryPoints='Name:http Address::80' \ --entryPoints='Name:https Address::443 TLS' \ --defaultentrypoints=https,http
Deploy Application
You can start deploying applications in Docker Swarm with labels configured:
- Start by creating the following Docker YAML Compose file,
with
public.cluster.dns.orgbeing the public DNS to reach the cluster:
version: '3.4'
networks:
  traefikee_net:
    external: true

services:
  whoami:
    image: containous/whoami
    deploy:
      mode: replicated
      replicas: 2
      labels:
        - "traefik.enable=true"
        - "traefik.frontend.rule=Path:/whoami"
        - "traefik.port=80"
    networks:
- traefikee_net-
Deploy your application with the following command:
docker stack deploy whoami --compose-file=./docker-whoami.yaml -
Check the application deployment status, with
2/2replicas ready:docker service ls -
Verify that the requests are routed by TraefikEE to the "whoami" application:
curl http://public.cluster.dns.org:9080 -
Cleanup the "whoami" application if everything is working as expected:
docker stack rm whoami
With Kubernetes
Default Storage Class
As specified in the Kubernetes requirements for TraefikEE, check that your DockerEE Kubernetes installation has a default storage class:
kubectl get storageclassYou should get an output similar to this one, where one of the elements is defined as (default):
NAME                 PROVISIONER    AGE
standard (default)   xxxxxxxxxx     1d
If you do not have any default storage class defined, please check the following Docker EE guides:
- Section "Exposing NFS shares as a Cluster Object" in "Configuring NFS Storage for Kubernetes"
- Configure AWS EBS Storage for Kubernetes
You might also want to check the official Kubernetes documentation:
Once you have a default storage class defined, you can go to the next step.
Installation
Installation is a Kubernetes Customised One Line Installation, specifying the HTTP/HTTPS ports (chosen earlier in the "Ports" section) in the YAML values file:
ports:
  http: 9080
  https: 9443
Then execute the following installation command:
traefikeectl install \
  --kubernetes \
  --dashboard \
  --licensekey="${TRAEFIKEE_LICENSE_KEY}" \
  --kubernetes.helmvaluespath=./custom-values.yaml \
  --clustername=traefikee-kube
traefikeectl install options
You can learn more about the command-line options used
on the traefikeectl install Reference Guide
- Don't forget to retrieve the default dashboard generated password from the installation output.
Configuration
Once the installation is finished:
-
You can manage the cluster with
traefikeectl:traefikeectl list-nodes --clustername=traefikee-kube traefikeectl logs --clustername=traefikee-kube ... -
Deploy a customized routing configuration to create the entrypoints. Please note that TraefikEE uses the
80and443port internally, hence these values for the entrypoints:traefikeectl deploy --clustername=traefikee-kube \ --kubernetes \ --entryPoints='Name:http Address::80' \ --entryPoints='Name:https Address::443 TLS' \ --defaultentrypoints=https,http
Deploy Application
You can start deploying applications in Kubernetes with Ingress Rules:
- Start by creating the following YAML file describing the Kubernetes Objects for an application,
with
public.cluster.dns.orgbeing the public DNS to reach the cluster:
---
apiVersion: extensions/v1beta1
kind: Deployment
metadata:
  name: whoami
  namespace: traefikee
spec:
  replicas: 2
  template:
    metadata:
      labels:
        app: whoami
    spec:
      containers:
        - name: whoami
          image: containous/whoami
---
apiVersion: v1
kind: Service
metadata:
  name: whoami
  namespace: traefikee
  labels:
    app: whoami
spec:
  type: ClusterIP
  ports:
    - port: 80
      name: whoami
  selector:
    app: whoami
---
apiVersion: extensions/v1beta1
kind: Ingress
metadata:
  name: whoami
  namespace: traefikee
  labels:
    app: whoami
spec:
  rules:
    - http:
        paths:
          - path: /whoami
            backend:
              serviceName: whoami
servicePort: 80-
Deploy your application with the following command:
kubectl apply -f ./kubernetes-whoami.yaml -
Check the application deployment status, expecting the 3 objects to be in staus
Ready:kubectl get deployment,svc,ingress \ --namespace=traefikee \ --selector=app=whoami -
Verify that the requests are routed by TraefikEE to the "whoami" application:
curl http://public.cluster.dns.org:9080/whoami -
Cleanup the "whoami" application if everything is working as expected:
kubectl delete -f ./kubernetes-whoami.yaml