Getting Started with MCP Gateway
This guide walks you through setting up Traefik Hub MCP Gateway to proxy and govern a remote MCP server. You'll configure authentication, implement tool filtering policies, and verify the setup with an MCP client.
What You'll Build
By the end of this guide, you will have:
- MCP Gateway proxying DeepWiki's public MCP server
- JWT-based authentication protecting access
- Policy-based tool filtering (controlling access to tools and resources)
- OAuth 2.1/2.0 resource discovery for MCP clients
- Verified setup using MCP Inspector
Why use MCP Gateway?
- Centralized governance: Control which tools and resources users can access across all MCP servers
- Security: Add authentication and authorization to MCP servers that lack it
- Observability: Monitor all MCP operations with OpenTelemetry metrics and traces
- Scalability: Proxy multiple remote MCP servers through a single gateway
About DeepWiki MCP
This guide uses DeepWiki, a public MCP server that provides AI agents with access to GitHub repository documentation. DeepWiki is ideal for this tutorial because:
- Publicly accessible: No authentication required to access the upstream server, letting us focus on adding gateway-level security
- Real-world use case: Demonstrates how to govern AI agent access to external knowledge sources
- Multiple tools: Provides several tools (
read_wiki_structure,read_wiki_contents,ask_question) that we can selectively allow or deny through policies
DeepWiki connects to GitHub repositories and makes their documentation queryable by AI agents. We'll use the MCP Gateway to add authentication and implement tool-level access control—allowing some users to read documentation structure while restricting others from querying content.
Prerequisites
Before you begin, ensure you have:
- Kubernetes cluster: k3s, k3d, kind, or any Kubernetes cluster
- Traefik Hub license: Log in to the Traefik Hub Online Dashboard and create a new Hub Gateway. If you don't yet have a Traefik Hub account, please contact our sales team.
- MCP Inspector: For testing the gateway. We'll set this up later with npx or Docker (no installation needed)
If you don't have a cluster, create one with k3d:
k3d cluster create traefik-hub \
  --port 80:80@loadbalancer \
  --port 443:443@loadbalancer \
  --k3s-arg "--disable=traefik@server:0"
Step 1: Enable MCP Gateway
First, install Traefik Hub with the MCP Gateway feature enabled.
helm repo add traefik https://traefik.github.io/charts
helm repo update

helm install traefik traefik/traefik \
  --namespace traefik \
  --create-namespace \
  --set hub.token=<YOUR_HUB_TOKEN> \
  --set hub.mcpgateway.enabled=true \
  --set hub.mcpgateway.maxRequestBodySize=2097152 \
  --set providers.kubernetesCRD.allowExternalNameServices=true \
  --set providers.kubernetesCRD.allowCrossNamespace=true
What this does:
hub.mcpgateway.enabled=true: Enables the MCP Gateway featurehub.mcpgateway.maxRequestBodySize=2097152: Sets max request body to 2MB (default is 1MB)
Verify installation:
kubectl -n traefik wait --for=condition=ready pod -l app.kubernetes.io/name=traefik --timeout=90s
Step 2: Create External Service for DeepWiki MCP Server
Create a Kubernetes ExternalName service that points to DeepWiki's public MCP server. This allows the gateway to route traffic to the remote server.
cat <<EOF | kubectl apply -f -
apiVersion: v1
kind: Service
metadata:
  name: deepwiki-mcp-server
  namespace: apps
spec:
  type: ExternalName
  externalName: mcp.deepwiki.com
  ports:
    - name: https
      port: 443
      protocol: TCP
EOF
Verify the service:
kubectl get svc deepwiki-mcp-server -n apps
Expected output:
NAME                  TYPE           CLUSTER-IP   EXTERNAL-IP         PORT(S)   AGE
deepwiki-mcp-server   ExternalName   <none>       mcp.deepwiki.com    443/TCP   5s
Step 3: Configure JWT Authentication
Create a JWT middleware to authenticate users accessing the MCP server.
Create JWT Secret
For this guide, we'll use a basic signing secret. In production, use JWKS URLs or public/private key pairs.
kubectl create secret generic mcp-jwt-secret -n apps \
  --from-literal=signingSecret='my-super-secret-key-change-in-production'
Create JWT Middleware
cat <<EOF | kubectl apply -f -
apiVersion: traefik.io/v1alpha1
kind: Middleware
metadata:
  name: deepwiki-mcp-jwt
  namespace: apps
spec:
  plugin:
    jwt:
      signingSecret: urn:k8s:secret:mcp-jwt-secret:signingSecret
      forwardAuthorization: false
      wwwAuthenticate: https://mcp.localhost/.well-known/oauth-protected-resource/deepwiki-mcp
      forwardHeaders:
        X-User-ID: sub
        X-User-Groups: groups
EOF
DeepWiki's MCP server doesn't require authentication, so we set forwardAuthorization: false to prevent the JWT token from being forwarded to the upstream server. The JWT is only used by the gateway for authentication
and policy enforcement. The user identity is extracted to X-User-ID and X-User-Groups headers if needed by the upstream.
Understanding the wwwAuthenticate Option
The wwwAuthenticate option needs to point to the auto-generated well-known endpoint created by the MCP Gateway.
How it works:
- You configure
resourceMetadata.resourcein the MCP middleware (we'll do this in Step 4) - The MCP Gateway automatically creates a well-known endpoint following this pattern:
- Pattern:
https://<host>/.well-known/oauth-protected-resource/<path> - Example:
https://mcp.localhost/.well-known/oauth-protected-resource/github-mcp
- Pattern:
- The JWT middleware's
wwwAuthenticateshould point to this exact URL
In our configuration:
- MCP middleware will have:
resource: https://mcp.localhost/deepwiki-mcp - Auto-generated endpoint:
https://mcp.localhost/.well-known/oauth-protected-resource/deepwiki-mcp - JWT
wwwAuthenticate: Points to the auto-generated endpoint above
Why this matters:
When the JWT middleware returns a 401 Unauthorized, it includes a WWW-Authenticate header pointing to this URL. OAuth-compliant MCP clients use this to discover authorization requirements automatically (per RFC 6750).
We'll verify this endpoint works correctly in Step 7.
Step 4: Configure MCP Middleware
Create the MCP middleware that will proxy DeepWiki's MCP server. We'll start with an allow-all configuration for testing, then add restrictive policies in the smoke tests.
cat <<EOF | kubectl apply -f -
apiVersion: traefik.io/v1alpha1
kind: Middleware
metadata:
  name: deepwiki-mcp-gateway
  namespace: apps
spec:
  plugin:
    mcp:
      resourceMetadata:
        resource: https://mcp.localhost/deepwiki-mcp
        authorizationServers:
          - https://mcp.localhost/oauth/authorize
        resourceDocumentation: https://docs.devin.ai/work-with-devin/deepwiki-mcp
      defaultAction: allow
EOF
The authorizationServers field is required by the MCP Gateway but we're using a placeholder URL (https://mcp.localhost/oauth/authorize) since DeepWiki doesn't require OAuth authentication.
In production, replace this with your actual OAuth provider (for example, https://your-tenant.auth0.com/authorize, https://accounts.google.com/o/oauth2/v2/auth, etc.).
Configuration explanation:
- defaultAction: allow: Allows all MCP operations for initial testing. We'll add restrictive policies later in the smoke tests to demonstrate Task-Based Access Control (TBAC)—the authorization model that enables fine-grained control over what tasks agents can perform, which tools they can access, and what transaction limits apply.
Verify middleware:
kubectl get middleware deepwiki-mcp-gateway -n apps
Step 5: Create StripPrefix Middleware
Create a StripPrefix middleware to remove the /deepwiki-mcp prefix before forwarding requests to the upstream server.
cat <<EOF | kubectl apply -f -
apiVersion: traefik.io/v1alpha1
kind: Middleware
metadata:
  name: deepwiki-strip-prefix
  namespace: apps
spec:
  stripPrefix:
    prefixes:
      - /deepwiki-mcp
EOF
What this does:
The StripPrefix middleware removes the /deepwiki-mcp prefix from the request path before forwarding to the upstream MCP server. For example:
- Request:
http://mcp.localhost/deepwiki-mcp/mcp - Forwarded to upstream:
https://mcp.deepwiki.com/mcp
This middleware will be used in the IngressRoute we create in the next step.
Verify the middleware:
kubectl get middleware deepwiki-strip-prefix -n apps
Step 6: Create IngressRoute
Create an IngressRoute that chains the JWT, MCP, and StripPrefix middlewares together and routes traffic to the DeepWiki MCP server.
cat <<EOF | kubectl apply -f -
apiVersion: traefik.io/v1alpha1
kind: IngressRoute
metadata:
  name: deepwiki-mcp-route
  namespace: apps
spec:
  entryPoints:
    - web
  routes:
    - kind: Rule
      match: Host(\`mcp.localhost\`) && PathPrefix(\`/deepwiki-mcp\`)
      middlewares:
        - name: deepwiki-mcp-jwt
        - name: deepwiki-mcp-gateway
        - name: deepwiki-strip-prefix
      services:
        - name: deepwiki-mcp-server
          port: 443
          scheme: https
          passHostHeader: false
EOF
Middleware chain order matters:
- JWT middleware first: Validates the token and extracts claims
- MCP middleware second: Uses JWT claims to enforce policies
- StripPrefix middleware third: Removes the
/deepwiki-mcpprefix before forwarding to the upstream server
Verify the route:
kubectl get ingressroute deepwiki-mcp-route -n apps
Step 7: Test OAuth Discovery Endpoint
The MCP Gateway automatically creates an OAuth 2.1/2.0 resource metadata endpoint. Let's verify it works.
curl http://mcp.localhost/.well-known/oauth-protected-resource/deepwiki-mcp | jq
Expected output:
{
  "resource": "https://mcp.localhost/deepwiki-mcp",
  "authorization_servers": [
    "https://mcp.localhost/oauth/authorize"
  ],
  "bearer_methods_supported": [
    "header"
  ],
  "resource_documentation": "https://docs.devin.ai/work-with-devin/deepwiki-mcp"
}
Success! The MCP Gateway has automatically generated the OAuth discovery endpoint based on your resourceMetadata configuration.
This endpoint allows MCP clients to discover:
- What resource this endpoint protects (
resource) - Where to get authorization (
authorization_servers) - How to send authentication tokens (
bearer_methods_supported) - Where to find documentation (
resource_documentation)
While DeepWiki's MCP server doesn't require authentication from DeepWiki itself, our MCP Gateway adds JWT authentication as a governance layer.
The authorization_servers field points to a placeholder OAuth endpoint - in production, you'd replace this with your actual OAuth provider.
Step 8: Generate a Test JWT
Create a JWT token for testing. This token will include a groups claim to test our policies.
First, create a small script to generate the JWT:
cat > generate-jwt.sh <<'SCRIPT'
#!/bin/bash
# Simple JWT generator for testing
# Requires: jwt-cli (install with: cargo install jwt-cli)

SECRET="my-super-secret-key-change-in-production"

jwt encode \
  --secret "$SECRET" \
  --exp='+1 hour' \
  '{"sub":"test-user","groups":["developer"],"email":"[email protected]"}'
SCRIPT

chmod +x generate-jwt.sh
If you don't have jwt-cli, install it:
# Using Homebrew (macOS/Linux)
brew install mike-engel/jwt-cli/jwt-cli

# Using cargo
cargo install jwt-cli

# Using Manjaro/Arch:
sudo pacman -S jwt-cli
Generate the token:
export TEST_JWT=$(./generate-jwt.sh)
echo $TEST_JWT
Verify the token (optional):
jwt decode $TEST_JWT
You should see the payload with sub, groups, and email claims.
Step 9: Verify the Setup with curl
Let's verify that the MCP Gateway is working correctly before connecting with MCP Inspector.
Test OAuth Discovery
Verify that the auto-generated OAuth discovery endpoint is accessible:
curl -k http://mcp.localhost/.well-known/oauth-protected-resource/deepwiki-mcp | jq
Expected output:
{
  "resource": "https://mcp.localhost/deepwiki-mcp",
  "authorization_servers": [
    "https://mcp.localhost/oauth/authorize"
  ],
  "bearer_methods_supported": [
    "header"
  ],
  "scopes_supported": null,
  "resource_documentation": "https://docs.devin.ai/work-with-devin/deepwiki-mcp"
}
Test JWT Authentication
Verify that JWT authentication is working by calling the MCP endpoint without a token:
curl -v http://mcp.localhost/deepwiki-mcp/mcp
Expected output:
curl -v http://mcp.localhost/deepwiki-mcp/mcp
* Host mcp.localhost:80 was resolved.
* IPv6: ::1
* IPv4: 127.0.0.1
*   Trying [::1]:80...
* Connected to mcp.localhost (::1) port 80
> GET /deepwiki-mcp/mcp HTTP/1.1
> Host: mcp.localhost
> User-Agent: curl/8.7.1
> Accept: */*
>
* Request completely sent off
< HTTP/1.1 401 Unauthorized
< Www-Authenticate: https://mcp.localhost/.well-known/oauth-protected-resource/deepwiki-mcp
< Date: Fri, 03 Oct 2025 20:36:14 GMT
< Content-Length: 0
<
* Connection #0 to host mcp.localhost left intact
This confirms JWT authentication is required. Now test with your JWT:
curl -v \
  -H "Authorization: Bearer $TEST_JWT" \
  http://mcp.localhost/deepwiki-mcp/mcp
Expected behavior:
The connection should return an event-stream response. This is correct! It means:
- JWT authentication passed
- The request reached DeepWiki's MCP server
- The MCP Gateway is proxying correctly
Enter Ctrl+C to stop the curl command.
If you get 404 Not Found, verify the IngressRoute is correctly configured.
Step 10: Connect with MCP Inspector
Now that the gateway is verified, let's use MCP Inspector to test the DeepWiki MCP server through the gateway.
Start MCP Inspector
MCP Inspector is a developer tool for testing and debugging MCP servers. It supports Streamable HTTP, SSE, and stdio transports.
Start the MCP Inspector UI:
- npx
- Docker
npx @modelcontextprotocol/inspector
docker run --rm --network host -p 6274:6274 -p 6277:6277 ghcr.io/modelcontextprotocol/inspector:latest
The Inspector will launch at http://localhost:6274?MCP_PROXY_AUTH_TOKEN=YOUR_AUTOGENERATED_TOKEN
This guide uses MCP Inspector v0.17.0 or later. Earlier versions (like v0.16.6) have UI differences, including the absence of the "Via Proxy" connection option.
If you encounter UI differences, update to the latest version using npx @modelcontextprotocol/inspector@latest or pull the latest Docker image.
Configure Connection
-
Open http://localhost:6274 in your browser
-
In the connection form, select Streamable HTTP transport
-
Configure the connection:
-
Server URL:
http://mcp.localhost/deepwiki-mcp/mcp -
Connection Type: Via Proxy
-
Select Add Header and add:
- Header name:
Authorization - Header value:
Bearer YOUR_JWT_TOKEN_HERE
- Header name:
-
-
Replace
YOUR_JWT_TOKEN_HEREwith your test JWT:
echo $TEST_JWT
Copy the output and paste it into the Authorization header value.
- Select Connect
Expected result:
- Connection status should show Connected
- You should see available tools in the sidebar
If you're using the Docker version of MCP Inspector, the container cannot resolve mcp.localhost to your host's localhost. You'll see an error like:
Error: getaddrinfo ENOTFOUND mcp.docker.localhost
To fix this, get your Traefik LoadBalancer IP and add it to your host machine's /etc/hosts:
# Get Traefik LoadBalancer IP
kubectl get svc -A | grep LoadBalancer
Then add to /etc/hosts:
<TRAEFIK_LB_IP> mcp.localhost
For npx users, mcp.localhost should resolve automatically. If it doesn't, add to /etc/hosts:
127.0.0.1 mcp.localhost
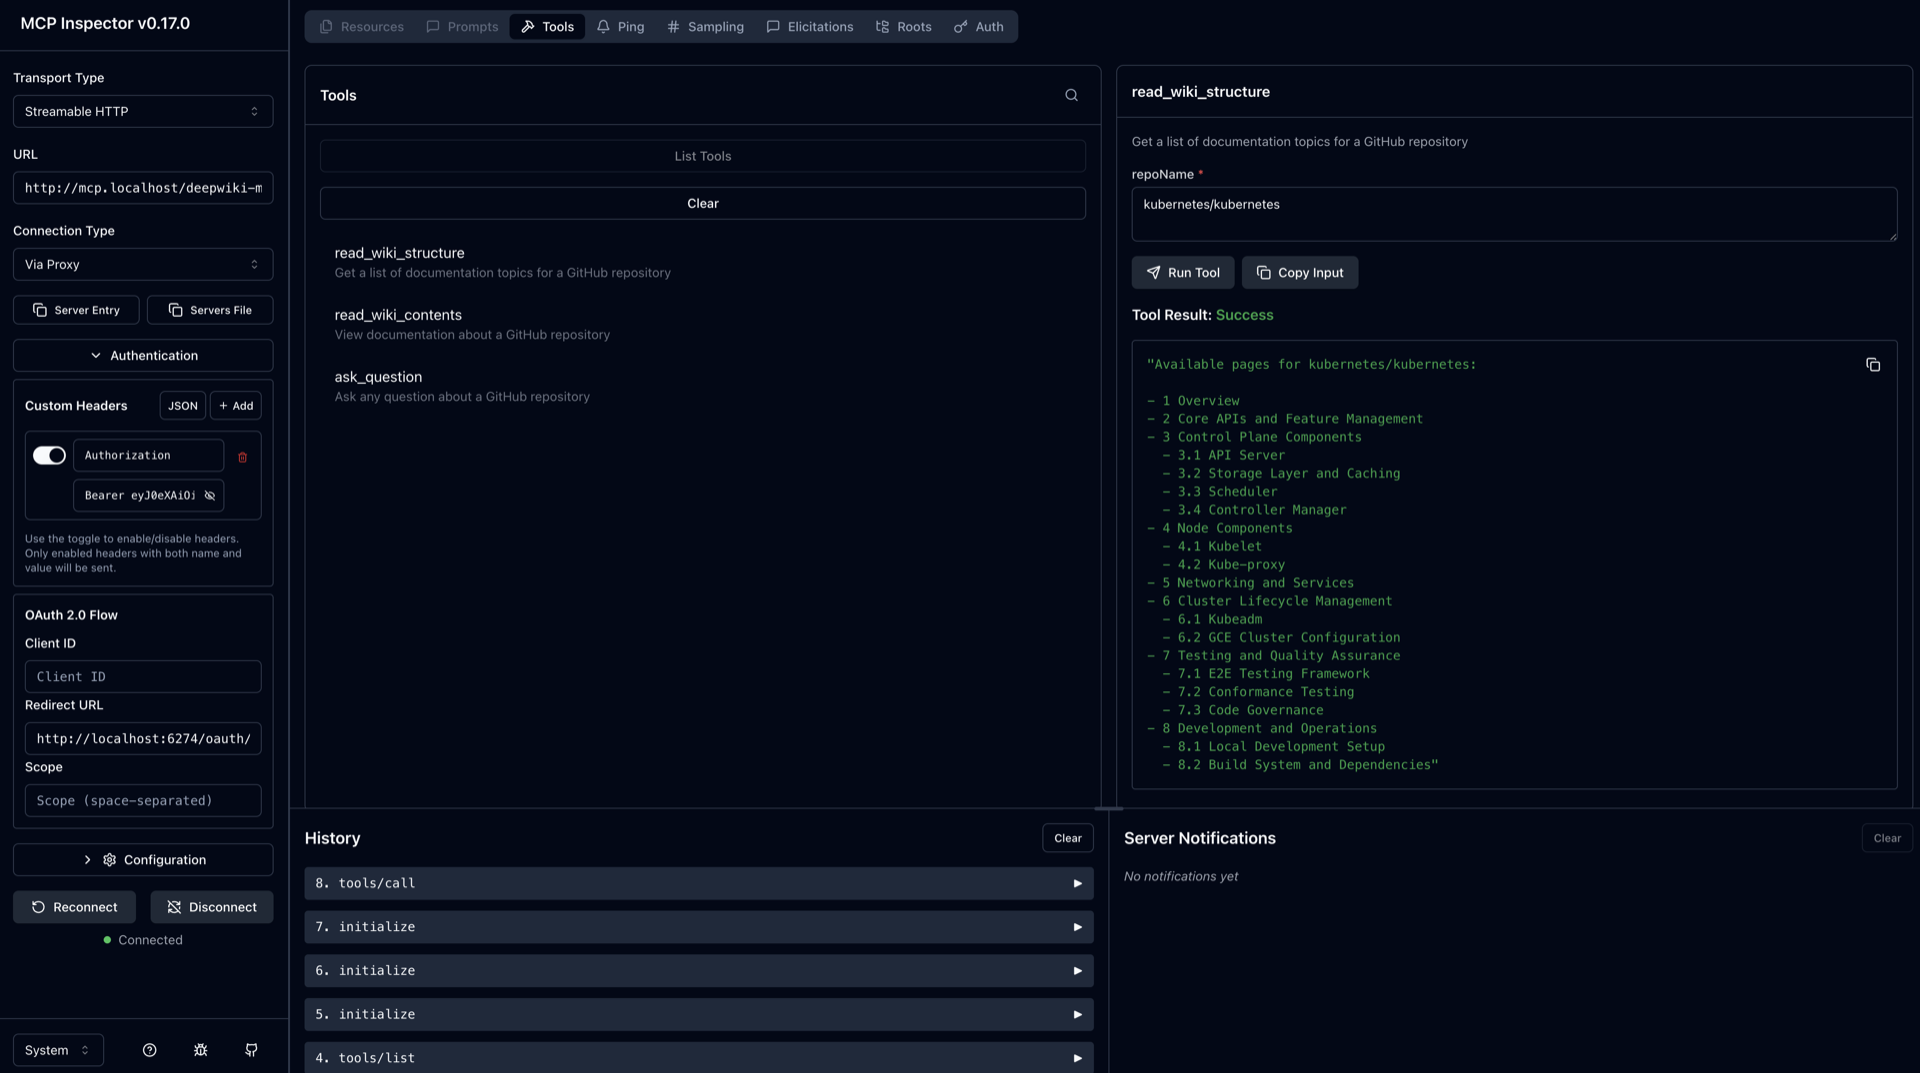
Step 11: Smoke Test: Read Kubernetes Wiki Structure
Now let's test the DeepWiki MCP server by reading the Kubernetes repository wiki structure.
-
In the MCP Inspector sidebar, select Tools
-
Select List Tools to fetch available tools from the server
-
Find and select read_wiki_structure
-
Fill in the arguments with the repository in
owner/repoformat:
kubernetes/kubernetes
Enter the repository as a single string in owner/repo format. Do not add line breaks or extra formatting—only the bare string.
- Select Run Tool
You should see a list of documentation topics from the Kubernetes wiki! This confirms:
- JWT authentication passed
- MCP Gateway proxied the request
- Policy allowed
read_wiki_structuretool - DeepWiki returned the wiki structure
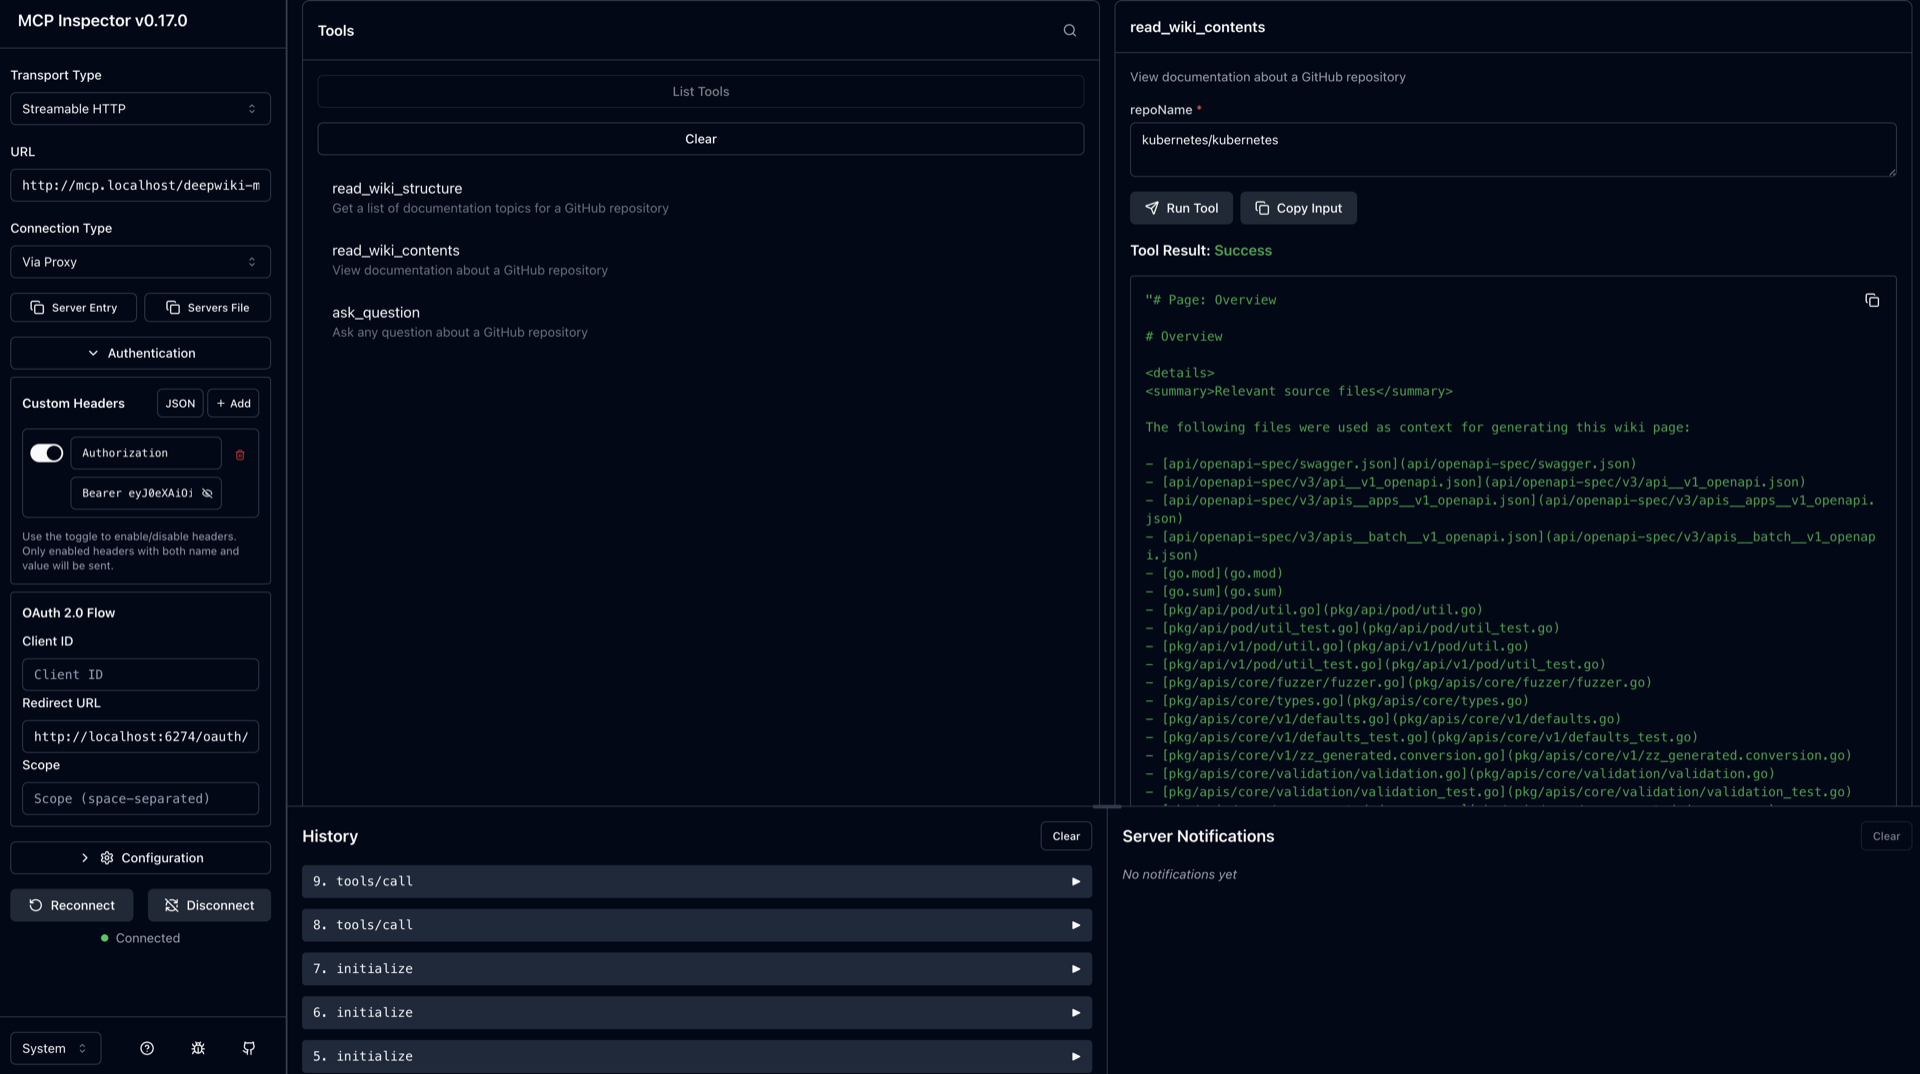
Smoke Test: Read Wiki Contents
-
Select List Tools to fetch available tools from the server if you haven't already
-
Select read_wiki_contents in the Tools sidebar
-
Fill in the arguments with the repository in
owner/repoformat:
kubernetes/kubernetes
- Select Run Tool
You should see the generated content explaining the Kubernetes repo and it's content
Step 12: Smoke Test: Policy-Based Access Control (TBAC)
Now let's test the MCP Gateway's policy enforcement by blocking the read_wiki_contents tool for regular users.
Update MCP Middleware with Restrictive Policy
- CRD
- kubectl apply
apiVersion: traefik.io/v1alpha1
kind: Middleware
metadata:
  name: deepwiki-mcp-gateway
  namespace: apps
spec:
  plugin:
    mcp:
      resourceMetadata:
        resource: https://mcp.localhost/deepwiki-mcp
        authorizationServers:
          - https://mcp.localhost/oauth/authorize
        resourceDocumentation: https://docs.devin.ai/work-with-devin/deepwiki-mcp
      policies:
        # Allow listing tools
        - match: Equals(`mcp.method`, `tools/list`)
          action: allow

        # Allow read_wiki_structure for everyone
        - match: Equals(`mcp.method`, `tools/call`) && Equals(`mcp.params.name`, `read_wiki_structure`)
          action: allow

        # Allow read_wiki_contents only for admin group
        - match: Equals(`mcp.method`, `tools/call`) && Equals(`mcp.params.name`, `read_wiki_contents`) && Contains(`jwt.groups`, `admin`)
          action: allow

      defaultAction: deny
cat <<EOF | kubectl apply -f -
apiVersion: traefik.io/v1alpha1
kind: Middleware
metadata:
  name: deepwiki-mcp-gateway
  namespace: apps
spec:
  plugin:
    mcp:
      resourceMetadata:
        resource: https://mcp.localhost/deepwiki-mcp
        authorizationServers:
          - https://mcp.localhost/oauth/authorize
        resourceDocumentation: https://docs.devin.ai/work-with-devin/deepwiki-mcp
      policies:
        # Allow listing tools
        - match: Equals(\`mcp.method\`, \`tools/list\`)
          action: allow

        # Allow read_wiki_structure for everyone
        - match: Equals(\`mcp.method\`, \`tools/call\`) && Equals(\`mcp.params.name\`, \`read_wiki_structure\`)
          action: allow

        # Allow read_wiki_contents only for admin group
        - match: Equals(\`mcp.method\`, \`tools/call\`) && Equals(\`mcp.params.name\`, \`read_wiki_contents\`) && Contains(\`jwt.groups\`, \`admin\`)
          action: allow

      defaultAction: deny
EOF
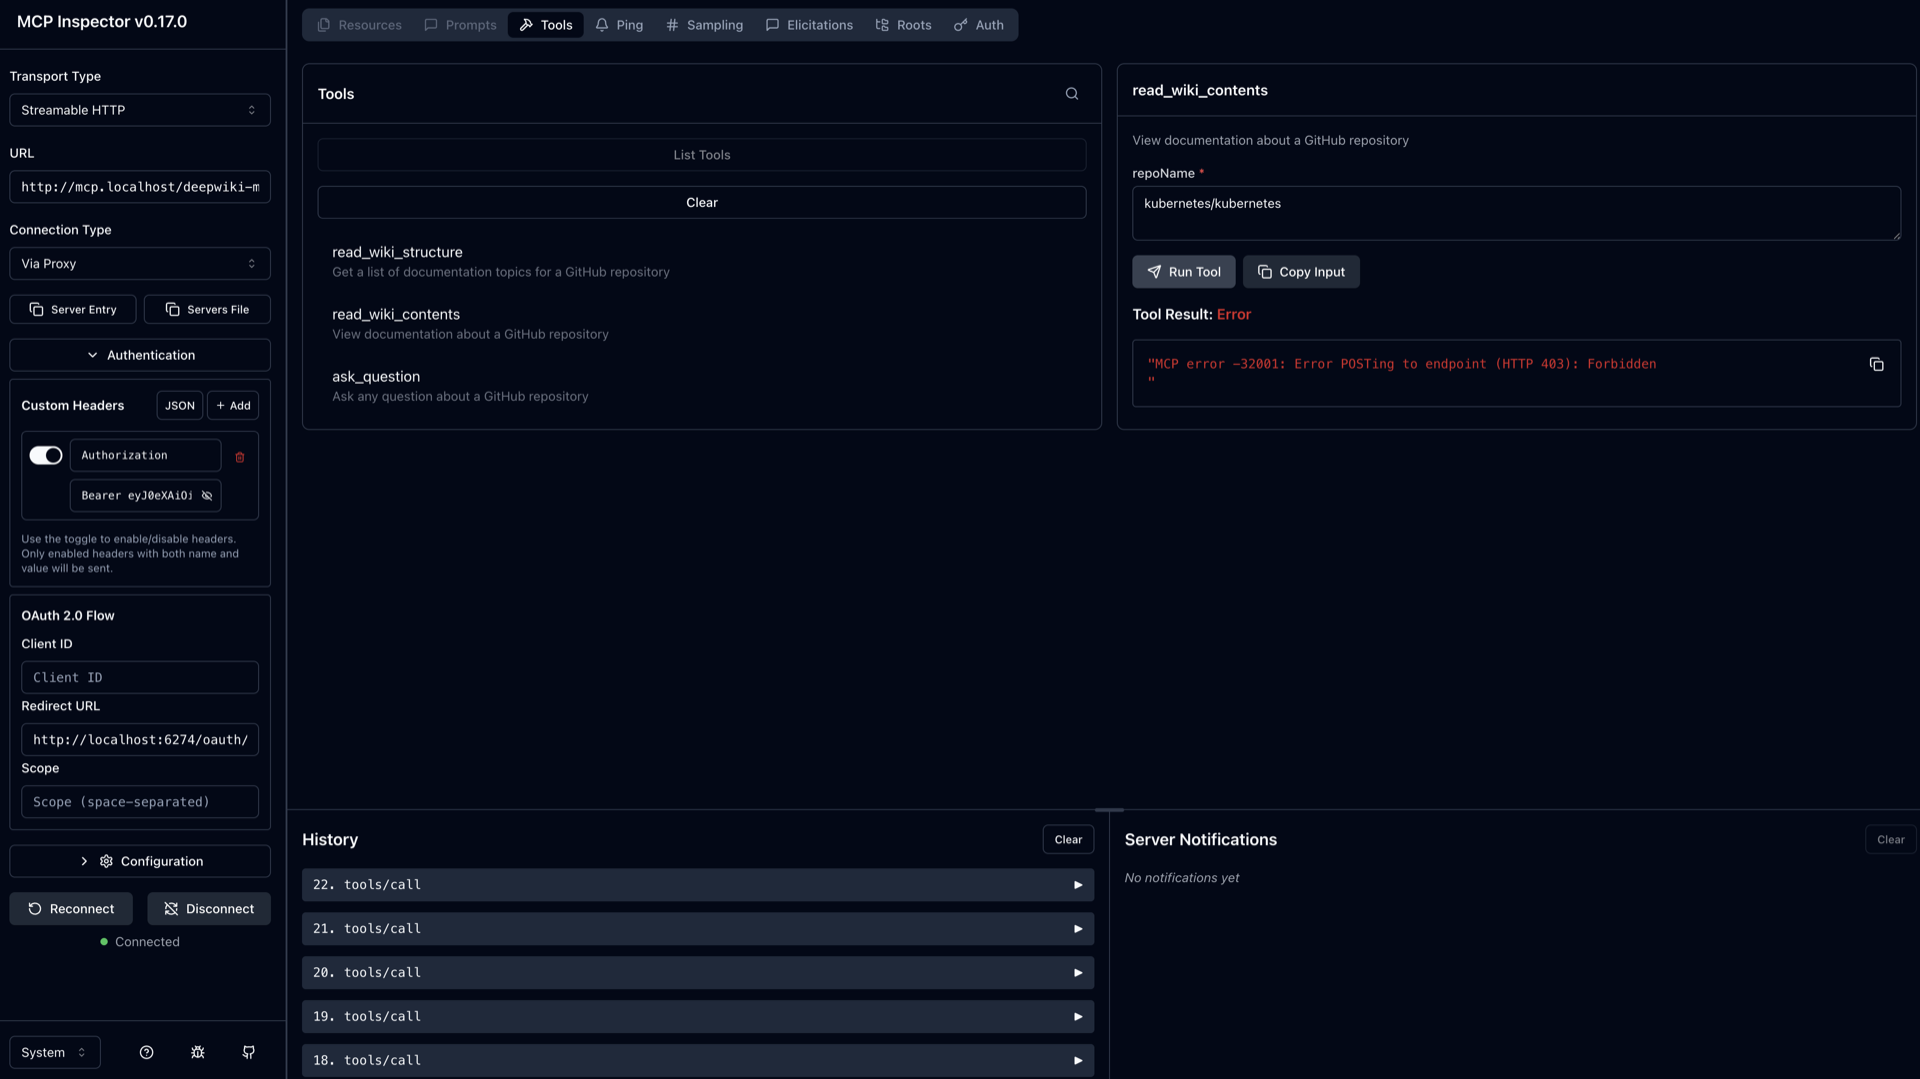
Test with Developer JWT (Should Fail)
Your current JWT has groups: ["developer"], so trying to call read_wiki_contents should now fail:
- Try calling read_wiki_contents again
- Expected result: 403 Forbidden
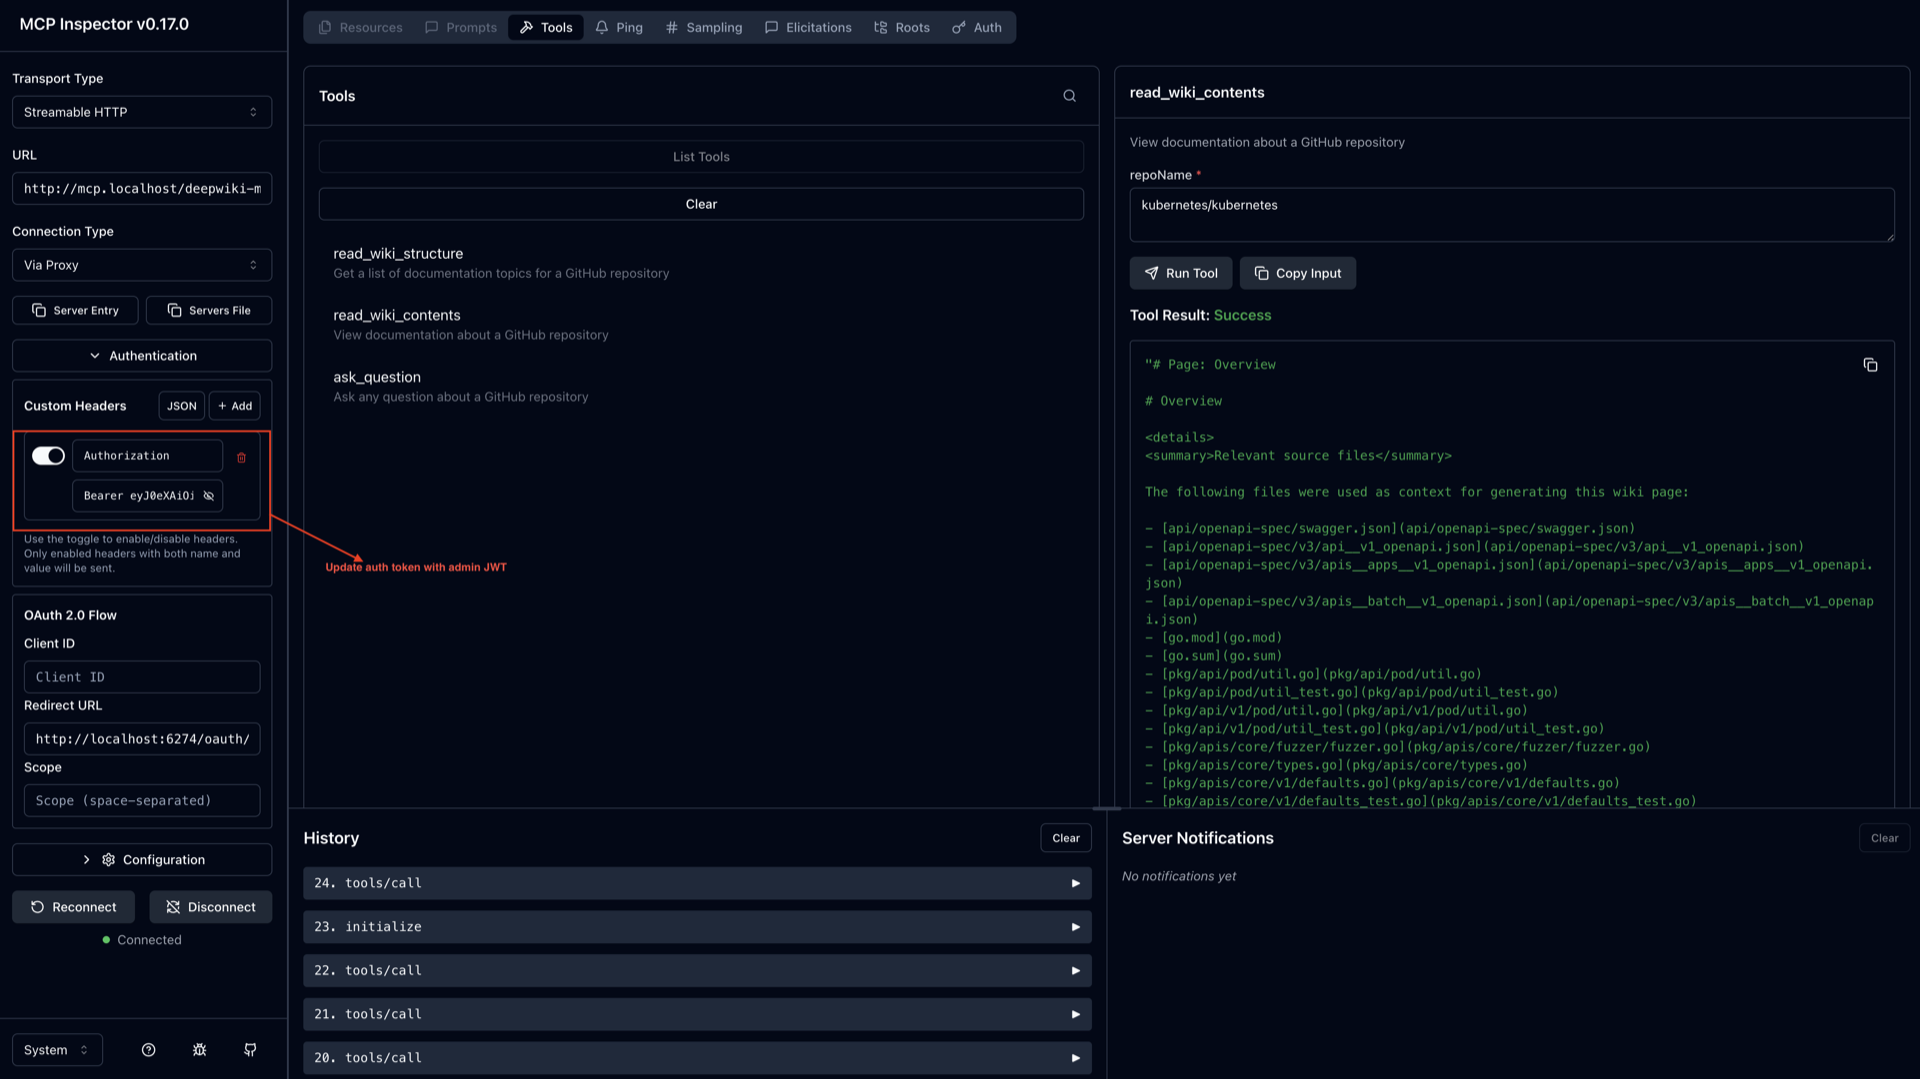
Test with Admin JWT (Should Succeed)
Generate an admin JWT and test:
# Generate admin JWT
SECRET="my-super-secret-key-change-in-production"
ADMIN_JWT=$(jwt encode --secret "$SECRET" --exp='+1 hour' '{"sub":"admin-user","groups":["admin"],"email":"[email protected]"}')
echo $ADMIN_JWT
Update the Authorization header in MCP Inspector with the admin JWT and reconnect.
Now try read_wiki_contents again:
Expected result: Success! The tool returns wiki content because your JWT has the admin group.
What happens when a tool is blocked:
- The MCP middleware returns
HTTP 403 Forbidden - MCP Inspector displays the error in the response panel
- You can see the exact policy that blocked the request in the Traefik
DEBUGlogs
2025-10-07T13:39:51Z DBG github.com/traefik/traefik-hub/v3/hub/pkg/middleware/mcp/middleware.go:188
> The request has been denied since no policy matched middlewareName=apps-deepwiki-mcp-
gateway@kubernetescrd middlewareType=mcp
In production, replace the test JWT with a proper authentication flow:
- Use the OIDC middleware for OAuth/OIDC authentication
- Integrate with your identity provider (Okta, Auth0, Azure AD, etc.)
- Extract user groups from OIDC claims
- MCP Gateway policies will automatically use the real user's groups
Step 13: Monitor MCP Traffic
The MCP Gateway automatically emits OpenTelemetry metrics and traces for all MCP operations.
What gets collected:
-
For example,
-
Metrics:
mcp.client.operation.durationhistogram with attributes:mcp.method.name:for example,tools/call,resources/readmcp.tool.name: for example,read_wiki_contentmcp.session.id: Session identifiermcp.request.id: Request identifiermcp.request.argument.*: Tool arguments
-
Traces: Full request context including MCP method, tool name, and arguments
Example observability backends:
- Grafana Cloud
- Dash0
- Datadog
- Any OpenTelemetry-compatible platform
For detailed observability configuration, see the Observability section in the MCP middleware reference documentation .
Next Steps
Now that you have a working MCP Gateway setup, you can:
Connect Different Types of MCP Servers
The guide above showed how to protect an MCP server without built-in authentication (DeepWiki). Here are examples for other common scenarios:
API Key-Protected MCP Servers (For Example, GitHub MCP)
For MCP servers that require API keys or Personal Access Tokens (PAT), add a Headers middleware to inject the upstream authentication:
- Headers middleware
- IngressRoute
apiVersion: traefik.io/v1alpha1
kind: Middleware
metadata:
  name: github-upstream-auth
  namespace: apps
spec:
  headers:
    customRequestHeaders:
      Authorization: "Bearer ghp_YOUR_GITHUB_PAT"
apiVersion: traefik.io/v1alpha1
kind: IngressRoute
metadata:
  name: github-mcp-route
  namespace: apps
spec:
  entryPoints:
    - web
  routes:
    - kind: Rule
      match: Host(`github-mcp.localhost`) && PathPrefix(`/mcp`)
      middlewares:
        - name: github-mcp-jwt       # Gateway auth (first)
        - name: github-mcp-gateway   # MCP policies (second)
        - name: github-upstream-auth # Upstream auth (last)
      services:
        - name: github-mcp-server
          port: 443
The Headers middleware injects the API key that the upstream MCP server requires, while your gateway still enforces JWT authentication and policies.
OAuth-Protected MCP Servers (Passthrough OAuth)
For MCP servers with existing OAuth protection (like Notion or Number Guessing Game), you need to:
- Copy the upstream's OAuth configuration to your gateway middleware
- Add HTTPS support (required for OAuth discovery)
- Configure CORS for browser-based clients
Example: Notion MCP with OAuth Passthrough
- Service
- MCP Middleware
- CORS Middleware
- IngressRoute
---
apiVersion: v1
kind: Service
metadata:
  name: notion-mcp-server
  namespace: apps
spec:
  type: ExternalName
  externalName: mcp.notion.com
  ports:
    - name: https
      port: 443
      protocol: TCP
apiVersion: traefik.io/v1alpha1
kind: Middleware
metadata:
  name: notion-mcp-gateway
  namespace: apps
spec:
  plugin:
    mcp:
      resourceMetadata:
        resource: https://notion-mcp.localhost/mcp
        authorizationServers:
          - https://mcp.notion.com  # Copy from upstream's .well-known
      policies:
        - match: "Equals(`mcp.method`, `tools/call`) && Equals(`mcp.params.name`, `notion-get-self`)"
          action: deny
      defaultAction: allow
---
apiVersion: traefik.io/v1alpha1
kind: Middleware
metadata:
  name: notion-mcp-cors
  namespace: apps
spec:
  headers:
    accessControlAllowMethods:
      - "GET"
      - "OPTIONS"
      - "POST"
    accessControlAllowHeaders:
      - "*"
    accessControlAllowOriginList:
      - "*"
    accessControlExposeHeaders:  # Required for MCP Inspector
      - "*"
    accessControlMaxAge: 100
    addVaryHeader: true
apiVersion: traefik.io/v1alpha1
kind: IngressRoute
metadata:
  name: notion-mcp-route
  namespace: apps
spec:
  entryPoints:
    - web
    - websecure  # HTTPS required for OAuth discovery
  routes:
    - kind: Rule
      match: Host(`notion-mcp.localhost`)
      middlewares:
        - name: notion-mcp-cors     # CORS (first)
        - name: notion-mcp-gateway  # MCP policies (second)
      services:
        - name: notion-mcp-server
          port: 443
          scheme: https
          passHostHeader: false
- HTTPS entrypoint required: The
.well-known/oauth-protected-resourceendpoint must be accessible via HTTPS. AddwebsecuretoentryPoints. - Accept self-signed cert: For local testing with MCP Inspector, visit
https://notion-mcp.localhost/in your browser and accept the self-signed certificate before connecting. - CORS headers: Set
accessControlExposeHeaders: ["*"]to ensure MCP Inspector can read OAuth headers. - Resource URL override: Set
resourceMetadata.resourceto your gateway's URL (for example,https://notion-mcp.localhost/mcp). - Copy authorization servers: Set
authorizationServersto match the upstream MCP server's values (found in their.well-known/oauth-protected-resourceendpoint).
Replace Test JWTs with Production OAuth
The guide above used static test JWTs for simplicity. For production, replace them with real OAuth/OIDC authentication at the gateway level:
This section is about authenticating users to your gateway (replacing the jwt-cli test tokens).
This is different from the OAuth passthrough section above, which is about proxying MCP servers that have their own OAuth protection.
Production OAuth setup:
- Configure JWT middleware to validate tokens from your OAuth provider (Auth0, Okta, Azure AD, etc.)
- Point
jwksUrlto your provider's JWKS endpoint (for example,https://your-tenant.auth0.com/.well-known/jwks.json) - Users authenticate with your OAuth provider and receive JWT access tokens
- MCP clients send the JWT in the
Authorization: Bearerheader - JWT middleware validates the token signature and extracts claims for policy evaluation
See the JWT Middleware documentation for complete OAuth/OIDC configuration options.
Add Multi-Tenancy
Isolate users by tenant using variable substitution:
policies:
  # Users can only access their tenant's resources
  - match: Contains(`mcp.params.uri`, `tenant-${jwt.tenant_id}`)
    action: allow
Explore Advanced Policies
Use the full power of the expression language:
String matching functions:
SplitContainsfor OAuth scopes:SplitContains('jwt.scope', ' ', 'mcp:admin')OneOffor multiple allowed values:OneOf('mcp.params.name', 'tool1', 'tool2')Prefixfor path matching:Prefix('mcp.params.uri', 'file:///safe/')
Numeric comparison functions:
Ltefor amount limits:Lte('mcp.params.arguments.amount', '${jwt.approval_limit}')Gtefor minimum values:Gte('jwt.clearance_level', '5')Ltfor strict less than:Lt('mcp.params.arguments.count', '100')Gtfor strict greater than:Gt('jwt.rate_limit', '${mcp.params.arguments.requests}')
Complex boolean logic:
- Combine conditions:
(A && B) || (C && !D) - Nested expressions:
Equals('mcp.method', 'tools/call') && (Contains('jwt.groups', 'admin') || Lte('mcp.params.arguments.amount', '1000'))
See Policy Expression Language for the full reference.
Control Tool and Resource Discovery with List Filtering
Use list filtering to control which tools, prompts, and resources appear in discovery responses (tools/list, prompts/list, resources/list).
This improves user experience by showing only the capabilities users are authorized to use.
Example: Show only developer tools to developers
apiVersion: traefik.io/v1alpha1
kind: Middleware
metadata:
  name: filtered-mcp
spec:
  plugin:
    mcp:
      # Runtime authorization (controls execution)
      policies:
        - match: Equals(`mcp.method`, `tools/call`) && Prefix(`mcp.params.name`, `dev_`) && Contains(`jwt.groups`, `developers`)
          action: allow
      defaultAction: deny

      # List filtering (controls visibility)
      listPolicies:
        - match: Prefix(`mcp.params.name`, `dev_`) && Contains(`jwt.groups`, `developers`)
          action: show
      listDefaultAction: hide
List filtering is evaluated when the MCP server responds to tools/list, prompts/list, or resources/list requests.
Only JWT claims and item names/URIs are available—runtime parameters like mcp.params.arguments are not available at list time.
See Resource and Tool Filtering for complete documentation including best practices and troubleshooting.
Related Content
- Read the MCP Middleware Reference for complete configuration options
- Read the JWT Middleware reference for JWT authentication details
- Learn more about the Model Context Protocol Specification
