Plugin Development Guide
This comprehensive guide walks you through creating, configuring, and publishing Traefik Hub API Gateway plugins. Whether you're building public plugins for the community or private plugins for your organization, this guide covers everything you need to know.
What You'll Learn
By the end of this guide, you will understand how to:
- Create a plugin repository with the required structure
- Develop middleware plugins using Go
- Publish public plugins to the Traefik Plugin Catalog
- Configure private plugins with authentication for GitHub and GitLab
- Deploy and test plugins in your infrastructure
- Migrate plugins between repositories and visibility settings
- Troubleshoot common plugin development issues
Plugin Types
Public Plugins
Public plugins are:
- Listed in the Traefik Plugin Catalog
- Must be hosted on public GitHub repositories (only GitHub is supported by the catalog's plugin discovery)
- Available to the entire Traefik community
- Downloaded automatically by Traefik through the Go module proxy
- Ideal for open-source middleware solutions
Private Plugins
Private plugins are:
- Hosted in private Git repositories (GitHub, GitLab, GitHub Enterprise, self-hosted instances) or mirrored via JFrog Artifactory
- Accessible only with authentication tokens
- Perfect for proprietary business logic
- Secured for internal or vendor-specific use cases
Public plugins: GitHub.com only (required for Plugin Catalog submission)
Private plugins: Traefik Hub supports multiple Git providers through the plugin registry configuration:
- GitHub.com
- GitHub Enterprise Server
- GitLab.com
- Self-hosted GitLab
- JFrog Artifactory
This guide focuses on GitHub.com and GitLab.com as the most common use cases, but the configuration patterns apply to enterprise and self-hosted versions as well.
Both types follow the same development structure—the main difference is repository visibility and how Traefik Hub accesses them.
Prerequisites
Before you begin, ensure you have:
- Traefik Hub API Gateway installed (Kubernetes or Linux)
- GitHub account (required for public plugins) or GitLab account (for private plugins only)
- Git installed locally
- Go 1.19 or later (for plugin development)
- Basic understanding of Go programming and Git workflows
- GitHub CLI (gh) installed locally
- GitLab CLI (glab) installed locally
Step 1: Create Your Plugin Repository
1.1 Initialize the Repository
- GitHub
- GitLab (Private Plugins Only)
# Create a new directory for your plugin
mkdir my-plugin
cd my-plugin

# Initialize git repository
git init

# Create on GitHub (using gh CLI)
# For public plugins (Plugin Catalog):
gh repo create my-org/my-plugin --public --source=. --remote=origin

# For private plugins:
gh repo create my-org/my-plugin --private --source=. --remote=origin
A GitHub public repository is required if you plan to submit your plugin to the Traefik Plugin Catalog.
# Create a new directory for your plugin
mkdir my-plugin
cd my-plugin

# Initialize git repository
git init

# Create on GitLab (using glab CLI)
# GitLab repositories can only be used for private plugins
glab repo create my-org/my-plugin --private
GitLab repositories cannot be submitted to the Traefik Plugin Catalog. Use GitLab only for private plugins that will be configured with hub.pluginRegistry.
1.2 Create the Plugin Manifest (.traefik.yml)
Create .traefik.yml in the root of your repository:
- GitHub
- GitLab
displayName: "My Plugin"
type: middleware
import: github.com/my-org/my-plugin

summary: "Custom middleware for specific use case"

testData:
  Headers:
    X-Custom-Header: "test-value"
displayName: "My Plugin"
type: middleware
import: gitlab.com/my-org/my-plugin

summary: "Custom middleware for specific use case"

testData:
  Headers:
    X-Custom-Header: "test-value"
The import field must match your repository path:
- GitHub:
github.com/my-org/my-plugin - GitLab:
gitlab.com/my-org/my-plugin
This value must be consistent across .traefik.yml, go.mod, and all import statements in your Go code.
Manifest Fields Reference
| Field | Required | Description | Notes |
|---|---|---|---|
displayName | Yes | Plugin name displayed in the catalog and logs | Example: "My Custom Plugin" |
type | Yes | Plugin type | middleware or provider |
import | Yes | Your plugin's Go import path | Must match repository: github.com/my-org/my-plugin |
summary | Yes | Brief description of plugin functionality | Displayed in the Plugin Catalog |
testData | Yes | Sample configuration for testing the plugin | Key-value pairs matching your plugin's Config struct |
runtime | Optional | Plugin runtime interpreter | yaegi (default) or wasm. Provider plugins only support yaegi |
wasmPath | Optional | Path to WebAssembly binary | Required if runtime: wasm. Defaults to plugin.wasm |
basePkg | Optional | Base package name for the plugin | Auto-derived from import if not specified |
compatibility | Optional | Traefik version compatibility requirement | Example: >= 2.10.0 |
useUnsafe | Optional | Allow plugin to use unsafe and syscall packages | Defaults to false. Security implications apply |
Provider plugins only support the yaegi runtime (the default). The wasm runtime is not supported for provider plugins.
If you're developing a provider plugin, omit the runtime field or explicitly set it to yaegi in your .traefik.yml.
1.3 Initialize Go Module
Create go.mod with the correct module name:
- GitHub
- GitLab
go mod init github.com/my-org/my-plugin
go mod init gitlab.com/my-org/my-plugin
1.4 Create Plugin Source Code
Create your plugin implementation in plugin.go:
package my_plugin

import (
    "context"
    "fmt"
    "net/http"
)

// Config holds the plugin configuration.
type Config struct {
    HeaderName  string `json:"headerName,omitempty"`
    HeaderValue string `json:"headerValue,omitempty"`
}

// CreateConfig creates the default plugin configuration.
func CreateConfig() *Config {
    return &Config{
        HeaderName:  "X-Custom-Header",
        HeaderValue: "default-value",
    }
}

// MyPlugin is the plugin struct.
type MyPlugin struct {
    next        http.Handler
    name        string
    headerName  string
    headerValue string
}

// New creates a new plugin instance.
func New(ctx context.Context, next http.Handler, config *Config, name string) (http.Handler, error) {
    if len(config.HeaderName) == 0 {
        return nil, fmt.Errorf("headerName cannot be empty")
    }

    return &MyPlugin{
        next:        next,
        name:        name,
        headerName:  config.HeaderName,
        headerValue: config.HeaderValue,
    }, nil
}

func (p *MyPlugin) ServeHTTP(rw http.ResponseWriter, req *http.Request) {
    req.Header.Set(p.headerName, p.headerValue)
    p.next.ServeHTTP(rw, req)
}
Your plugin must export three objects:
- Config struct - holds plugin configuration
- CreateConfig() function - creates default configuration
- New() function - creates an
http.Handlerinstance
1.5 Create a Git Tag (Required)
Git tags are required for Traefik to download your plugin. When you specify a version like v1.0.0,
Traefik uses the git tag to fetch the plugin source code.
# Commit your changes
git add .
git commit -m "Initial plugin implementation"

# Create and push a tag
git tag v1.0.0
git push origin main
git push origin v1.0.0
For public plugins, Traefik downloads from the Traefik Plugin Registry at https://plugins.traefik.io/public/, which acts as a proxy to GitHub repositories.
For private plugins, Traefik Hub uses the Git provider's API to download source code archives from your git tags:
- GitHub:
/repos/{owner}/{repo}/zipball/{tag}API - GitLab:
/projects/{id}/repository/archive.zip?sha={tag}API (requires numeric project ID or URL-encoded path)
The git tag is sufficient—releases with attached ZIPs are created automatically by GitHub/GitLab when you create a release.
1.6 Create a Release (Optional but Recommended)
While not technically required, creating releases is a best practice for:
- Documenting changes and version history
- Providing release notes for users
- Making plugin versions quickly discoverable in the repository UI
- GitHub
- GitLab
# Create a release using GitHub CLI (optional)
gh release create v1.0.0 \
  --title "v1.0.0" \
  --notes "Initial release of my plugin"
When you create a GitHub Release, GitHub automatically generates and attaches source code archives (zip/tar.gz). Traefik fetches from the git tag directly via API, but releases provide a nice UI for users.
# Create a release using GitLab CLI (optional)
glab release create v1.0.0 \
  --name "v1.0.0" \
  --notes "Initial release of my plugin"
GitLab automatically generates and attaches source code archives when you create a release.
Step 2: Publishing Your Plugin
Now that your plugin is ready, choose how you want to publish it:
Option A: Public Plugin (Plugin Catalog - GitHub Only)
To submit your plugin to the Traefik Plugin Catalog:
The Traefik Plugin Catalog only accepts GitHub repositories. If you're using GitLab, you can only configure your plugin as a private plugin (see Option B).
2.1 Add the Plugin Catalog Topic
- Go to your repository on GitHub
- Select the gear icon next to "About"
- Add the topic:
traefik-plugin - Select "Save changes"
Or using the GitHub CLI:
gh repo edit --add-topic traefik-plugin
2.2 Automatic Plugin Discovery
The Traefik Plugin Catalog automatically discovers and indexes plugins from GitHub. There is no manual submission process.
How it works:
- The Plugin Catalog polls GitHub every 30 minutes
- It searches for repositories with the
traefik-plugintopic - It automatically validates and adds qualifying plugins to the catalog
Your plugin will be discovered if it meets these requirements:
- Repository is on GitHub (GitLab is not supported)
- Repository is NOT a fork
- Repository is public
traefik-plugintopic is set.traefik.ymlexists with validtestData- Valid
go.modfile exists - Plugin is versioned with git tags
After adding the traefik-plugin topic, your plugin will appear in the catalog within 30 minutes (the next polling cycle).
If your plugin fails validation, the Plugin Catalog will create an issue in your GitHub repository explaining the problem. It will only retry adding your plugin when you close the issue after fixing the problem.
2.3 Verify Catalog Listing
Once your plugin is discovered (within 30 minutes), you can verify it's listed:
- Go to Traefik Plugin Catalog
- Search for your plugin by name or browse the catalog
- Check that your plugin appears with correct information
2.4 Using Public Plugins
Once listed in the catalog, users can use your plugin without any extra configuration:
experimental:
  plugins:
    myPlugin:
      moduleName: "github.com/my-org/my-plugin"
      version: "v1.0.0"
Option B: Private Plugin
For private plugins, you need to configure Traefik Hub with authentication tokens. GitHub, GitLab, and Artifactory are supported for private plugins.
2.1 Create Access Tokens
- GitHub.com
- GitHub Enterprise
- GitLab
- JFrog Artifactory
Create a Personal Access Token:
- Go to Settings → Developer settings → Personal access tokens → Tokens (classic)
- Select Generate new token → Generate new token (classic)
- Set a descriptive name (for example, "Traefik Hub Private Plugins")
- Select scopes:
- ✅
repo(Full control of private repositories)
- ✅
- Select Generate token
- Copy the token (starts with
ghp_)
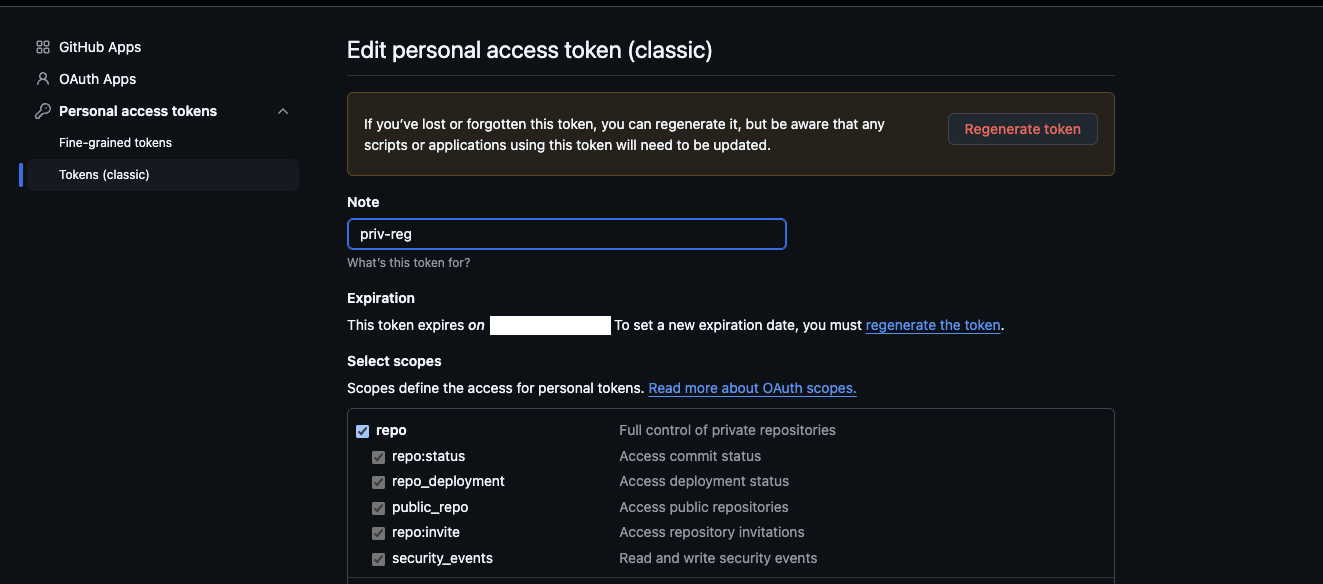
You can also use fine-grained personal access tokens with Contents: Read permission for specific repositories.
For GitHub Enterprise Server, follow the same steps as GitHub.com. The token configuration is identical.
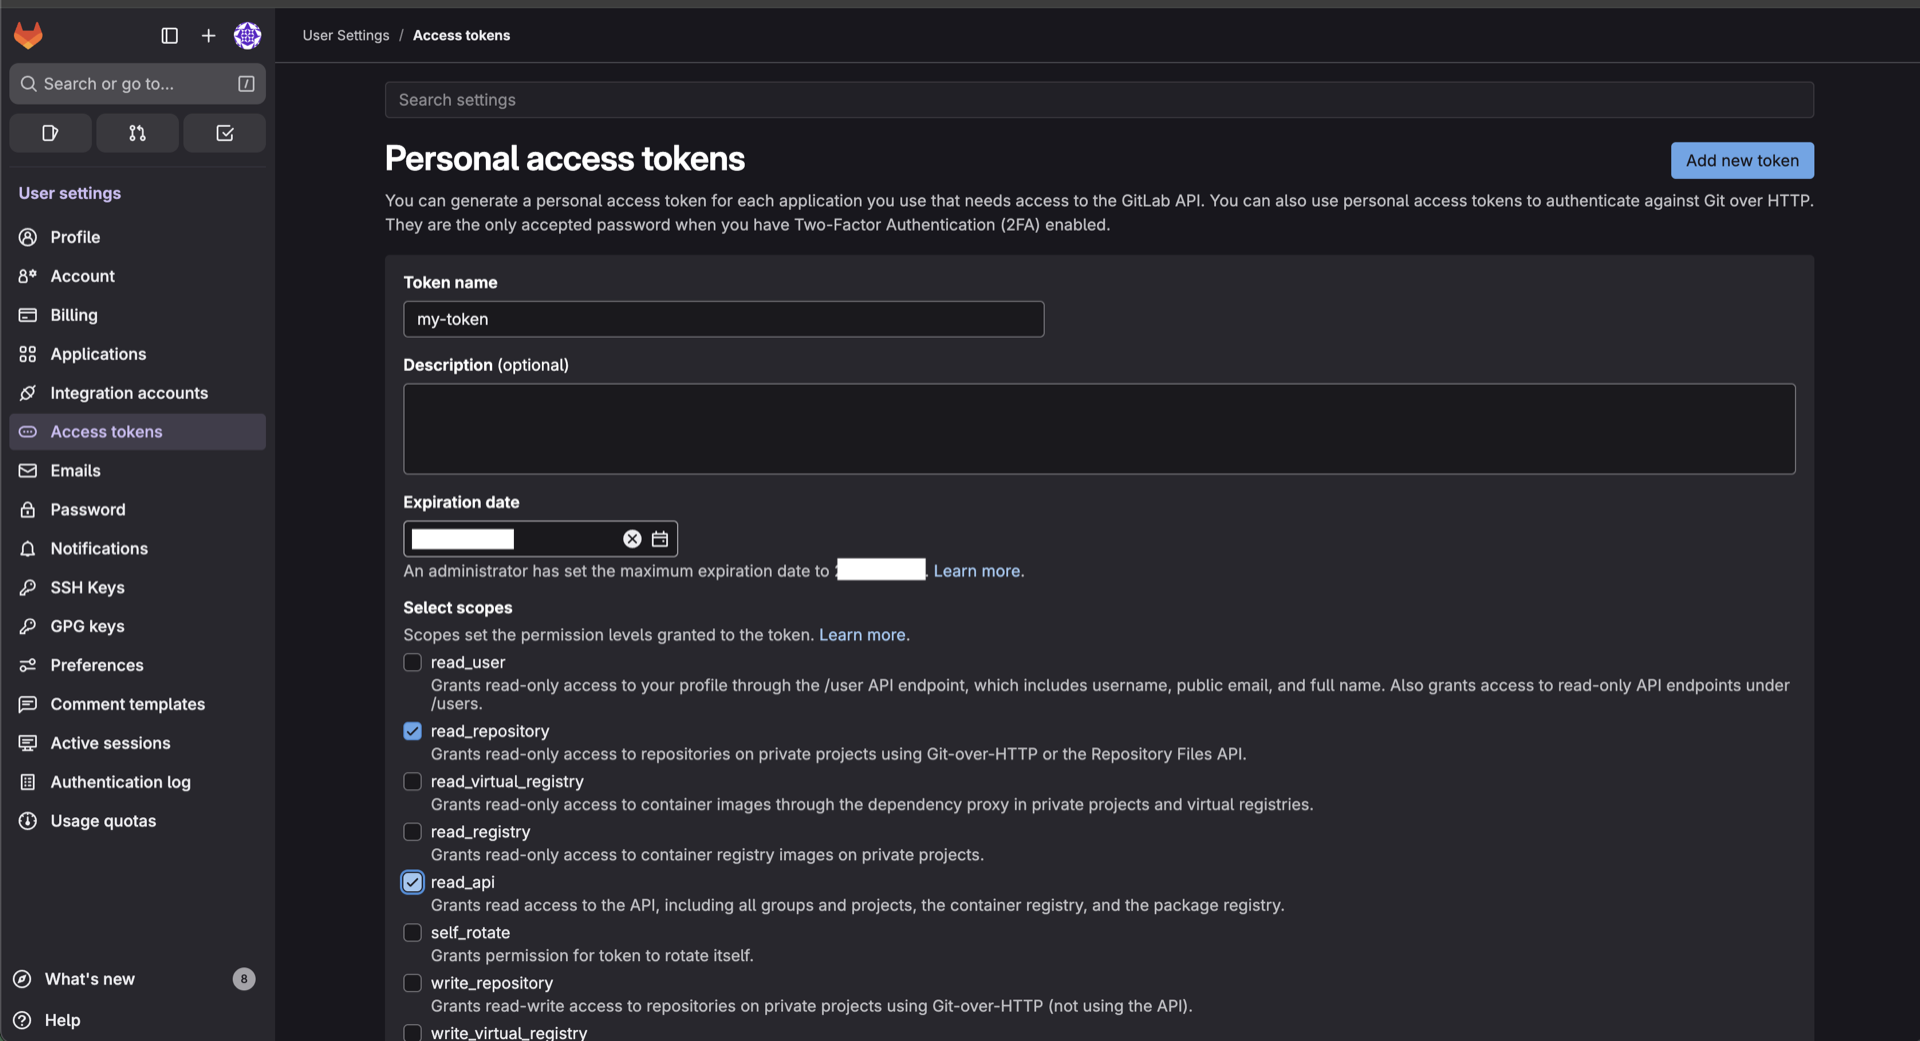
Create a Personal Access Token or Project Access Token:
Personal Access Token:
- Go to Settings → Access Tokens
- Select Add new token
- Set a descriptive name (for example, "Traefik Hub Private Plugins")
- Select scopes:
- ✅
read_api - ✅
read_repository
- ✅
- Select Create personal access token
- Copy the token (starts with
glpat-)
Project Access Token (Repository-specific):
- Go to your project → Settings → Access Tokens
- Select Add new token
- Set token name and role: Developer (minimum required)
- Select scopes:
- ✅
read_api - ✅
read_repository
- ✅
- Select Create project access token
- Copy the token (starts with
glpat-)
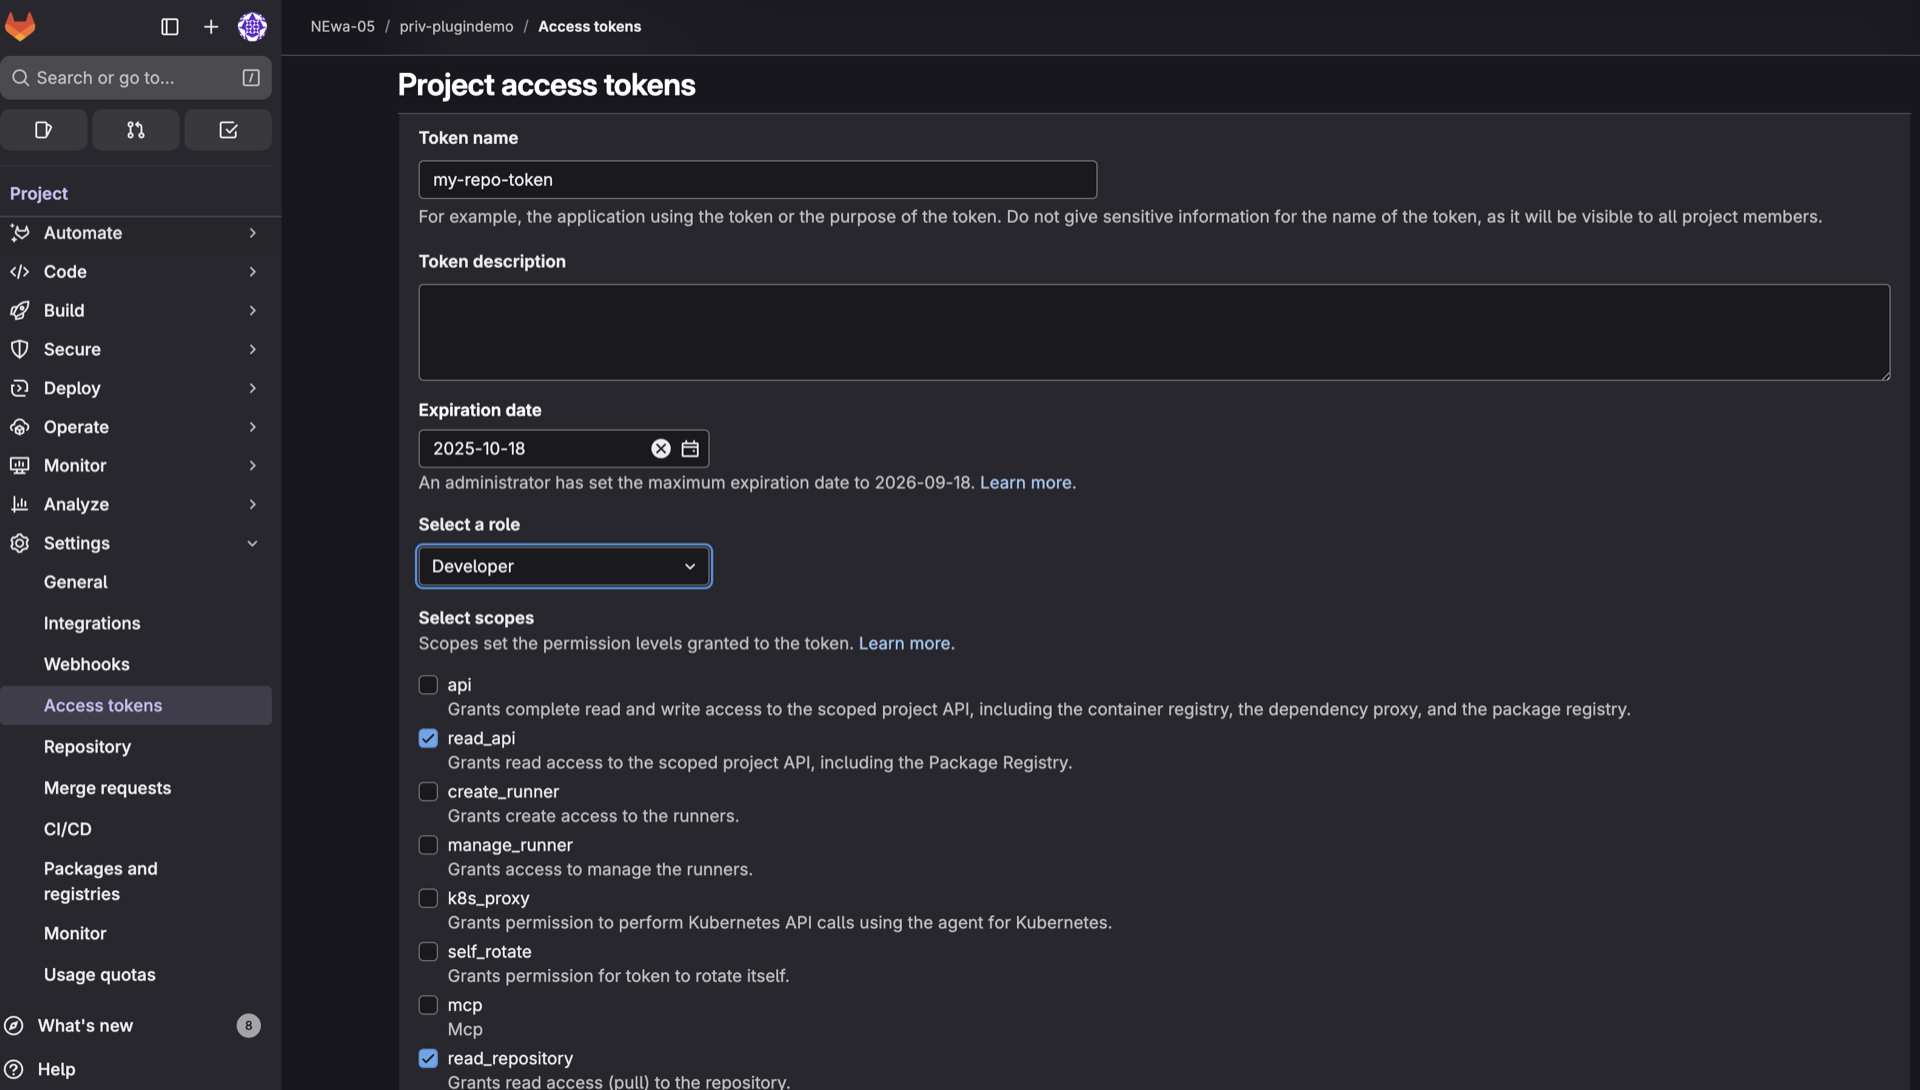
For both personal and project tokens, you must select both read_api and read_repository scopes.
The project token must have at least Developer role.
Create an Artifactory Access Token:
- Log in to your Artifactory instance
- Navigate to your user profile or select the Set Me Up button in the artifacts page
- Generate an access token based on your Artifactory user password
- Ensure the token has read permissions to the remote repository containing mirrored plugins
- Copy the token for use in Traefik Hub configuration
Artifactory tokens are passed as Bearer tokens in the Authorization header when downloading plugins from VCS-mirrored repositories.
2.2 Store Token in Kubernetes Secret
For production deployments, store tokens in Kubernetes secrets:
# GitHub token
kubectl create secret generic github-plugin-token \
  --from-literal=token="ghp_xxxxxxxxxxxxxxxxxxxx" \
  --namespace traefik

# GitLab token
kubectl create secret generic gitlab-plugin-token \
  --from-literal=token="glpat-xxxxxxxxxxxxxxxxxxxx" \
  --namespace traefik
2.3 Configure Plugin Registry
- GitHub
- GitLab
- JFrog Artifactory
# values.yaml
hub:
  pluginRegistry:
    sources:
      github-private:
        baseModuleName: "github.com"
        github:
          token: "urn:k8s:secret:github-plugin-token:token"

experimental:
  plugins:
    myPlugin:
      moduleName: "github.com/my-org/my-plugin"
      version: "v1.0.0"
# values.yaml
hub:
  pluginRegistry:
    sources:
      gitlab-private:
        baseModuleName: "gitlab.com"
        gitlab:
          token: "urn:k8s:secret:gitlab-plugin-token:token"
          url: "https://gitlab.com"

experimental:
  plugins:
    myPlugin:
      moduleName: "gitlab.com/my-org/my-plugin"
      version: "v1.0.0"
# values.yaml
hub:
  pluginRegistry:
    sources:
      artifactory-mirror:
        baseModuleName: "artifactory.example.com"
        artifactory:
          token: "urn:k8s:secret:artifactory-plugin-token:token"
          url: "https://artifactory.example.com"
          repositoryKey: "traefik-plugins-mirror"

experimental:
  plugins:
    myPlugin:
      moduleName: "artifactory.example.com/my-org/my-plugin"
      version: "v1.0.0"
The baseModuleName should match your Artifactory instance domain (e.g., artifactory.example.com). The plugin's moduleName
follows the pattern <baseModuleName>/<owner>/<repo>. Artifactory must be configured as a Remote Repository with VCS mirroring enabled.
Once you configure hub.pluginRegistry, the native Traefik plugin download system is completely turned off.
If you use public plugins, you must explicitly configure a GitHub source to maintain access.
hub:
  pluginRegistry:
    sources:
      # Required to maintain access to public plugins
      github-public:
        baseModuleName: "github.com"
        github:
          token: "urn:k8s:secret:github-token:token"

      # Your private plugins
      gitlab-private:
        baseModuleName: "gitlab.com"
        gitlab:
          token: "urn:k8s:secret:gitlab-token:token"
Step 3: Deploy and Test Your Plugin
3.1 Create a Middleware Using Your Plugin
apiVersion: traefik.io/v1alpha1
kind: Middleware
metadata:
  name: my-plugin-middleware
  namespace: apps
spec:
  plugin:
    myPlugin:
      headerName: "X-Custom-Header"
      headerValue: "plugin-works"
3.2 Apply to an IngressRoute
apiVersion: traefik.io/v1alpha1
kind: IngressRoute
metadata:
  name: test-plugin
  namespace: apps
spec:
  entryPoints:
    - web
  routes:
  - match: Host(`test.localhost`) && PathPrefix(`/`)
    kind: Rule
    services:
    - name: my-service
      port: 8080
    middlewares:
    - name: my-plugin-middleware
3.3 Verify Plugin Loading
Check Traefik Hub logs:
kubectl logs -n traefik -l app.kubernetes.io/name=traefik --tail=50 | grep -i plugin
Expected output (with debug logging enabled):
time="..." level=info msg="Loading plugins..." plugins="[myPlugin]"
time="..." level=debug msg="Installing plugin: myPlugin: github.com/my-org/[email protected]"
time="..." level=info msg="Plugins loaded."
To see individual plugin installation messages, enable debug logging by setting --log.level=DEBUG in your Traefik configuration. Info-level logs only show the overall "Loading plugins..." and "Plugins loaded." messages.
3.4 Test the Middleware
# Test the endpoint
curl -v http://test.localhost/

# Check response headers for X-Custom-Header
Step 4: Plugin Hash Verification (Optional)
For enhanced security, specify a plugin hash to verify its integrity:
4.1 Calculate Hash
- GitHub
- GitLab
# Download the archive via API
curl -L -H "Authorization: token YOUR_TOKEN" \
  https://api.github.com/repos/my-org/my-plugin/zipball/v1.0.0 \
  -o plugin.zip

# Calculate SHA256 hash
sha256sum plugin.zip
# Download the archive via API
curl -L -H "PRIVATE-TOKEN: YOUR_TOKEN" \
  "https://gitlab.com/api/v4/projects/PROJECT_ID/repository/archive.zip?sha=v1.0.0" \
  -o plugin.zip

# Calculate SHA256 hash
sha256sum plugin.zip
4.2 Add Hash to Configuration
experimental:
  plugins:
    myPlugin:
      moduleName: "github.com/my-org/my-plugin"
      version: "v1.0.0"
      hash: "sha256:abcdef1234567890..."
Hashes are optional but recommended for production. They ensure the downloaded plugin hasn't been tampered with.
Step 5: Migrating Plugins
Changing Repository Visibility
From Public to Private
- Change repository visibility in GitHub/GitLab settings
- Configure plugin registry with authentication (see Step 2)
- Update Traefik Hub configuration to use plugin registry
- Hashes may change - recalculate if using hash verification
From Private to Public
You can only migrate to a public plugin if your repository is on GitHub. GitLab repositories cannot be submitted to the Plugin Catalog.
For GitHub repositories:
- Change repository visibility to public
- Add
traefik-plugintopic - Submit to Plugin Catalog
- Remove plugin registry configuration from Traefik Hub
- Update to standard public plugin configuration
For GitLab repositories:
GitLab repositories cannot be migrated to public catalog plugins. If you need catalog visibility, you must migrate to GitHub first (see "Migrating Between Platforms" below).
Migrating Between Platforms (GitHub ↔ GitLab)
Update Module Names
Before (GitHub):
// go.mod
module github.com/my-org/my-plugin
After (GitLab):
// go.mod
module gitlab.com/my-org/my-plugin
Update .traefik.yml
# Before
import: github.com/my-org/my-plugin

# After
import: gitlab.com/my-org/my-plugin
Migration Checklist
- Update
go.modmodule name - Update
.traefik.ymlimport path - Update all import statements in Go files
- Create new repository on target platform
- Push code to new repository
- Create git tags for versions (required)
- Optionally create releases for documentation
- Configure plugin registry for new platform (if private)
- Update plugin configuration in Traefik Hub
- Remove old hash values (hashes change between platforms)
- Test plugin loading and functionality
- Calculate new hash values for security
Troubleshooting
Authentication Errors (401)
Symptoms: HTTP 401 Unauthorized errors in logs
Solutions:
- Verify token has correct permissions (
reposcope for GitHub,read_api+read_repositoryfor GitLab) - Check token hasn't expired
- Ensure Kubernetes secret exists and is accessible
- For CLI arguments, verify tokens are not wrapped in quotes
Repository Not Found (404)
Symptoms: download failed with status 404
Solutions:
- Verify repository path is correct in
moduleName - Check token has access to the specific repository
- Confirm
baseModuleNamematches repository domain - For GitLab project tokens, ensure token has Developer role
- Verify the git tag exists
Plugin Fails to Load
Symptoms: Plugin not appearing in Traefik logs
Solutions:
- Verify
.traefik.ymlexists in repository root - Check module name consistency across
.traefik.yml,go.mod, and configuration - Ensure git tag exists for the specified version
- Verify token has access to the repository (for private plugins)
- Check that
testDatain.traefik.ymlis valid
Hash Verification Failures
Symptoms: hash mismatch errors
Solutions:
- Recalculate hash for current plugin version
- Remove hash temporarily during migration or testing
- Verify correct archive format is being downloaded
- Check for plugin version tag existence
Public Plugins Stop Working
Symptoms: Previously working public plugins fail after configuring pluginRegistry
Solutions:
- Add GitHub source configuration for public plugins
- Configure token even for public repositories
- See Private Plugins Reference
Plugin Not Appearing in Catalog
Symptoms: Plugin not discovered by the Plugin Catalog after adding the traefik-plugin topic
Solutions:
- Ensure repository is on GitHub (GitLab is not supported)
- Ensure repository is NOT a fork
- Verify
traefik-plugintopic is set correctly - Check
.traefik.ymlexists in root with validtestData - Confirm
go.modis valid - Ensure repository is public
- Verify plugin is versioned with git tags
- Wait at least 30 minutes for the next catalog polling cycle
- Check your repository for issues created by the Plugin Catalog which indicates the reason why the plugin was not added to the catalog
Module Name Mismatch
Symptoms: Import errors or plugin fails to initialize
Solutions:
- Verify
importin.traefik.ymlmatches repository path - Check
go.modmodule name matches - Ensure all internal imports use correct module name
- For GitLab, use
gitlab.com/...notgithub.com/...
Enable Debug Logging
For detailed troubleshooting:
log:
  level: DEBUG
Look for messages related to:
- Plugin registry initialization
- Token resolution from secrets
- Plugin download attempts
- Hash verification
- Authentication failures
Best Practices
- Use Git Tags: Always create git tags for plugin versions - required for download
- Semantic Versioning: Use semantic versioning (v1.0.0, v1.1.0, v2.0.0)
- Create Releases: Add release notes even though releases are optional
- Use Kubernetes Secrets: Store tokens in secrets, never in configuration files
- Enable Hash Verification: Calculate and specify hashes for production plugins
- Consistent Naming: Ensure module names match across all files
- Test Locally: Use local plugin mode for development
- Vendor Dependencies: If your plugin has dependencies, vendor them
- Document Configuration: Provide clear examples in README
- Monitor Logs: Enable debug logging when troubleshooting
Advanced Topics
Multiple Plugin Registry Sources
Configure multiple sources for different providers:
hub:
  pluginRegistry:
    sources:
      github-public:
        baseModuleName: "github.com"
        github:
          token: "urn:k8s:secret:github-token:token"

      github-enterprise:
        baseModuleName: "github.enterprise.local"
        github:
          token: "urn:k8s:secret:enterprise-token:token"
          enterprise:
            url: "https://github.enterprise.local"

      gitlab-private:
        baseModuleName: "gitlab.company.com"
        gitlab:
          token: "urn:k8s:secret:gitlab-token:token"
          url: "https://gitlab.company.com"
Local Plugin Development
For local testing without pushing to a repository, you can mount your plugin source code directly into Traefik.
Docker/Docker Compose
experimental:
  localPlugins:
    myPlugin:
      moduleName: github.com/my-org/my-plugin
Place your plugin in and mount the directory:
# docker-compose.yml
version: "3.7"

services:
  traefik:
    image: traefik:latest
    volumes:
      - /var/run/docker.sock:/var/run/docker.sock
      - ./traefik.yml:/etc/traefik/traefik.yml
      # Mount local plugin directory
      - ./my-plugin:/plugins-local/src/github.com/my-org/my-plugin
    ports:
      - "80:80"
      - "8080:8080"
Plugin directory structure:
./my-plugin/
├── plugin.go
├── go.mod
├── go.sum
└── .traefik.yml
Kubernetes with Helm
For local plugin development in Kubernetes, you can mount your plugin source to the required /plugins-local/src/ directory using ConfigMaps or persistent volumes.
Option 1: Using ConfigMap (Recommended for Development)
# Create ConfigMap from your plugin directory
kubectl create configmap my-plugin-source \
  --from-file=./my-plugin \
  --namespace traefik
Helm Values:
# values.yaml
experimental:
  plugins:
    enabled: false  # Disable remote plugins if not needed
  localPlugins:
    myPlugin:
      moduleName: github.com/my-org/my-plugin

# Mount the ConfigMap as a volume
volumes:
  - name: plugin-source
    configMap:
      name: my-plugin-source

additionalVolumeMounts:
  - name: plugin-source
    mountPath: /plugins-local/src/github.com/my-org/my-plugin
    readOnly: true
Install with Helm:
helm upgrade --install traefik traefik/traefik \
  --namespace traefik \
  --create-namespace \
  -f values.yaml
Option 2: Using Persistent Volume (For Larger Plugins)
# values.yaml
experimental:
  plugins:
    enabled: false
  localPlugins:
    myPlugin:
      moduleName: github.com/my-org/my-plugin

# Use a PersistentVolumeClaim
volumes:
  - name: plugin-dev
    persistentVolumeClaim:
      claimName: traefik-plugin-dev

additionalVolumeMounts:
  - name: plugin-dev
    mountPath: /plugins-local/src
Create PVC:
# pvc.yaml
apiVersion: v1
kind: PersistentVolumeClaim
metadata:
  name: traefik-plugin-dev
  namespace: traefik
spec:
  accessModes:
    - ReadWriteOnce
  resources:
    requests:
      storage: 1Gi
Then copy your plugin to the PV:
# Copy plugin source to PVC
kubectl cp ./my-plugin traefik/traefik-pod:/plugins-local/src/github.com/my-org/my-plugin
Option 3: K3d with Local Path
For k3d clusters, you can use hostPath mounts:
# Create k3d cluster with volume mount
k3d cluster create traefik-hub \
  --volume "$(pwd)/my-plugin:/plugins-local/src/github.com/my-org/my-plugin@server:0" \
  --port "80:30000@loadbalancer" \
  --port 443:30001@loadbalancer" \
  --k3s-arg "--disable=traefik@server:0" \
Traefik Hub Helm Values for K3d
# values.yaml
experimental:
  localPlugins:
    myPlugin:
      moduleName: github.com/my-org/my-plugin

volumes:
  - name: local-plugin
    hostPath:
      path: /plugins-local/src/github.com/my-org/my-plugin
      type: Directory

additionalVolumeMounts:
  - name: local-plugin
    mountPath: /plugins-local/src/github.com/my-org/my-plugin
Testing Local Plugins
After mounting your plugin, create a middleware to test it:
apiVersion: traefik.io/v1alpha1
kind: Middleware
metadata:
  name: test-local-plugin
  namespace: default
spec:
  plugin:
    myPlugin:
      headerName: "X-Local-Plugin"
      headerValue: "development"
Check Traefik logs to verify the plugin loaded:
kubectl logs -n traefik -l app.kubernetes.io/name=traefik | grep -i plugin
Expected output:
time="..." level=info msg="Loading plugins..." plugins="[myPlugin]"
time="..." level=info msg="Plugins loaded."
- Edit your plugin source locally
- Update the ConfigMap:
kubectl create configmap my-plugin-source --from-file=./my-plugin -n traefik --dry-run=client -o yaml | kubectl apply -f - - Restart Traefik Hub:
kubectl rollout restart deployment traefik -n traefik - Test changes
Local plugins are for development only. For production, always use versioned plugins from repositories with proper git tags and releases.
Related Content
- Read the Private Plugins Reference Documentation
- Explore the Traefik Plugin Catalog
- Read the Writing Traefik Plugins - Official Guide
- Explore the Traefik Plugin Demo Repository
