Nutanix Prism Central Setup Guide
This guide walks you through setting up Traefik Hub to automatically discover and route traffic to virtual machines running on Nutanix AHV infrastructure using the Nutanix Prism Central provider.
What You'll Accomplish
By the end of this guide, you will have:
- Configured a Nutanix Prism Central service account for Traefik Hub
- Created categories in Prism Central to organize your VMs
- Enabled automatic service discovery for your Nutanix VMs
- Verified that Traefik Hub can route traffic to your discovered services
Prerequisites
Before you begin, ensure you have:
- Nutanix Prism Central with administrative access
- Traefik Hub installed and running (see the installation guides)
- At least 2 VMs running in Nutanix for testing purposes
- kubectl configured (if using Kubernetes deployment) or access to Traefik Hub configuration
- Flow Virtual Networking enabled (optional, only needed for VPC filtering)
Step 1: Create a Service Account in Prism Central
First, you'll need to create a dedicated service account for Traefik Hub with appropriate permissions.
Create the Service Account
- Log in to your Nutanix Prism Central web console
- Click the Application Switcher and select Admin Center
- From the navigation bar, select Settings > IAM > Identities
- On the top right, click Service Accounts
- In the service accounts list, select Add New Service Account
- Configure the service account:
- Name:
traefik-hub-discovery - Description: Service account for Traefik Hub VM discovery (optional)
- Name:
- Click Save & Create Keys
Generate an API Key
- On creating the service account, you will be redirected to the service account details page. On the top right, click Add New Key
- Configure the API key:
- Key Type:
API Key - Name:
traefik-hub-key - Key Expiration: Set as needed (optional)
- Key Type:
- Click Generate Key
- Copy the generated API key immediately
The API key is displayed only once during creation. You cannot retrieve it later. If you lose the API key, you must generate a new one.
Assign Required Permissions
After creating the service account & API key, you need to grant it permissions to read VMs, Categories, and Subnets (if using VPC filtering).
- From the navigation bar, select Settings > IAM > Authorization Policies
- Click Create Authorization Policy
- Configure the authorization policy:
- Edit the autogenerated name to
traefik-hub-read-only - Role: Select Prism Viewer
- Entities: Select Full Access or configure specific clusters/VMs
- Identities: Select service account then search for and select the
traefik-hub-discoveryservice account from the dropdown
- Edit the autogenerated name to
- Click Save
For more restrictive permissions, you can create a custom role with only the following permissions:
View Virtual Machine- Required to read VM configurationsView Category Mapping- Required to read category assignmentsView Name Category- Required to read category keysView Value Category- Required to read category valuesView Subnet- Required if using VPC filteringView VPC- Required if using VPC filtering
However, using the built-in Prism Viewer role is simpler and provides all necessary read permissions.
Step 2: Identify VPC UUIDs (Optional)
If you want to restrict service discovery to specific Virtual Private Clouds, you'll need to identify their UUIDs. Skip this step if you want to discover all VMs regardless of VPC. Discovering VMs across all VPCs can be useful for load balancing between highly-available distributed applications spanning multiple environments.
Find VPC UUIDs
- Click the Application Switcher and select Admin Center
- From the navigation bar, select Infrastructure
- From the navigation bar, select Network & Security > VPCs
- Identify the VPC(s) you want to use for service discovery
- Select the VPC name to view details
- Once on the VPC details page, the UUID is displayed in the URL as the entity ID. Copy the UUID.
Step 3: Create Service Name Category in Prism Central
Categories are key-value pairs that act as metadata for your VMs.
Traefik Hub uses the TraefikServiceName category to map VMs to services defined in your base configuration file.
Create TraefikServiceName Category
- Click the Application Switcher
- Select Admin Center (if not already there)
- From the navigation bar, select Categories
- On the top left, click New Category
- Configure the category:
- Category/Key Name:
TraefikServiceName - Add the following value (you can add more later):
whoami- For test service
- Category/Key Name:
- Click Save
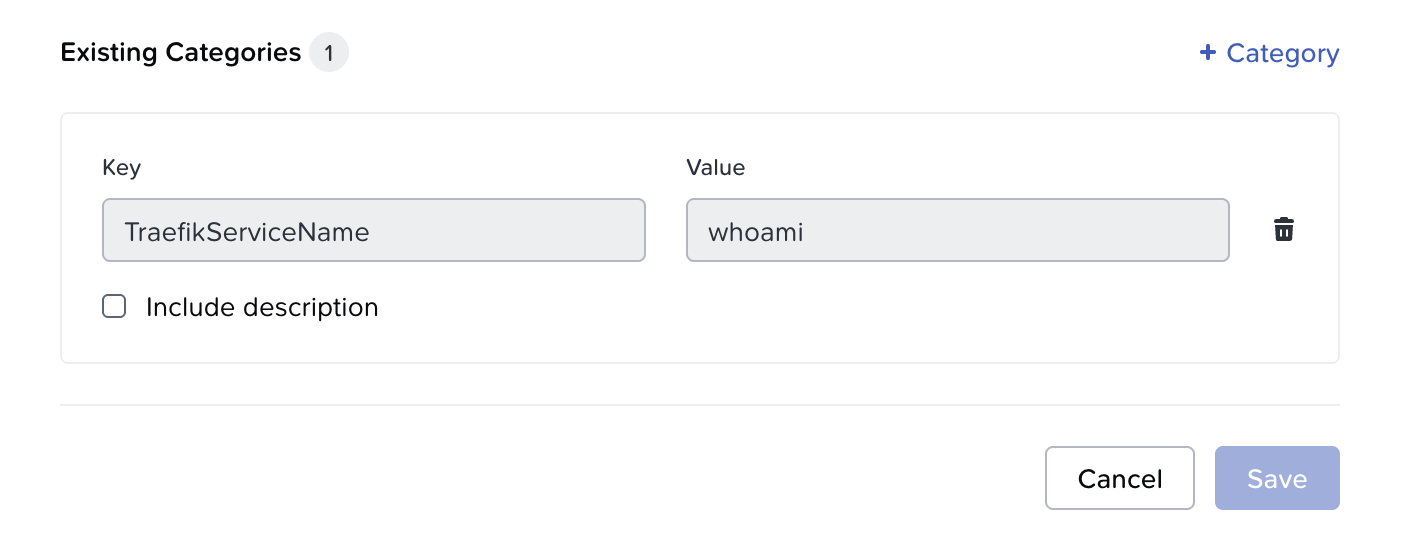
Categories are global resources in Prism Central. Once created, they can be reused across all VMs. You don't need to recreate categories for each VM.
Service properties like port, health checks, and load balancing strategy are NOT configured via categories. They are defined in a base configuration file that you'll create in the next step.
Step 4: Create Base Configuration File
Create a base configuration file that defines your services with their properties (port, health checks, load balancing strategy, etc.). The Nutanix provider will discover VM IPs and merge them with these service definitions.
Create the Configuration File
Create a file named nutanix-base-config.yaml:
http:
  routers:
    whoami-route:
      rule: "Host(`whoami.example.com`)"
      entryPoints:
        - web
      service: whoami

  services:
    whoami:
      loadBalancer:
        scheme: http
        port: "80"
        strategy: p2c
        healthCheck:
          path: /health
          interval: 10s
          timeout: 3s
This configuration defines:
- Router: Routes traffic from
whoami.example.comto thewhoamiservice - Service: Defines the
whoamiservice with:- Port
80where the application listens p2cload balancing strategy (Power of Two Choices)- Health checks at
/healthevery 10 seconds
- Port
Place this file where Traefik Hub can access it. Common locations:
- Local deployment:
/etc/traefik/nutanix-base-config.yaml - Kubernetes: Mount as ConfigMap or use a persistent volume
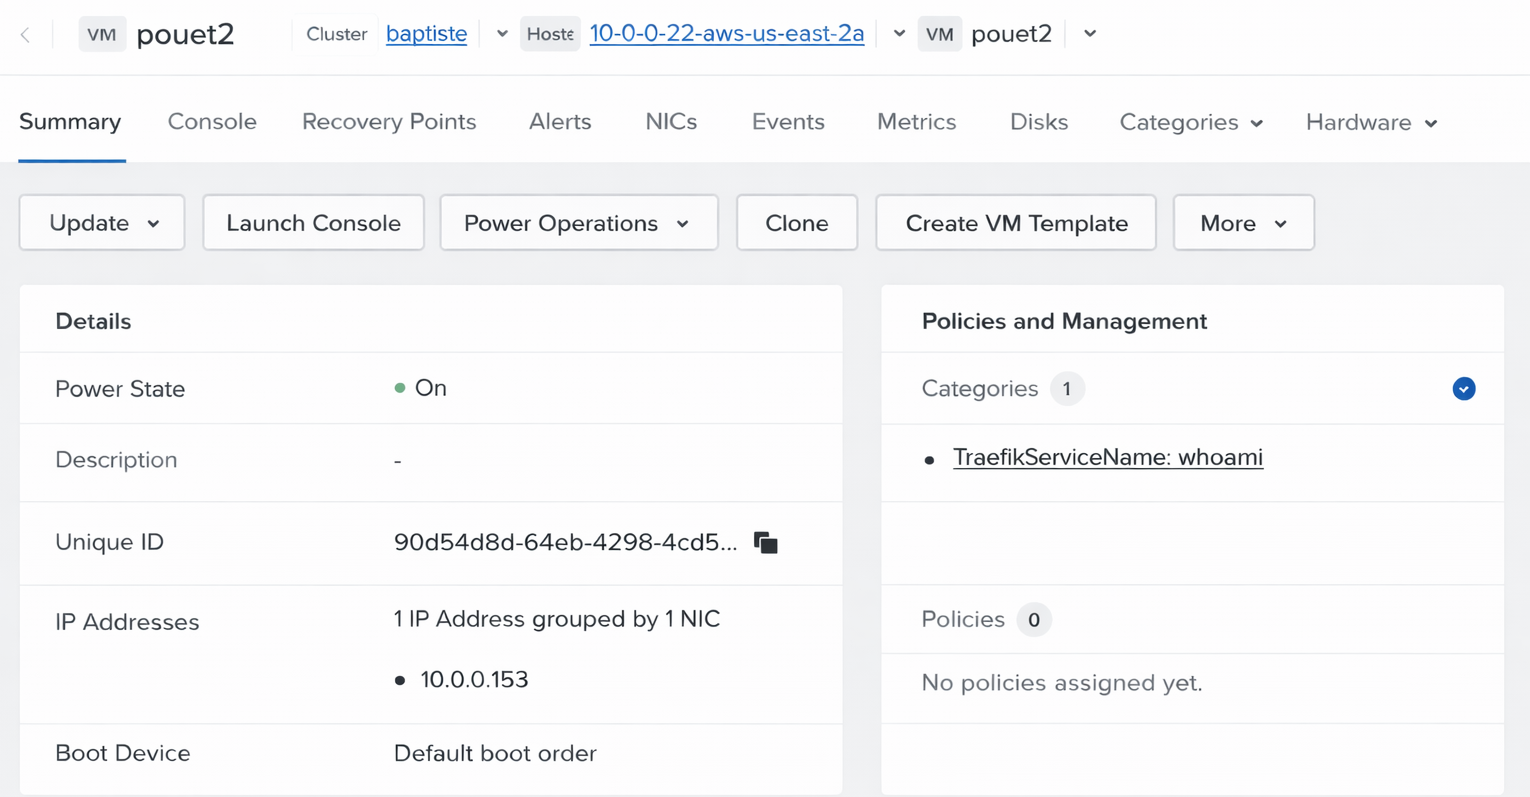
Step 5: Assign Category to VMs
Now assign the TraefikServiceName category to your VMs to map them to the whoami service you defined in the base configuration.
Assign Category to Test VMs
For this example, we'll configure two VMs to form the whoami service.
- Click the Application Switcher
- Select Infrastructure
- From the navigation bar, click Compute > VMs
- Select the VM (e.g.,
whoami-vm-01orwhoami-vm-02) - On the VM summary tab, select More > Other Actions > Manage Categories from the top menu bar
- Assign the category:
TraefikServiceName: whoami
- Click Save
- Ensure the VM is powered ON
- Repeat for each VM in the service
- VM 1
- VM 2
The category value (whoami) must exactly match the service name in your base configuration file.
If they don't match, the VM will not be added as a backend server.
Verify VM Configuration
Confirm that your VMs are properly configured:
- From the Infrastructure application, navigate to Compute > VMs
- For each VM, verify:
- Power State:
ON - IP Address: Assigned and visible in the VM list
- Categories: Shows
TraefikServiceName: whoami
- Power State:
Step 6: Configure Traefik Hub Provider
Now configure Traefik Hub to connect to your Nutanix Prism Central environment.
Configuration for Helm Deployment
If you're using Helm to deploy Traefik Hub, update your values.yaml file:
- With VPC Filtering
- Without VPC Filtering
providers:
  nutanixPrismCentral:
    enabled: true
    endpoint: https://prism-central.example.com
    apiKey: your-api-key-from-step-1
    filename: /etc/traefik/nutanix-base-config.yaml
    pollInterval: 30s
    pollTimeout: 5s
    serviceNameCategoryKey: TraefikServiceName
    allowedVPCs:
      - uuid: <your-vpc-uuid-from-step-2>  # Replace with your VPC UUID from Step 2
    tls:
      insecureSkipVerify: true  # Only for testing with self-signed certificates
providers:
  nutanixPrismCentral:
    enabled: true
    endpoint: https://prism-central.example.com
    apiKey: your-api-key-from-step-1
    filename: /etc/traefik/nutanix-base-config.yaml
    pollInterval: 30s
    pollTimeout: 5s
    serviceNameCategoryKey: TraefikServiceName
    tls:
      insecureSkipVerify: true  # Only for testing with self-signed certificates
Deploy or upgrade your Traefik Hub installation:
helm upgrade --install traefik-hub traefik/traefik-hub \
  --reset-then-reuse-values \
  --namespace traefik \
  --values values.yaml
Configuration for Static Config File
If you're using a install configuration file, add the provider configuration:
- Install Configuration
# traefik-config.yaml
providers:
  nutanixPrismCentral:
    endpoint: https://prism-central.example.com
    apiKey: your-api-key-from-step-1
    filename: /etc/traefik/nutanix-base-config.yaml
    pollInterval: 30s
    pollTimeout: 5s
    serviceNameCategoryKey: TraefikServiceName
    tls:
      insecureSkipVerify: true
Restart Traefik Hub to apply the configuration.
The tls.insecureSkipVerify: true setting should only be used in testing environments with self-signed certificates. For production:
- Remove
insecureSkipVerifyor set it tofalse - Configure proper TLS with
tls.capointing to your CA certificate - Use valid certificates signed by a trusted CA
Step 6: Verify Service Discovery
After configuring the provider, verify that Traefik Hub is successfully discovering your VMs.
Check Traefik Hub Logs
Verify the provider is running and discovering services:
- Kubernetes
- Docker
- Binary
# View Traefik Hub logs
kubectl logs -n traefik -l app.kubernetes.io/name=traefik-hub --tail=100 -f
# View Traefik Hub logs
docker logs traefik-hub --tail=100 -f
# Check log file or stdout
tail -f /var/log/traefik-hub.log
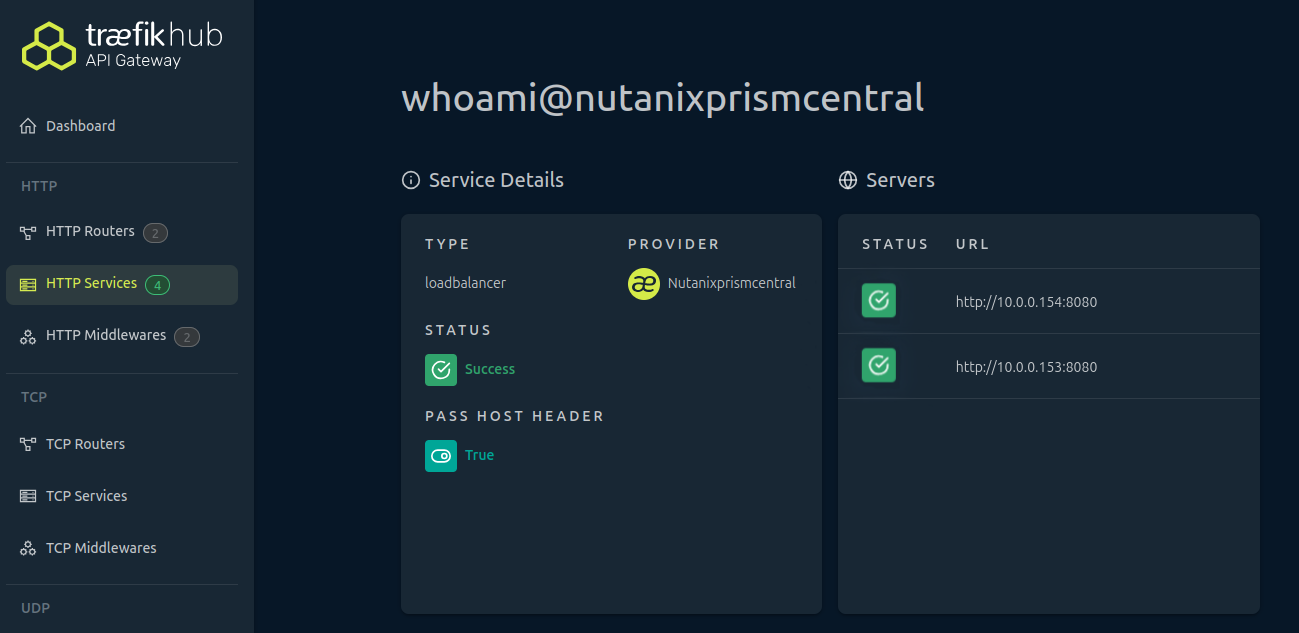
Check Traefik Hub Dashboard
If you have the Traefik Hub dashboard enabled:
- Navigate to the dashboard (typically
http://localhost:8080/dashboard/) - Click HTTP Services in the navigation
- Look for services with the
@nutanixprismcentralsuffix - Verify the service shows the correct number of servers
Step 7: Create Routing Rules
Now that your services are discovered, create routing rules to direct traffic to them.
Create an IngressRoute (Kubernetes)
If you're using Kubernetes with Traefik CRDs:
apiVersion: traefik.io/v1alpha1
kind: IngressRoute
metadata:
  name: whoami-route
  namespace: default
spec:
  entryPoints:
    - web
  routes:
    - match: Host(`whoami.example.com`)
      kind: Rule
      services:
        - name: whoami@nutanixprismcentral
          port: 8080
Apply the IngressRoute:
kubectl apply -f whoami-route.yaml
Create a File Provider Route
If you're using the File provider for routing:
# routing-config.yaml
http:
  routers:
    whoami-router:
      rule: "Host(`whoami.example.com`)"
      service: whoami@nutanixprismcentral
      entryPoints:
        - web
Update your Traefik configuration to load this file.
When referencing services from the Nutanix provider, always use the full service name with the @nutanixprismcentral suffix. This tells Traefik which provider manages the service.
Step 8: Test the Setup
Verify that traffic is being routed to your discovered VMs.
Test with curl
# Test the route
curl -H "Host: whoami.example.com" http://your-traefik-ip/

# Or if you have DNS configured
curl http://whoami.example.com/
Expected output (from one of your VMs):
Hostname: poeut
IP: 192.168.1.10
RemoteAddr: 10.0.0.5:45678
GET / HTTP/1.1
Host: whoami.example.com
...
Test Load Balancing
Make multiple requests to verify P2C load balancing is working:
# Make 10 requests and check which backend responds
for i in {1..10}; do
  curl -s -H "Host: whoami.example.com" http://your-traefik-ip/ | grep "Hostname"
done
You should see requests distributed between your VMs:
Hostname: whoami-vm-01
Hostname: whoami-vm-02
Hostname: whoami-vm-01
Hostname: whoami-vm-02
...
Test from Browser
Configure your local hosts file or DNS:
# Add to /etc/hosts (Linux/Mac) or C:\Windows\System32\drivers\etc\hosts (Windows)
your-traefik-ip whoami.example.com
Open your browser and navigate to http://whoami.example.com/. You should see the response from one of your VMs.
Troubleshooting
No Services Discovered
Symptoms: No services appear in Traefik Hub, API returns empty results.
Possible Causes:
- API key is incorrect or lacks permissions
- VMs are powered OFF
- VMs don't have
TraefikServiceNamecategory assigned - Endpoint URL is incorrect
Solutions:
-
Check Traefik Hub logs for authentication errors:
kubectl logs -n traefik -l app.kubernetes.io/name=traefik-hub | grep -i error -
Verify API key and permissions in Prism Central
-
Ensure VMs are powered ON
-
Verify categories are assigned correctly to VMs
-
Test connectivity to Prism Central:
curl -k https://prism-central.example.com/api/vmm/v4.2/ahv/config/vms
VMs Not Filtered by VPC
Symptoms: VMs from other VPCs are being discovered despite allowedVPCs configuration.
Possible Causes:
- VPC UUID is incorrect
- Flow Virtual Networking is not enabled
- VMs are not attached to subnets in the specified VPC
Solutions:
-
Verify the VPC UUID is correct:
- Application Switcher > Infrastructure > Network & Security > VPCs > Select VPC > Subnet > Update
- Copy the exact UUID including hyphens
-
Check if Flow Virtual Networking is enabled in Prism Central
-
Verify VMs' network configuration:
- Ensure VM NICs are attached to subnets in the allowed VPC
-
Test subnet filtering:
# Check which subnets belong to your VPCcurl -k -H "Authorization: Bearer $API_KEY" \"https://prism-central.example.com/api/networking/v4.2/config/subnets" | \jq '.data[] | select(.vpcReference == "your-vpc-uuid")'
Strategy Conflict Errors
Symptoms: Service appears in logs but is excluded from configuration. Log shows "Strategy conflict detected".
Possible Causes:
- VMs in the same service have different
TraefikLoadBalancerStrategyvalues
Solutions:
- Review category assignments for all VMs in the service
- Ensure all VMs have either:
- The same strategy value (e.g., all use
p2c) - OR no strategy category at all (uses default)
- The same strategy value (e.g., all use
- Fix category assignments in Prism Central
- Wait for the next polling interval or restart Traefik Hub
Wrong IP Address Selected
Symptoms: Traefik routes to wrong IP or unreachable IP.
Possible Causes:
- VM has multiple NICs and wrong NIC is selected
- VPC filtering is selecting unexpected NICs
- IPv6 is selected when IPv4 is expected
Solutions:
- Check VM NIC configuration in Prism Central
- If using VPC filtering, ensure the correct NICs are in allowed VPCs
- Review IP selection logic in the provider documentation
- Check Traefik Hub logs for IP selection details
TLS Certificate Errors
Symptoms: Logs show TLS handshake failures, certificate verification errors.
Possible Causes:
- Self-signed certificate without
insecureSkipVerify - Incorrect CA certificate configuration
- Certificate name mismatch
Solutions:
-
For testing with self-signed certificates:
tls:insecureSkipVerify: true -
For production, provide the CA certificate:
tls:ca: /path/to/prism-ca.pem -
Ensure the endpoint URL matches the certificate Common Name or SAN
-
Test TLS connection:
openssl s_client -connect prism-central.example.com:443 -showcerts
Slow Service Discovery
Symptoms: Changes to VMs take a long time to appear in Traefik.
Possible Causes:
pollIntervalis too high- Prism Central API is slow
Solutions:
-
Reduce
pollIntervalfor faster updates:pollInterval: 15s # Update every 15 seconds instead of 30s -
Monitor Prism Central API performance
-
Check network latency between Traefik Hub and Prism Central
Service Excluded Due to No Valid IP
Symptoms: Logs show "Skipping VM without valid IP address".
Possible Causes:
- VM NIC has no IP address assigned
- VPC filtering excludes all NICs
- Network configuration is incomplete
Solutions:
- Check VM network configuration in Prism Central
- Ensure VM has obtained an IP address (DHCP or static)
- Verify VPC filtering configuration is not too restrictive
- Check that VM's subnet has proper IP address management configured
Additional Resources
- Learn more about the Nutanix Prism Central Provider in the reference documentation
- Learn more about the Nutanix API in the Nutanix API Documentation
- Learn more about the Nutanix Prism Central Categories in the Nutanix Prism Central Categories Guide
