Deploy Traefik Hub API Management from the Oracle Marketplace
Traefik Hub API Management integrates with Oracle Cloud Infrastructure (OCI) to provide a cloud-native, Kubernetes-native solution for managing APIs with enterprise-grade security and comprehensive API lifecycle management.
In this guide, you'll learn how to deploy Traefik Hub API Management in your OCI Kubernetes Engine cluster using the Traefik Hub API Management stack available in the Oracle marketplace.
Prerequisites
- An Oracle Cloud account
- A Traefik Hub License token
- Access to your OCI Kubernetes Engine cluster (via kubeconfig or OCI Cloud Shell)
Access Your OCI Kubernetes Engine Cluster
Before proceeding with the deployment, you need to access your OCI Kubernetes Engine cluster. We recommend using your local machine for better control and easier port forwarding:
- Download kubeconfig:
- Navigate to your OCI Kubernetes Engine cluster in the OCI Console
- Select "Access Cluster"
- Select "Local Access"
- Follow the instructions to download and configure your kubeconfig
- Verify access:
kubectl get nodes
Deploy Traefik Hub API Management
Step 1: Launch the Stack
Navigate to the Traefik Hub API Management stack in the OCI marketplace and select Launch Stack.
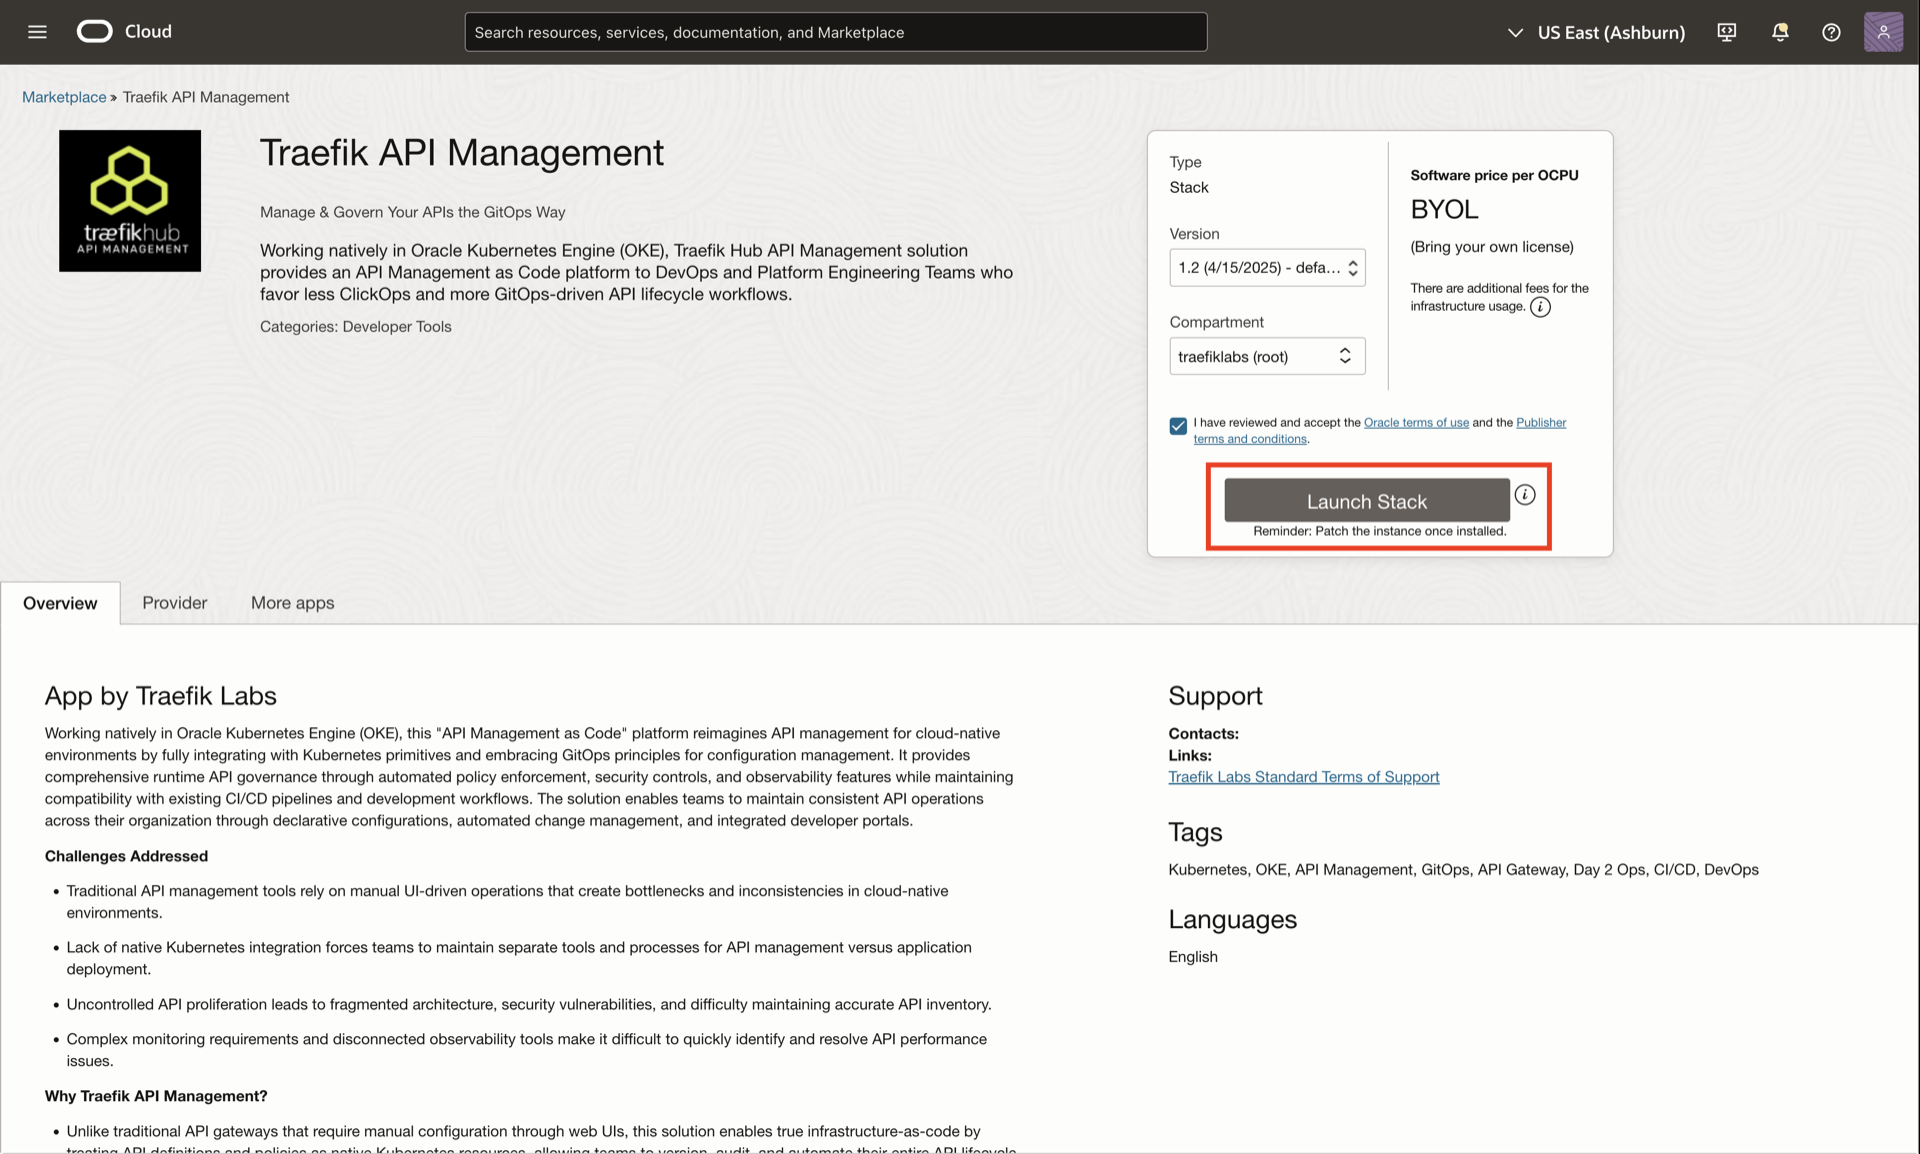
Review the stack information and select Next to proceed.
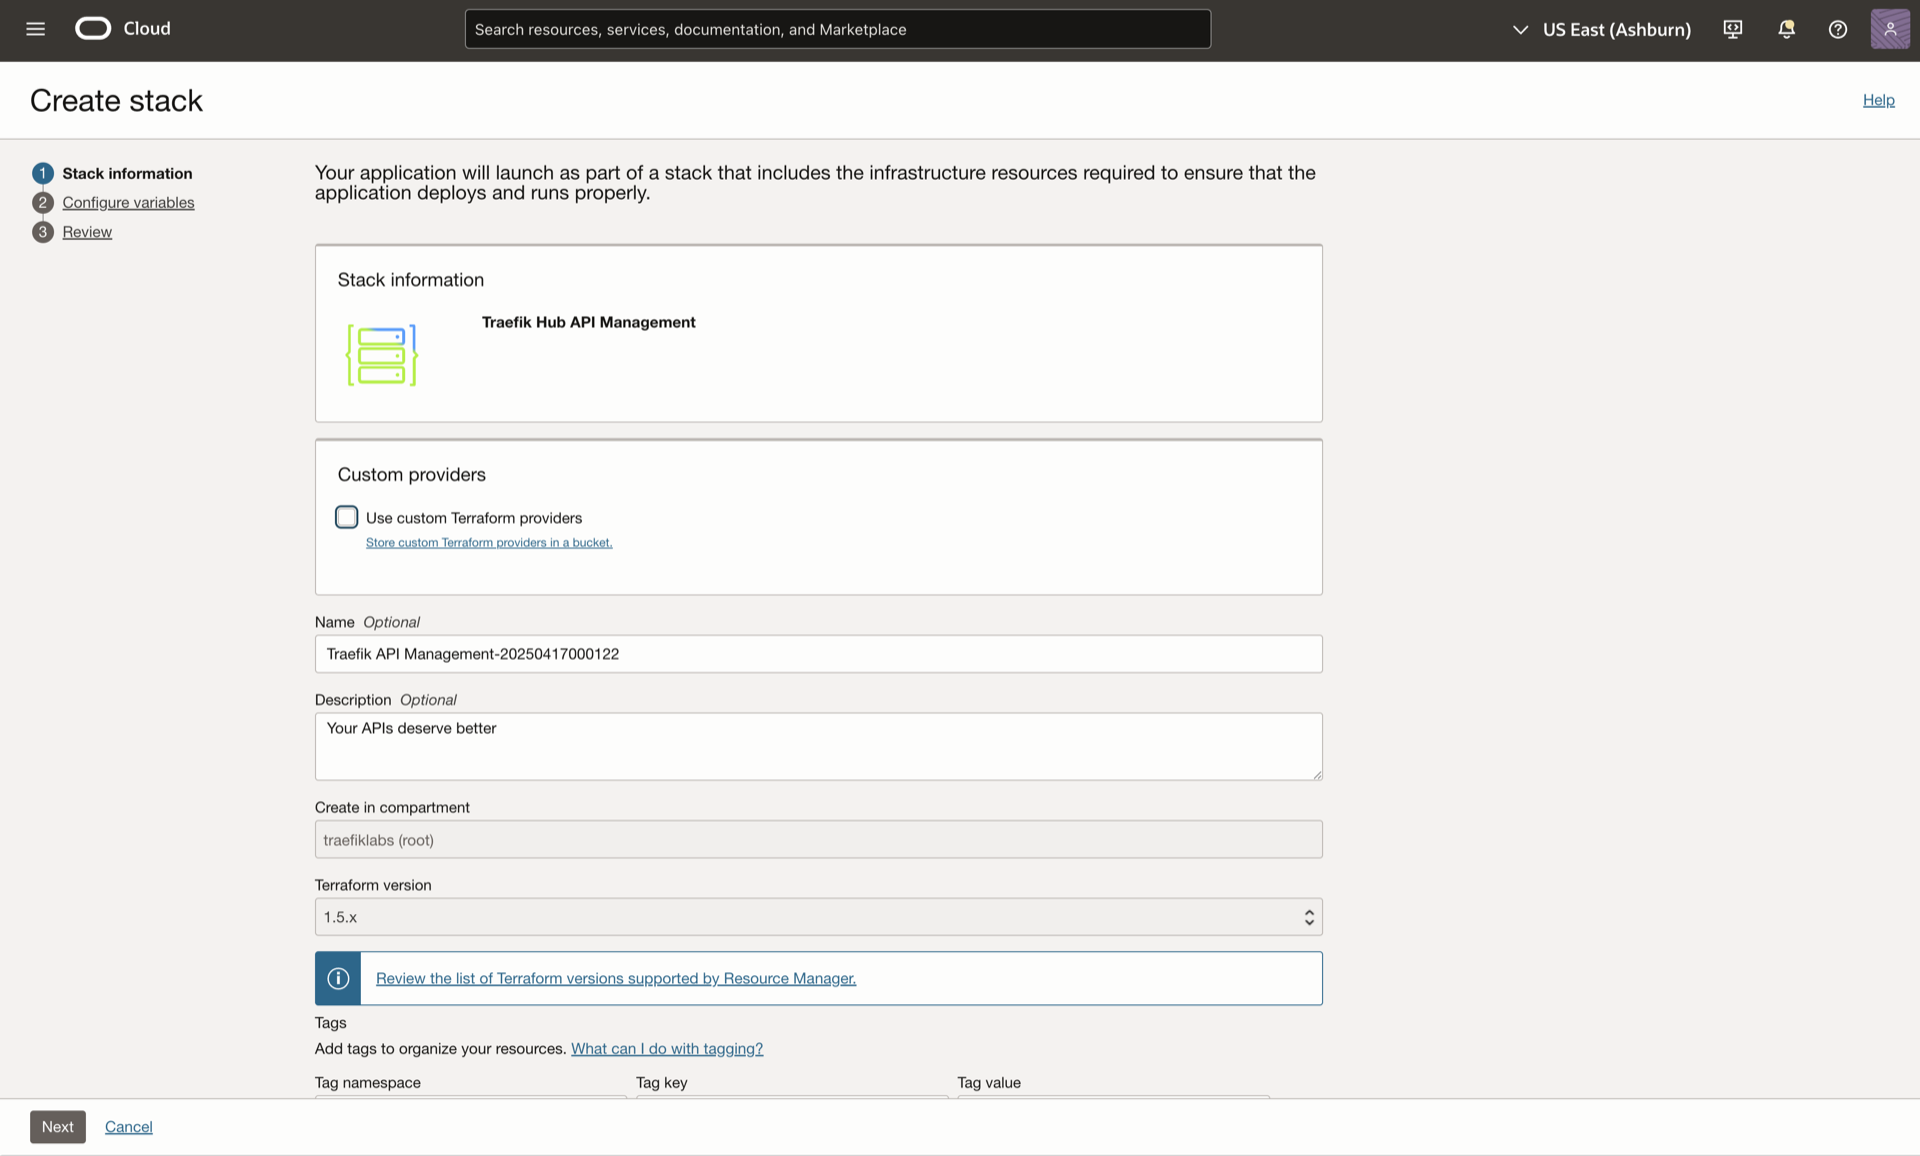
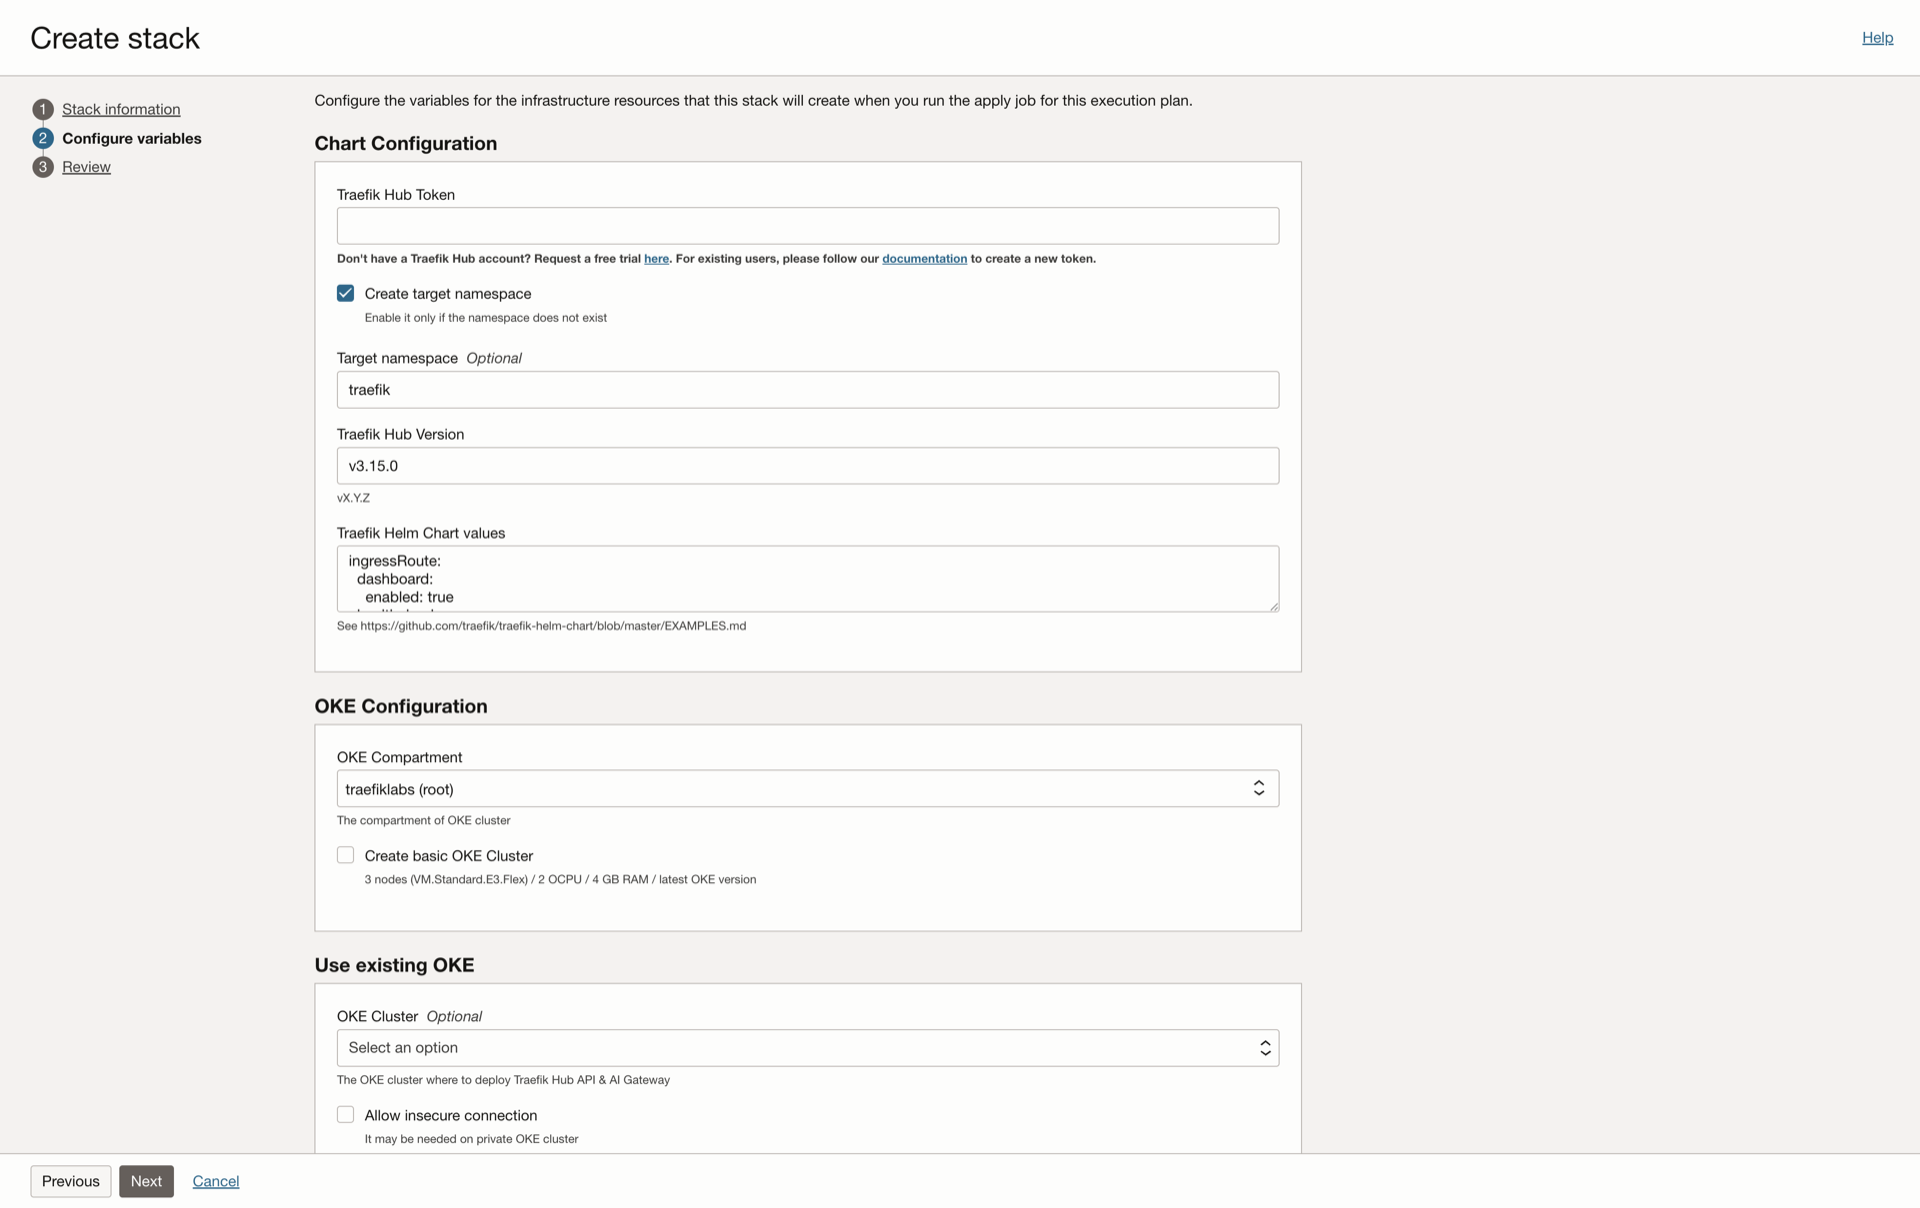
Step 2: Configure the Deployment
In the Configure variables menu, you'll need to provide the following information:
API Management Configuration
-
Target Namespace
- Enter the namespace for the Traefik deployment (for example, "traefik")
- Select the "create target namespace" checkbox if the namespace doesn't exist
-
Create a New Traefik Hub API Management Gateway
- Visit Create New Gateway to create your new gateway. If you don't yet have a Traefik Hub account, please reach out to our sales team.
- Enter your gateway name
- Set the platform to "Kubernetes"
- Copy the provided gateway token
-
Configure the Stack
- Paste the gateway token into the Traefik Hub Token field
- The Traefik Hub version field is pre-filled with the latest version
- The Traefik Helm Chart values field includes the necessary API Management configuration:
ingressRoute:
  dashboard:
    enabled: true
Next, update the helm values to enable cross-namespace referencing by appending the following to the bottom of the field:
ingressRoute:
  dashboard:
    enabled: true

providers:
  kubernetesCRD:
    allowCrossNamespace: true
- The
apimanagementconfiguration enables the API Management features
Step 3: Configure OCI Kubernetes Engine Cluster
In the OKE configuration section, you can create a new basic OCI Kubernetes Engine cluster in a compartment of your choice if you don't already have one by selecting the Create Basic OKE cluster check box.
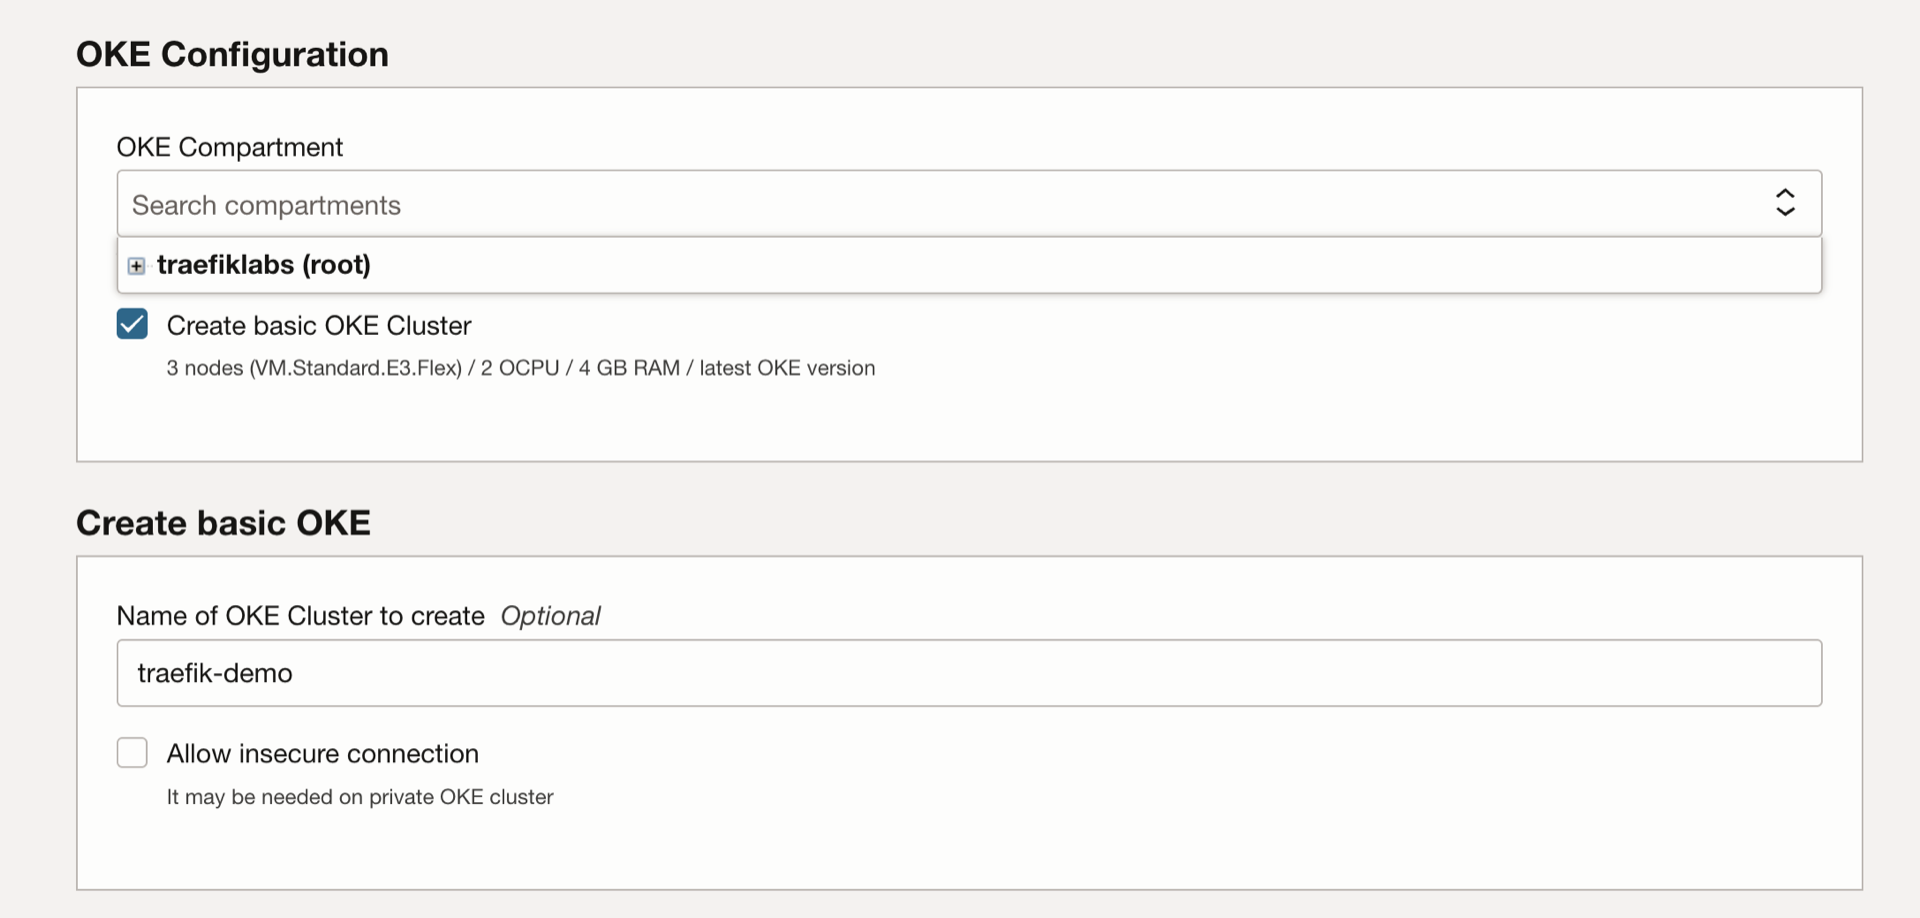
After selecting this option, you'll be required to enter a name for the OCI Kubernetes Engine cluster you want to create for the deployment.
In the Use existing OKE section, you can select your preferred cluster for the deployment from the dropdown menu.
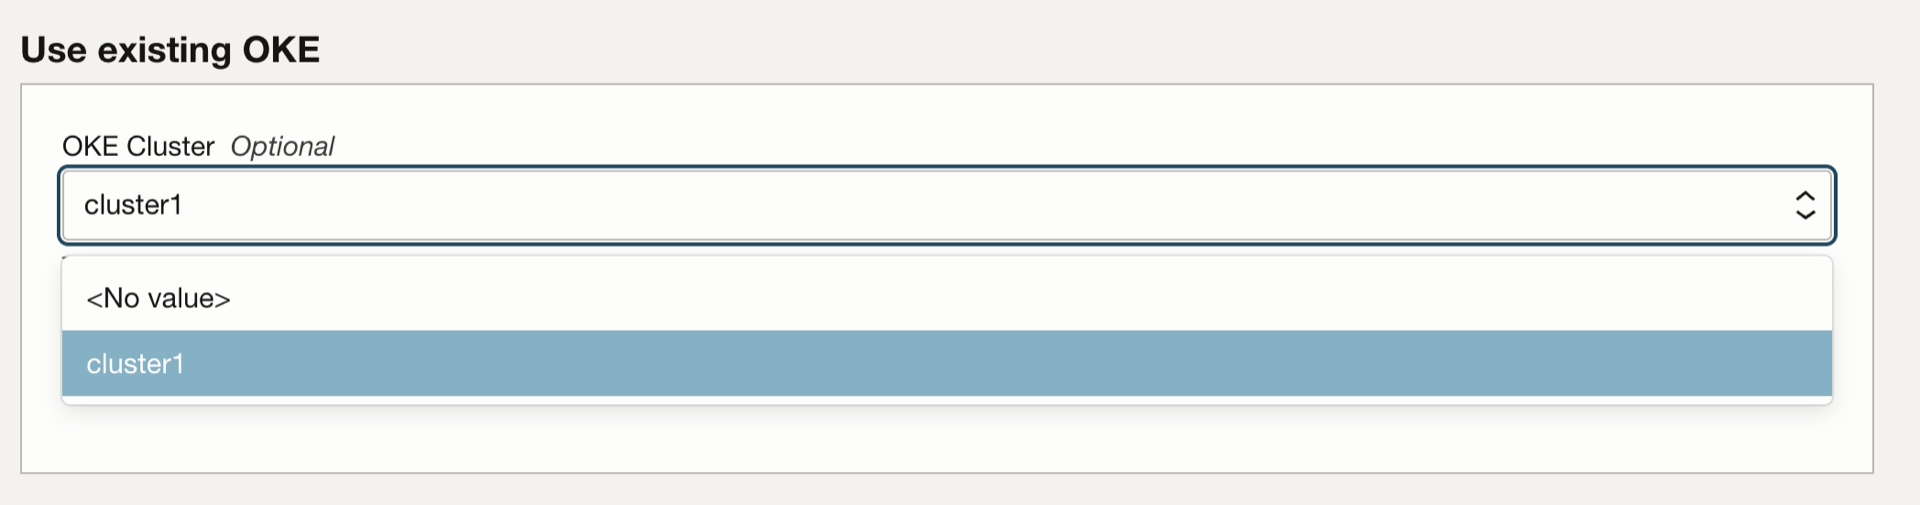
Make sure to select the Allow insecure connection check box if the cluster is private.
After inputing all the required details based on your preference, select "Next" and review your configuration Settings.
- Ensure that the values in the Traefik Helm Chart values field are correctly formatted.
- Make sure the "Run apply" checkbox is checked.
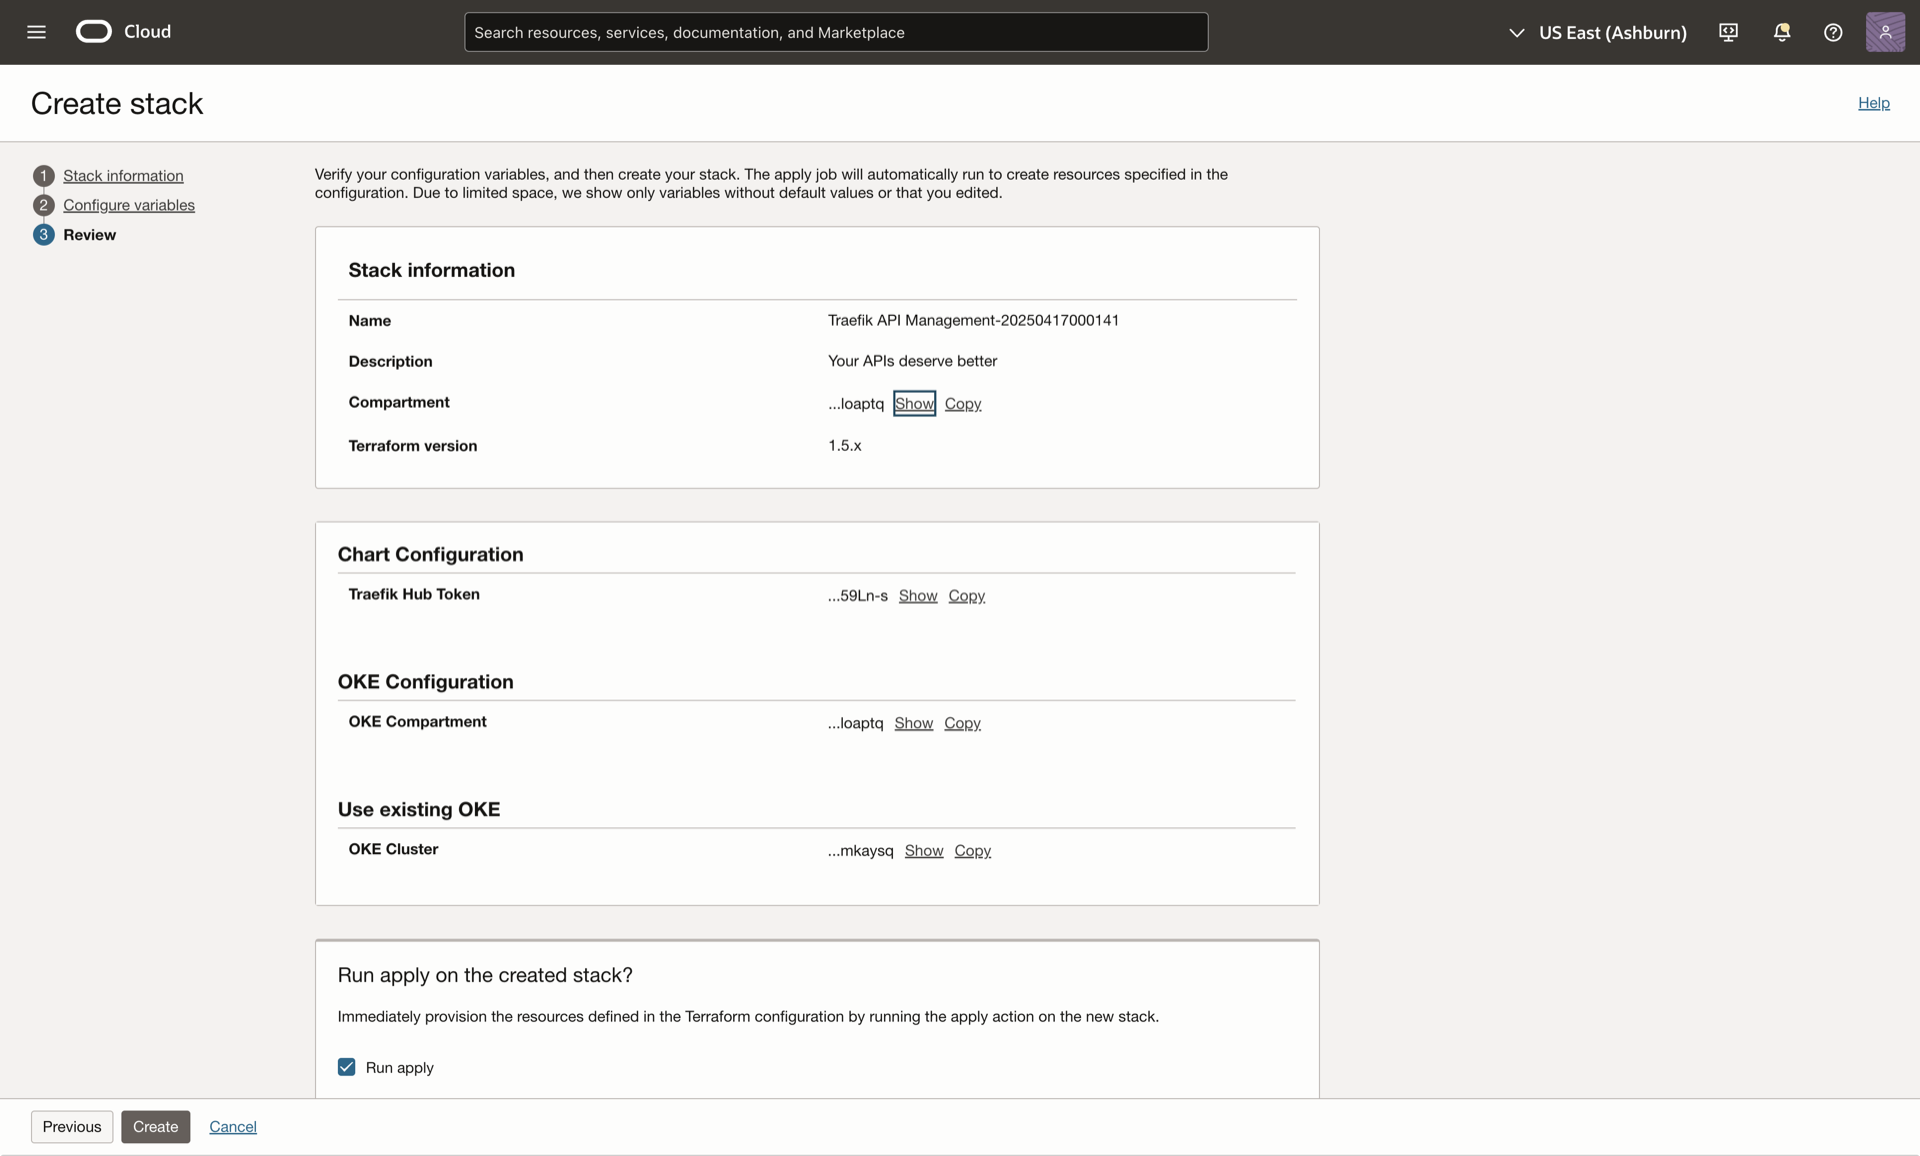
Step 4: Deploy and Verify
- Review your configuration settings
- Select Create to start the deployment
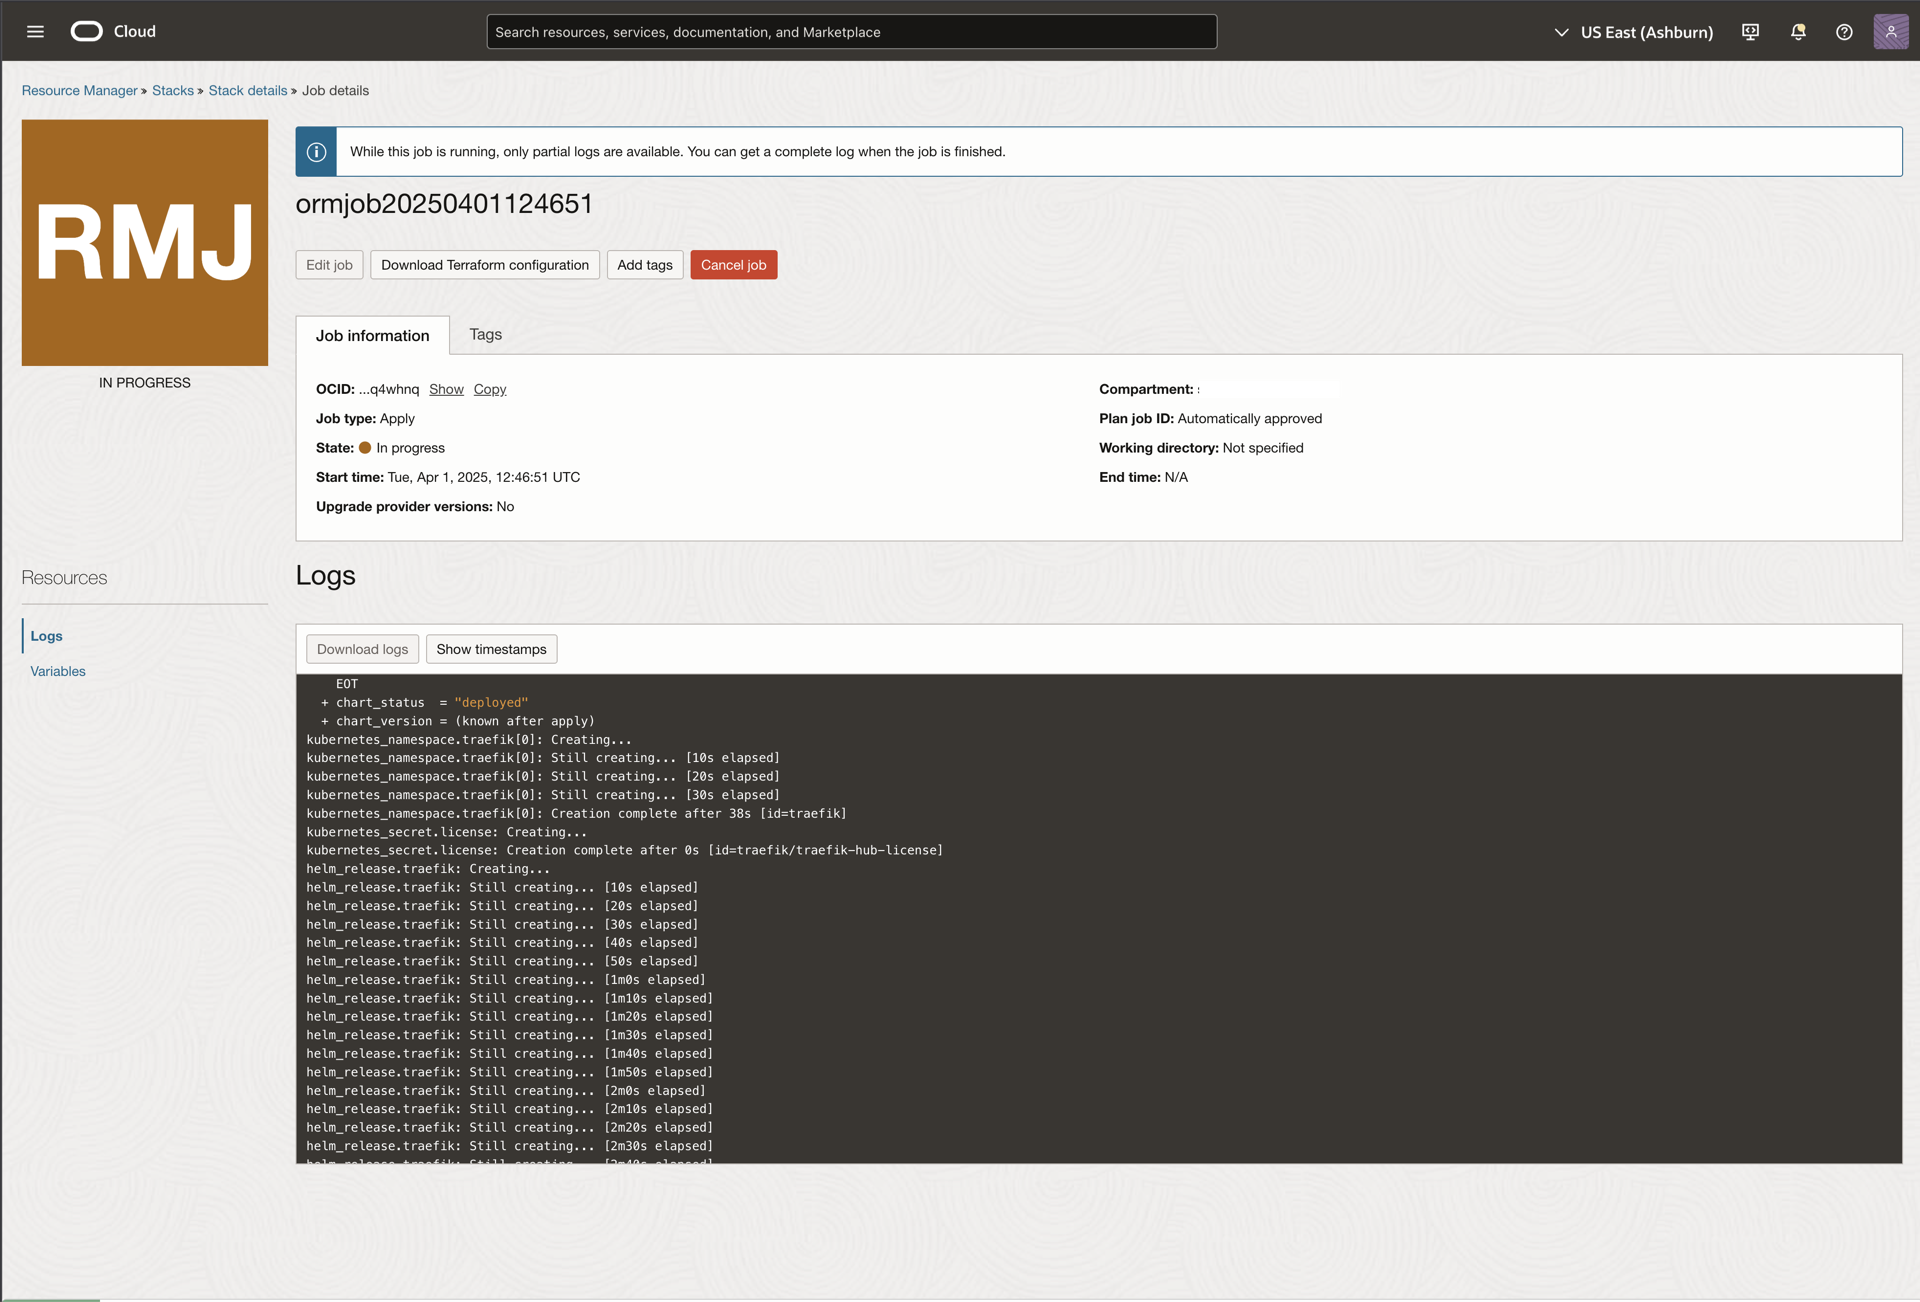
Monitor the deployment progress in the Stacks job page:
Once complete, verify the deployment in the Traefik Hub dashboard:
Deploy and Test an API
Before proceeding with the API deployment, we need to obtain the IP address of your cluster's load balancer. This IP will be used to configure the IngressRoutes for both the API and the API Portal.
Run the following command to get your load balancer IP:
export EXTERNAL_IP=$(kubectl get svc -n traefik traefik \
  -o jsonpath='{.status.loadBalancer.ingress[0].ip}')
echo "Use EXTERNAL_IP=${EXTERNAL_IP}"
Step 1: Create Namespace and Deploy Sample API�
First, create a namespace for your API and deploy the sample weather API:
kubectl create namespace apps
kubectl apply -f https://raw.githubusercontent.com/traefik/hub/main/src/manifests/weather-app.yaml

Step 2: Create API Resource
Create a new API resource with a Traefik IngressRoute to expose it by running the command below:
cat <<EOF | kubectl apply -f -
---
apiVersion: hub.traefik.io/v1alpha1
kind: API
metadata:
  name: weather-api
  namespace: apps
spec:
  openApiSpec:
    path: /openapi.yaml
    override:
      servers:
        - url: "https://$EXTERNAL_IP/weather"  # Replace $EXTERNAL_IP with your load balancer IP
---
apiVersion: traefik.io/v1alpha1
kind: IngressRoute
metadata:
  name: api-ingressroute
  namespace: apps
  annotations:
    hub.traefik.io/api: weather-api@apps
spec:
  entryPoints:
    - websecure
  routes:
    - match: Host(\`$EXTERNAL_IP\`) && PathPrefix(\`/weather\`)  # Replace $EXTERNAL_IP with your load balancer IP
      kind: Rule
      services:
        - name: weather-app
          port: 3000
      middlewares:
        - name: stripprefix-weather
EOF
Since we’re using an IP address over HTTPS, you’ll see a browser warning about an invalid certificate (Traefik serves a self‑signed cert by default). This is expected in a demo. For production, enable an ACME resolver to get real certificates (see Let’s Encrypt TLS docs), or use a free domain like https://traefik.me for valid certs.
If you head over to the traefik online dashboard, you should see this API:
You can also verify this within your cluster by running the following command:
kubectl get apis -n apps

Step 3: Create API Portal
Create the API Portal that will serve as the interface for managing your APIs:
cat <<EOF | kubectl apply -f -
apiVersion: hub.traefik.io/v1alpha1
kind: APIPortal
metadata:
  name: weather-portal
  namespace: apps
spec:
  title: "Weather API Portal"
  description: "Developer Portal for Weather APIs"
  trustedUrls:
    - https://$EXTERNAL_IP/no-auth/weather # Replace EXTERNAL_IP with your load balancer IP
EOF
Replace EXTERNAL_IP with your actual load balancer IP address.
The following response will be displayed after running the above command:
apiportal.hub.traefik.io/weather-portal created
Step 4: Expose the API Portal
Configure an IngressRoute to expose the API Portal:
cat <<EOF | kubectl apply -f -
---
apiVersion: traefik.io/v1alpha1
kind: IngressRoute
metadata:
  name: weather-portal
  namespace: apps
  annotations:
    # Link this IngressRoute to your API Portal (format: <portalName>@<portalNamespace>)
    hub.traefik.io/api-portal: weather-portal@apps
spec:
  entryPoints:
    - websecure
  routes:
    - match: Host(\`$EXTERNAL_IP\`) && PathPrefix(\`/no-auth/weather\`)
      kind: Rule
      middlewares:
      - name: stripprefix-weather
        namespace: apps
      services:
        - name: apiportal
          namespace: traefik
          port: 9903
EOF
The following response will be displayed after running the above command:
ingressroute.traefik.io/weather-portal configured
To access the API Portal, you need to create users and groups in the Traefik Hub Dashboard:
-
Log in to the Traefik Hub Dashboard
-
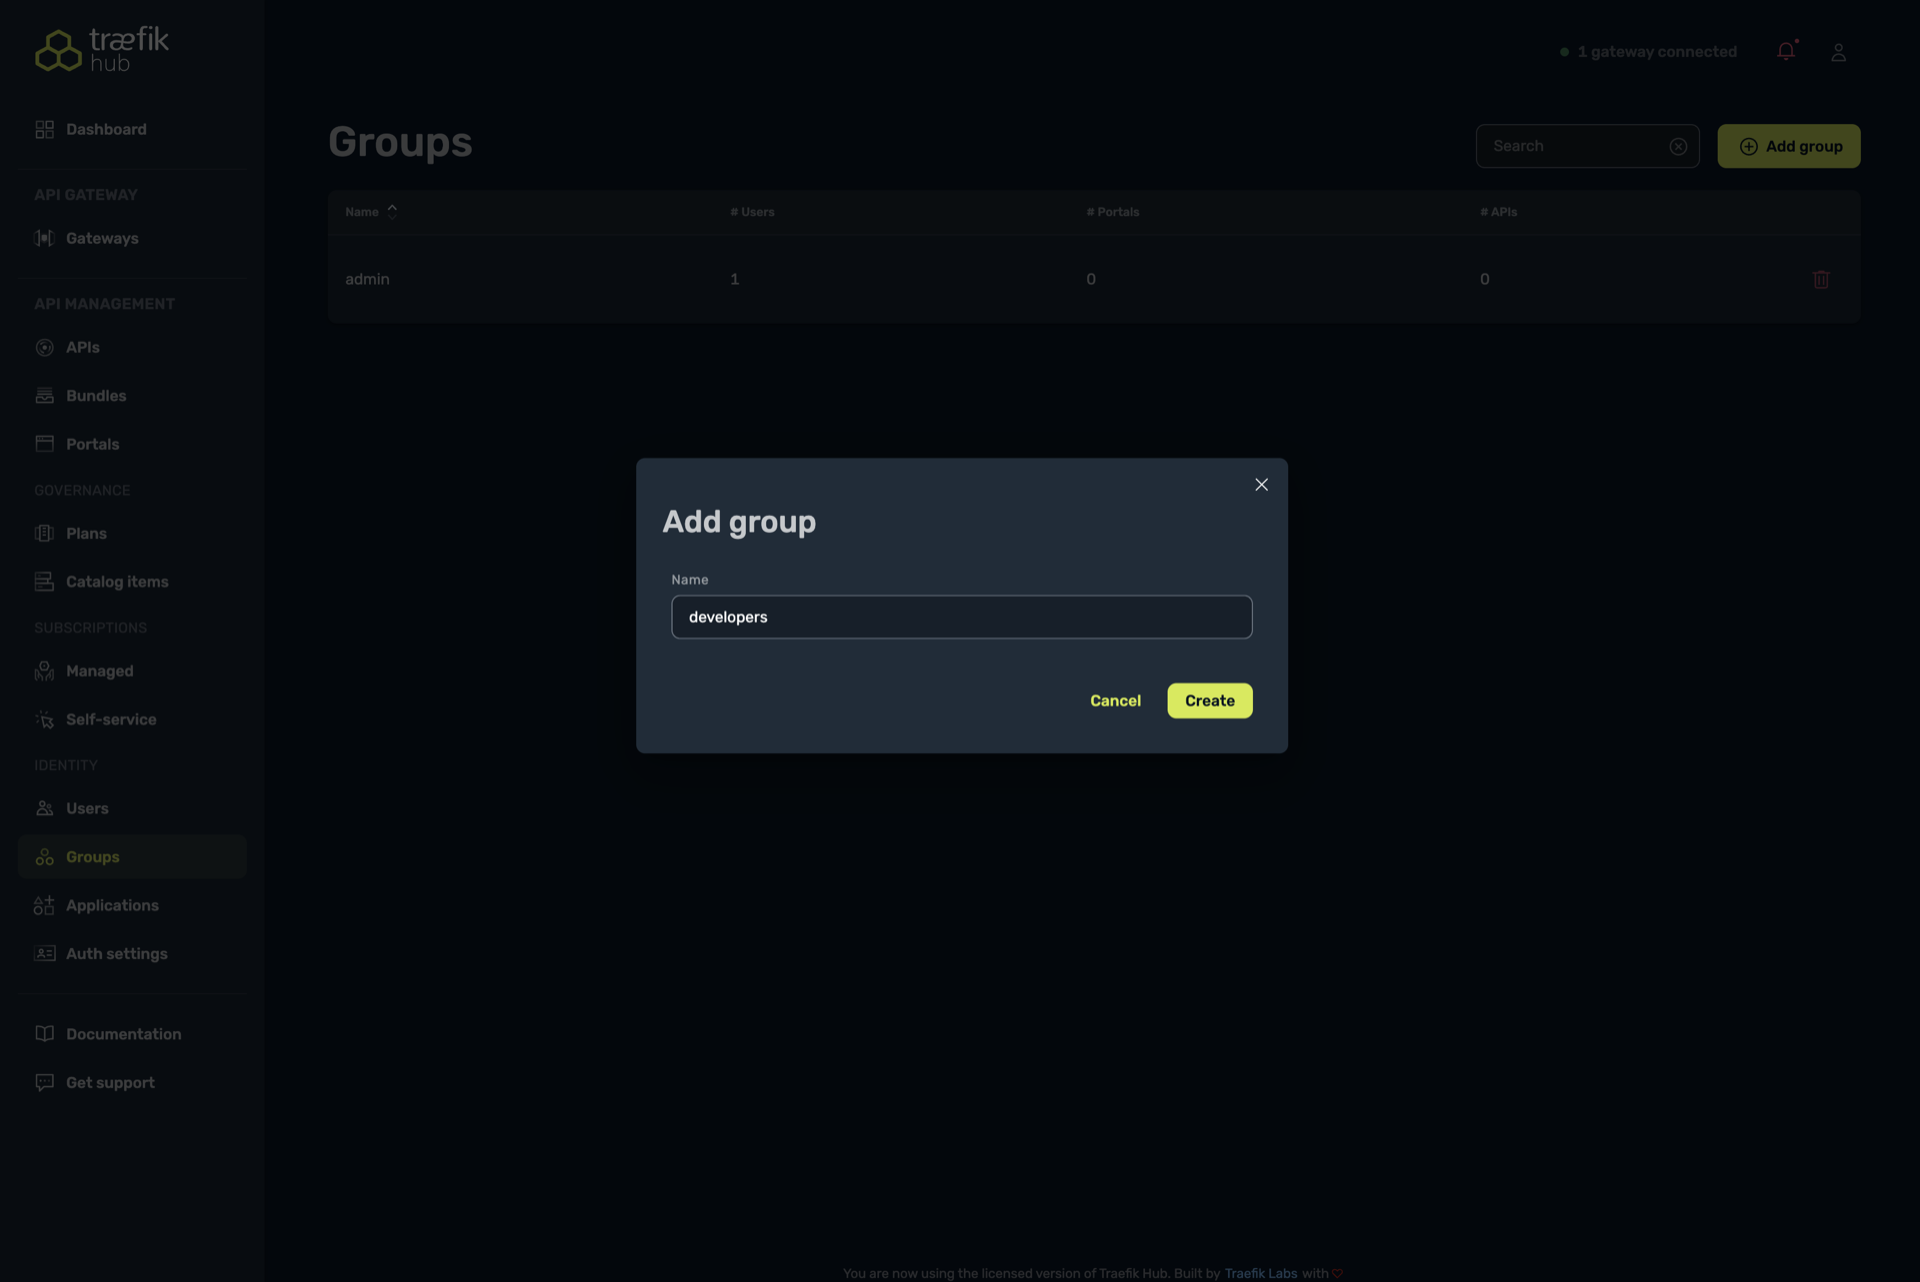
Navigate to the Groups section
-
Create a new group called "developers":
- Select "Add group"
- Enter "developers" as the group name
- Select "Create"
-
Create a new user:
- Navigate to the Users section
- Fill in the required fields (First name, Last name, Email, Company)
- Select the "developers" group
- Select "Save"

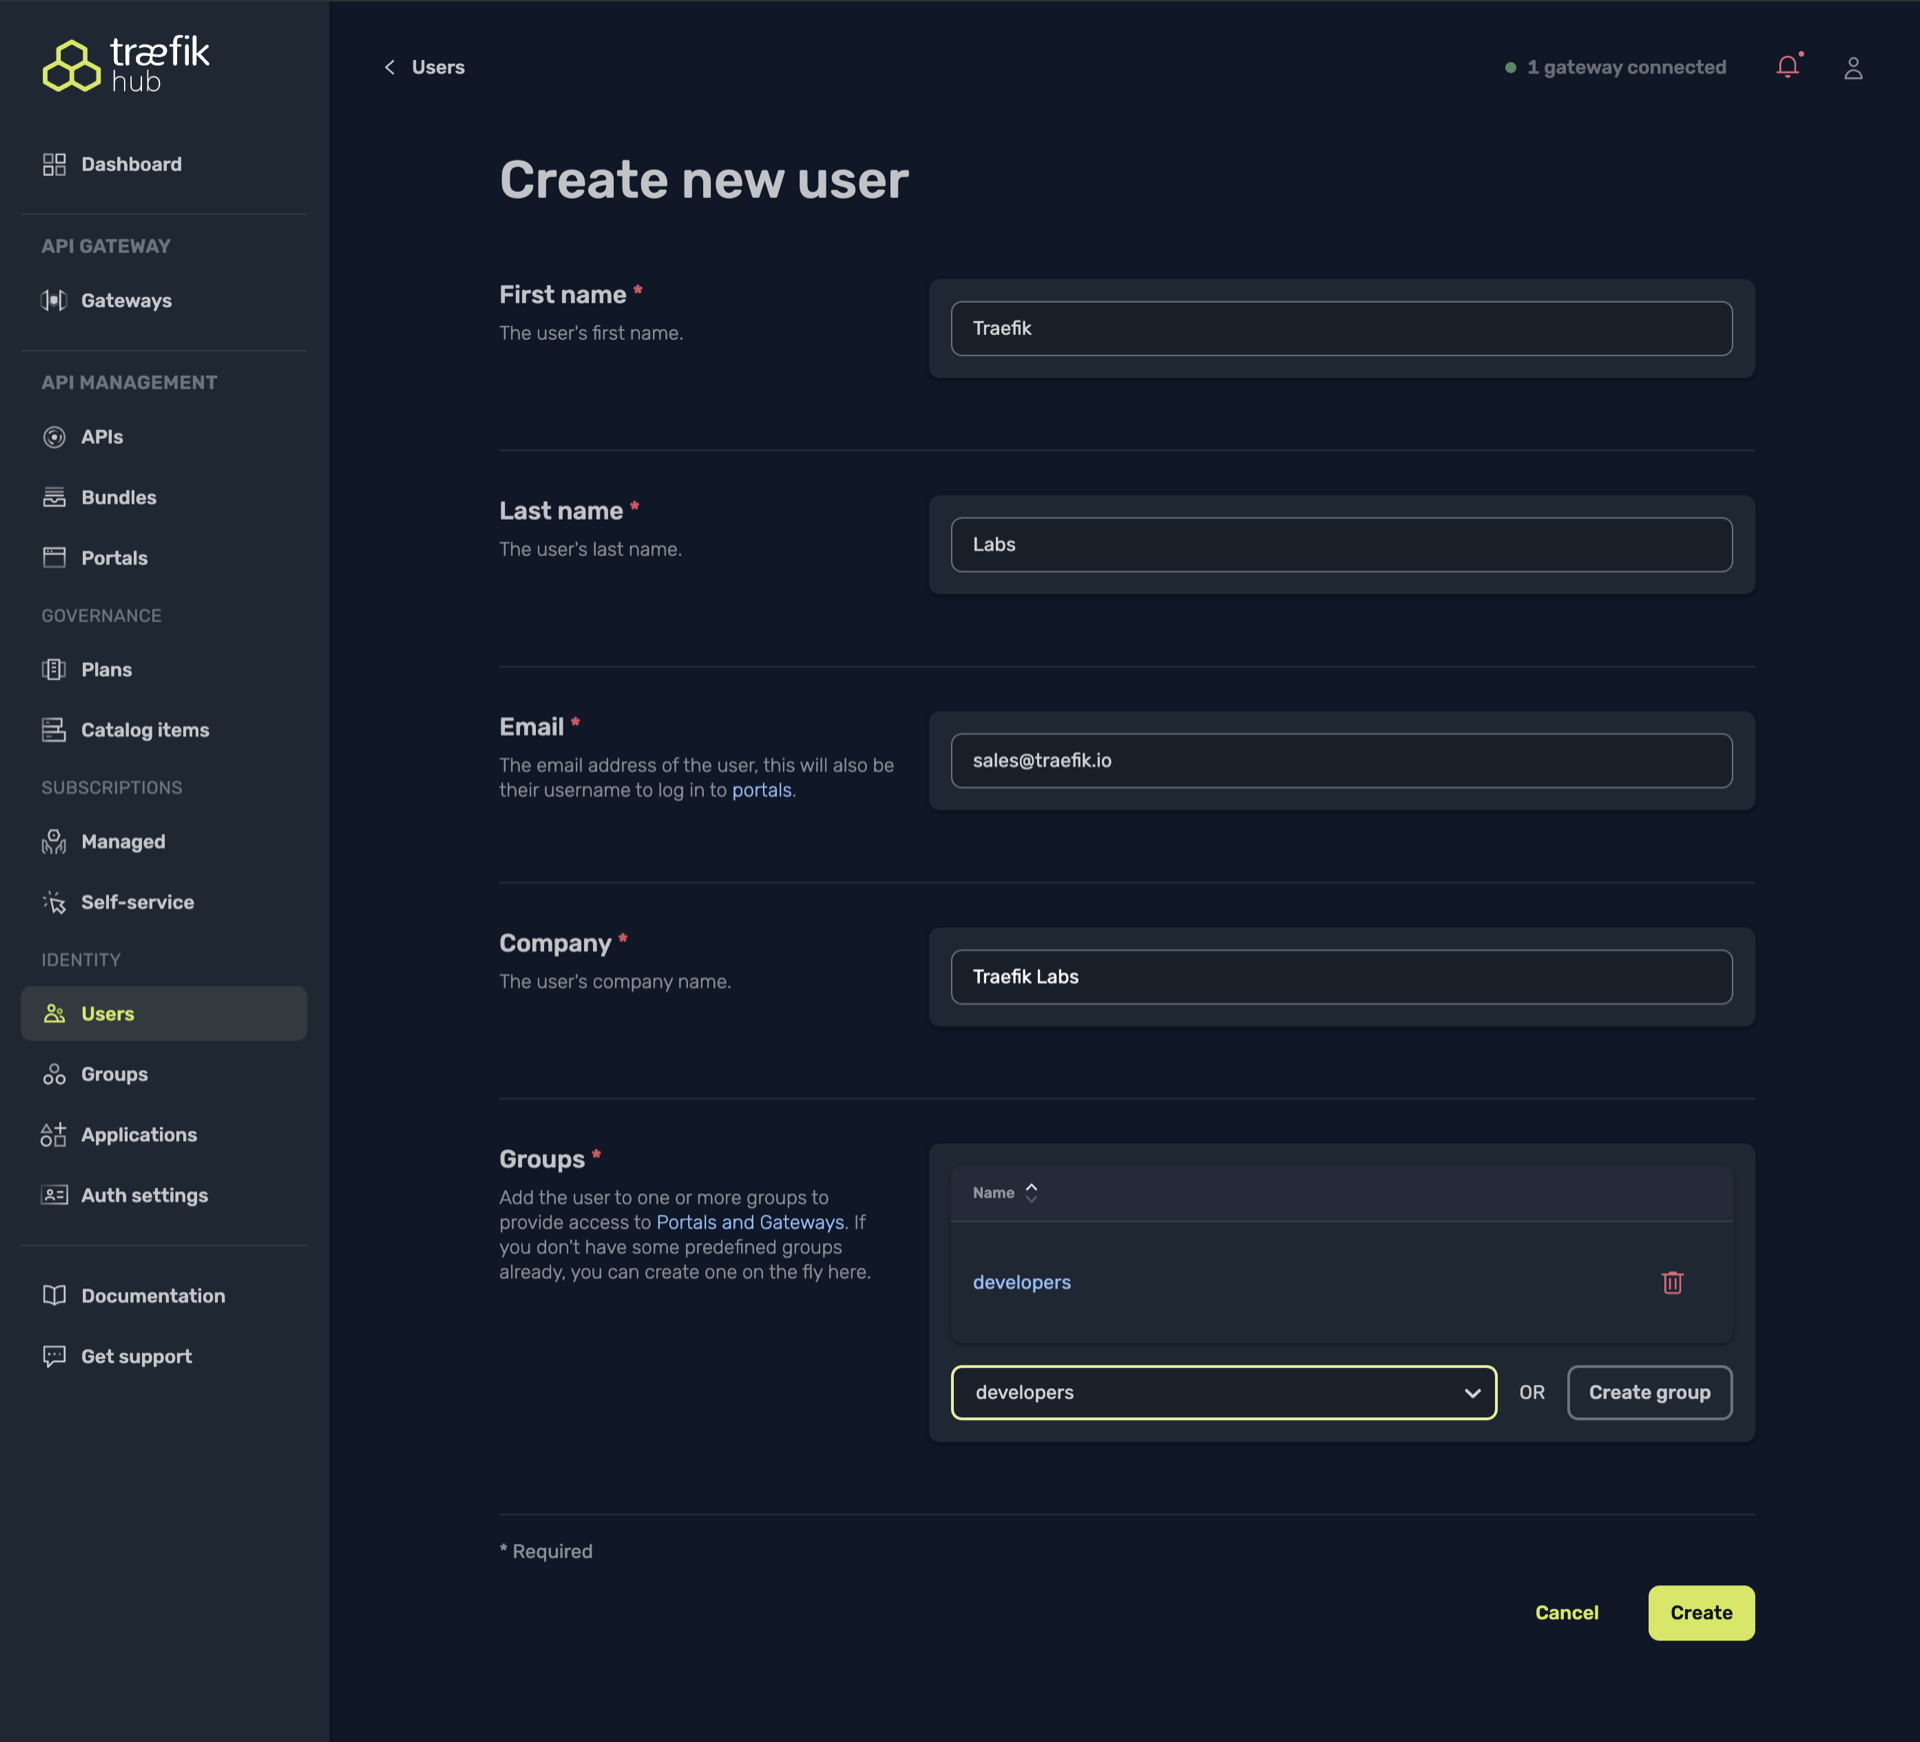
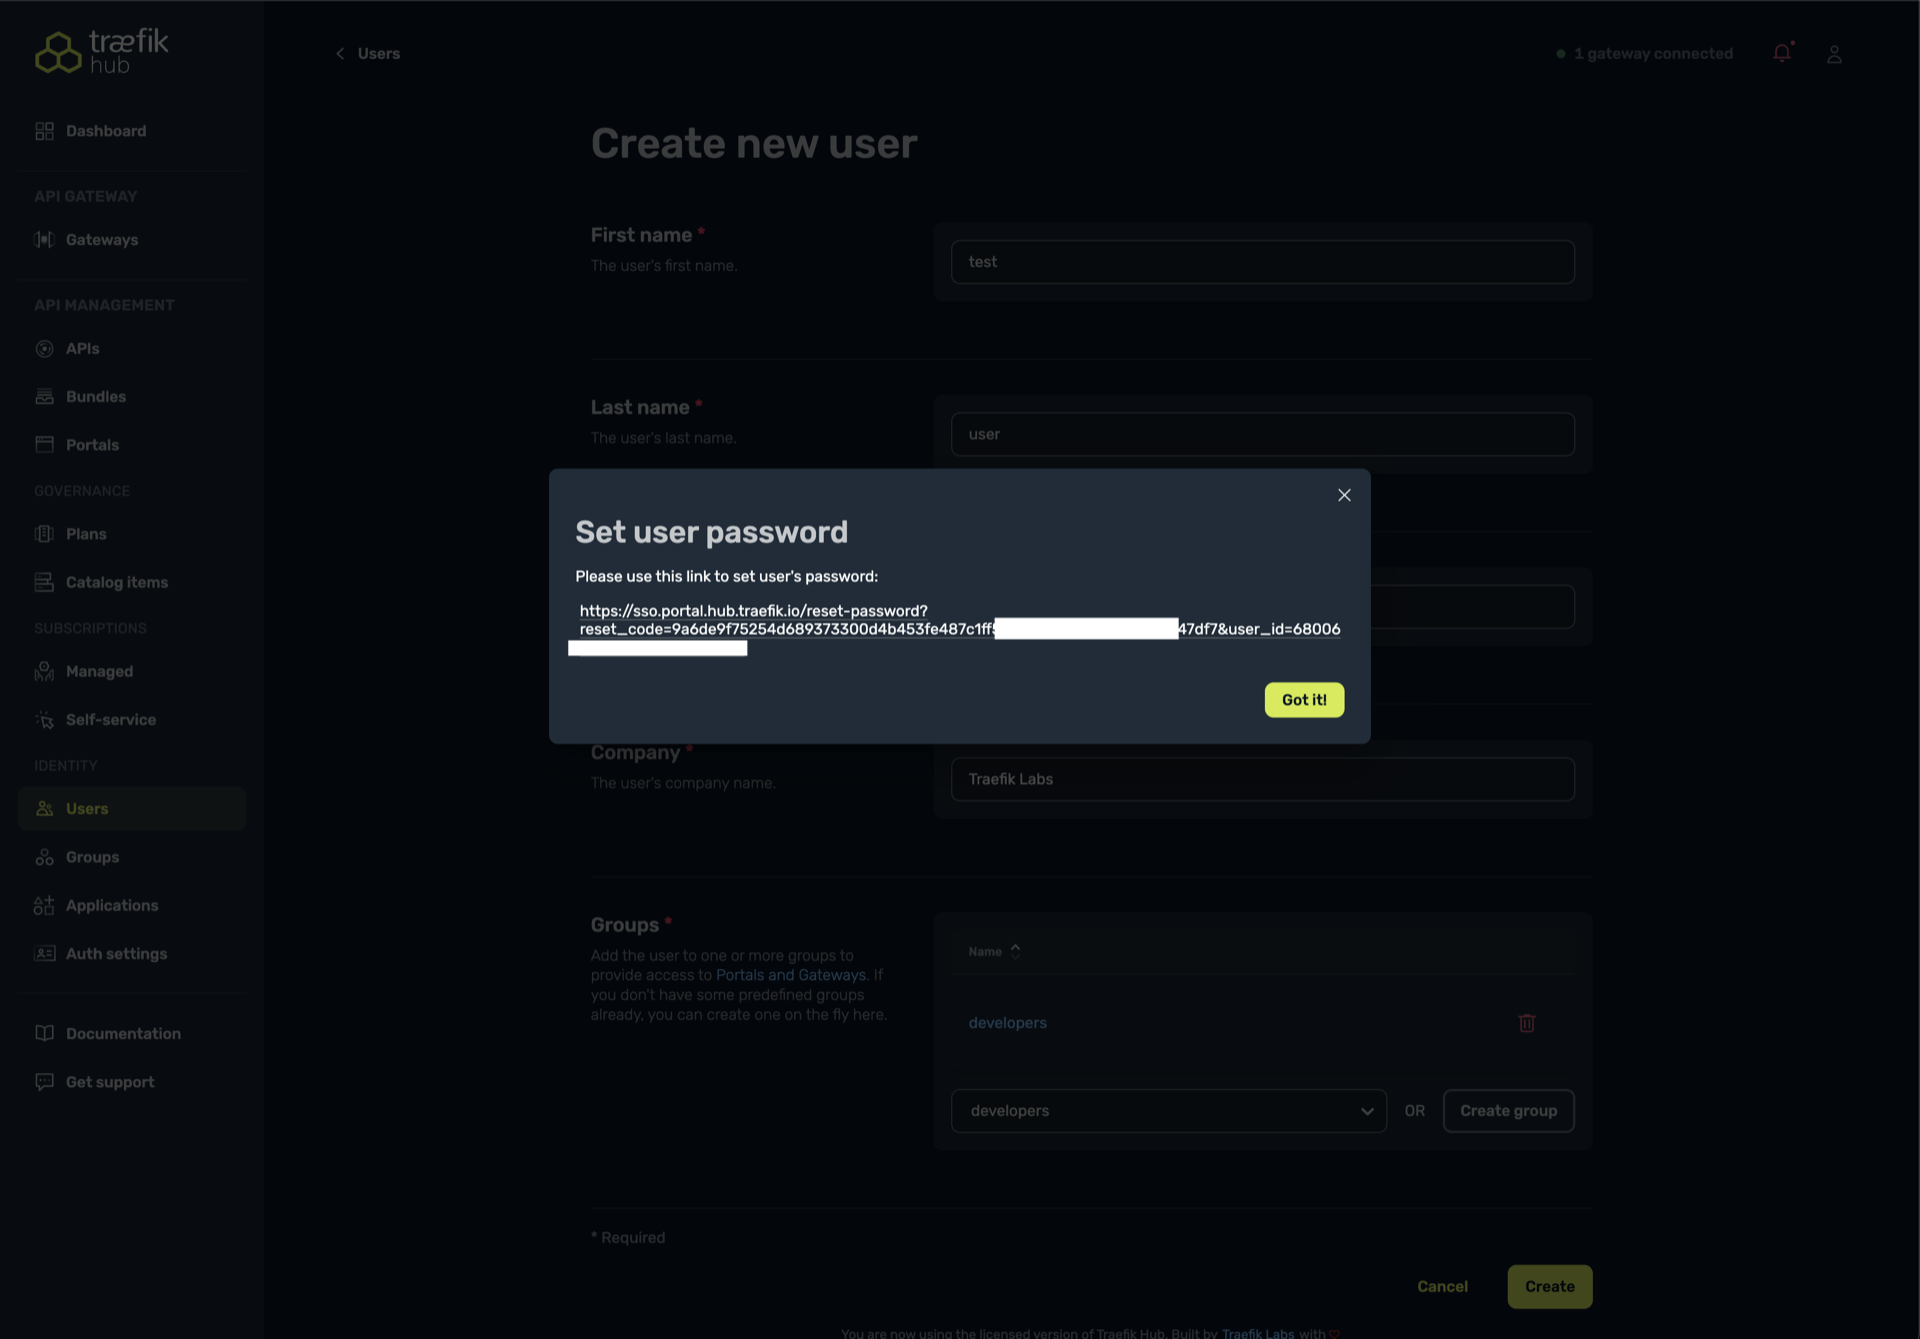
- After creating a new user, you'll be prompted to set a password. Select the link displayed and paste it in your browser to set a new password. Remember these credentials as they will be used to access the API Portal.
Before we can route requests correctly to our application and API portal, we must remove the /no-auth/weather prefix (and any other API prefixes) from incoming URLs.
The stripPrefix middleware handles this by stripping these path segments so the backend service sees clean routes.
To apply this change, run:
cat <<EOF | kubectl apply -f -
apiVersion: traefik.io/v1alpha1
kind: Middleware
metadata:
  name: stripprefix-weather
  namespace: apps
spec:
  stripPrefix:
    prefixes:
      - /no-auth/weather
      - /weather
      - /api-key
      - /simple
      - /complex
      - /weather-v1-wrr
      - /weather-v1
      - /weather-multi-versions
      - /no-auth
      - /basic-auth
      - /api-key
      - /forecast
EOF
Step 5: Create API Plan
For the APIPlan feature to work, you need to deploy and configure Redis in your cluster and Traefik deployment. You can do this by following these steps:
These commands install Redis for demo purposes. For production deployments, refer to the Redis production installation guide: https://doc.traefik.io/traefik-hub/api-gateway/expose/middleware/distributed-rate-limit
Install Redis via the Helm chart
helm install redis oci://registry-1.docker.io/cloudpirates/redis -n traefik --wait
The installation process can take a few seconds.
Get your Redis instance password:
kubectl get secret redis -n traefik -o jsonpath="{.data.redis-password}" | base64 -d
Finally, upgrade your helm values to include Redis:
ingressRoute:
  dashboard:
    enabled: true

providers:
  kubernetesCRD:
    allowCrossNamespace: true

hub:
  redis:
    endpoints: redis.traefik.svc.cluster.local:6379
    password: # <=== Set Redis instance password here
Next, create an API plan for the weather API:
cat <<EOF | kubectl apply -f -
apiVersion: hub.traefik.io/v1alpha1
kind: APIPlan
metadata:
  name: weather-api-plans
  namespace: apps
spec:
  title: "Weather API Plans"
  description: "Plans for accessing the Weather API"
  rateLimit:
    limit: 10
    period: 1s
  quota:
    limit: 1000
    period: 720h  # 30 days
EOF
The following response will be displayed after running the above command:
apiplan.hub.traefik.io/weather-api-plans created
Step 6: Create API Catalog Item
Create an APICatalogItem to make the API visible in the portal:
cat <<EOF | kubectl apply -f -
apiVersion: hub.traefik.io/v1alpha1
kind: APICatalogItem
metadata:
  name: weather-api-catalog
  namespace: apps
spec:
  groups:
    - developers
  apis:
    - name: weather-api # the name of the API deployed earlier
  apiPlan:
    name: weather-api-plans # name of the API plan deployed earlier
EOF
The following response will be displayed after running the above command:
apicatalogitem.hub.traefik.io/weather-api-catalog created
With this APICatalogItem, the weather API will only be visible to users in the developers group in the API portal.
Step 7: Create an Application in API Portal
-
Access the API Portal at
http://$EXTERNAL_IP/no-auth/weather/ -
Log in with the credentials created in the previous section
 info
infoYour browser will warn about an untrusted certificate—but that’s expected, and you can safely “proceed anyway” to your dashboard.
-
Navigate to the Applications section
-
Create a new application named "weather-app"
-
generate an application ID by clicking on "Generate" beside the application ID field
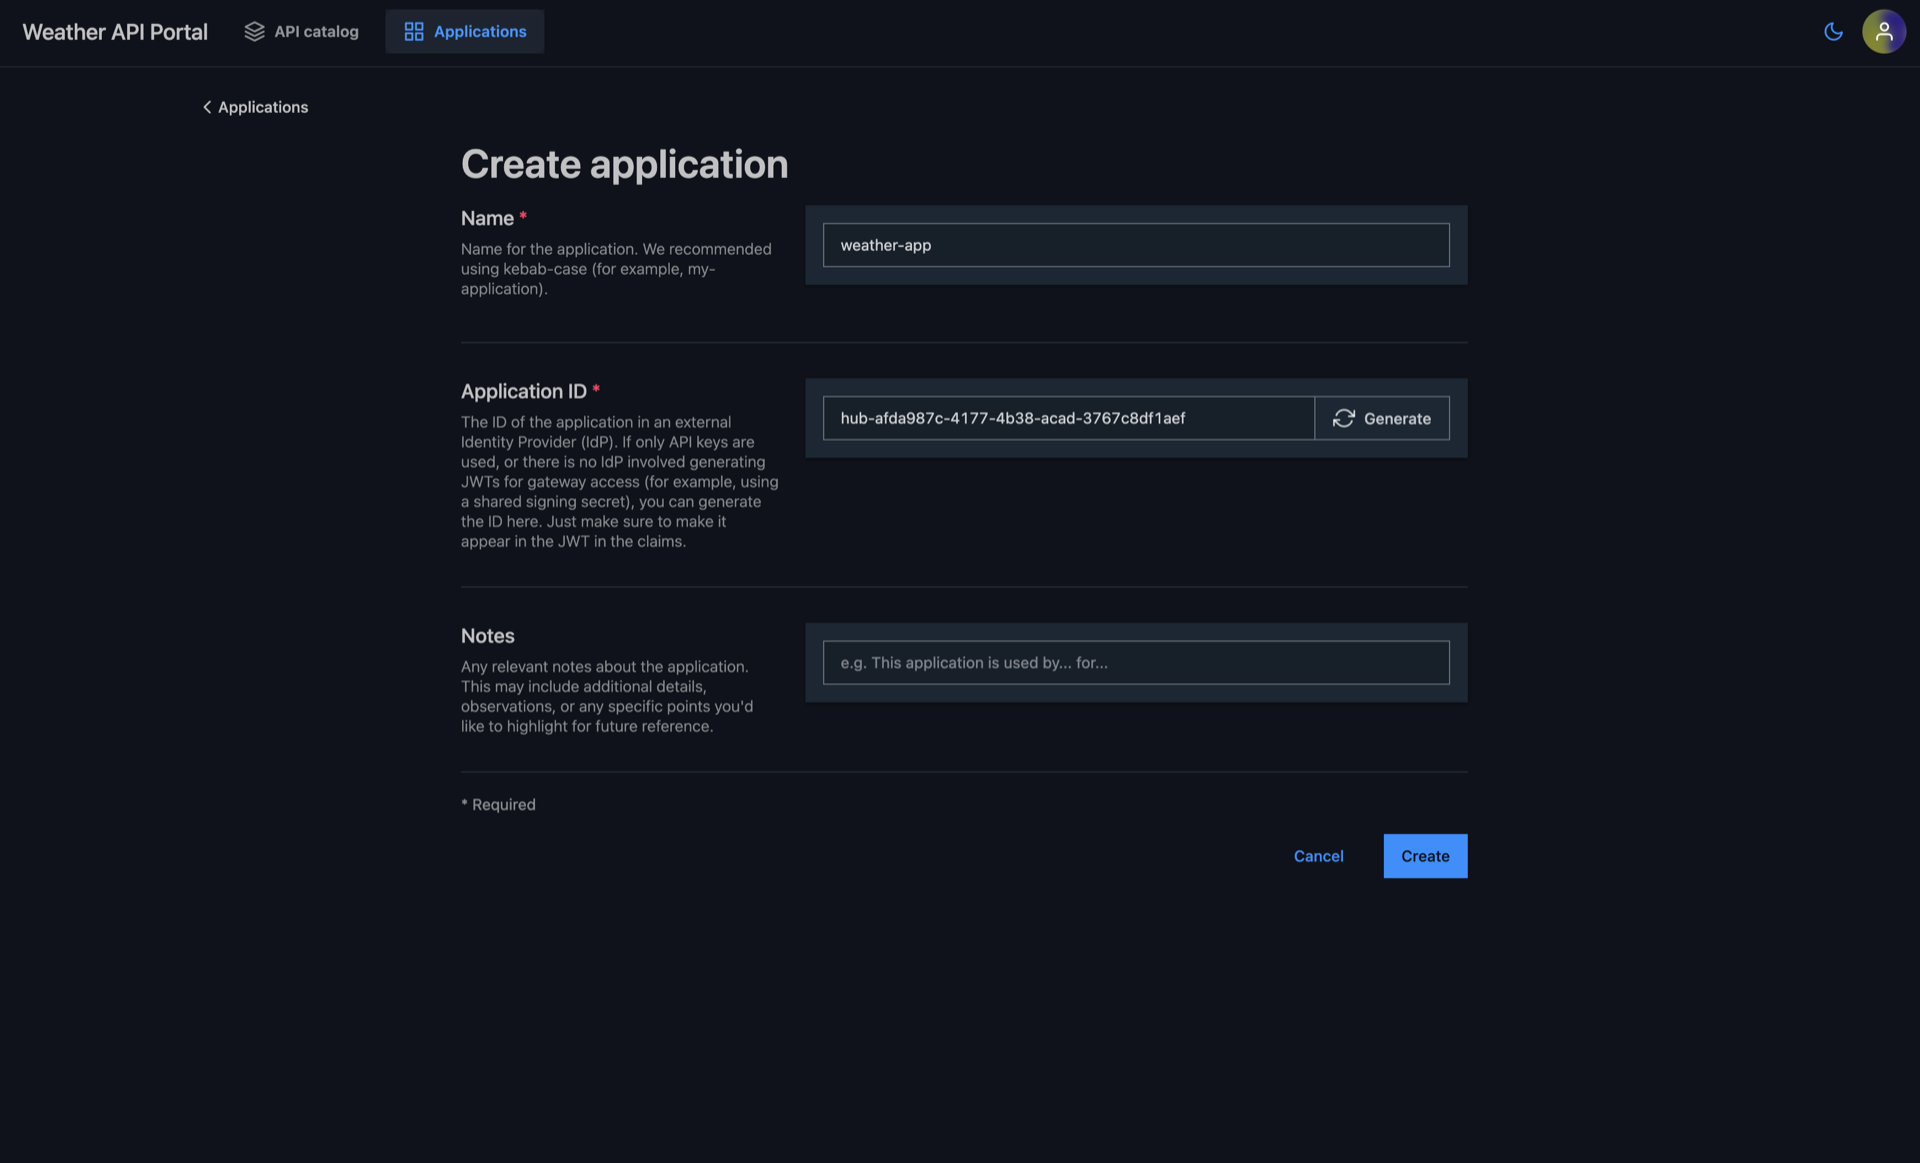
-
Note down the generated
appId(you'll need this for a managed subscription)
Step 8: Create Managed Subscription
cat <<EOF | kubectl apply -f -
apiVersion: hub.traefik.io/v1alpha1
kind: ManagedSubscription
metadata:
  name: weather-api-subscription
  namespace: apps
spec:
  applications:
    - appId: "REPLACE-WITH-YOUR-APP-ID"  # Use the appId generated in the API portal
  apis:
    - name: weather-api
  apiPlan:
    name: weather-api-plans
EOF
The following response will be displayed after running the above command:
managedsubscription.hub.traefik.io/weather-api-subscription created
Verify API Management Features
Step 1: Access the API Portal
- Open
http://$EXTERNAL_IP/no-auth/weather/in your browser - Log in with the credentials created earlier
- In the API Catalog section you can view the OpenAPI specification of your API. You can also explore API plans, managed subscription, endpoints, request/response schemas, and examples
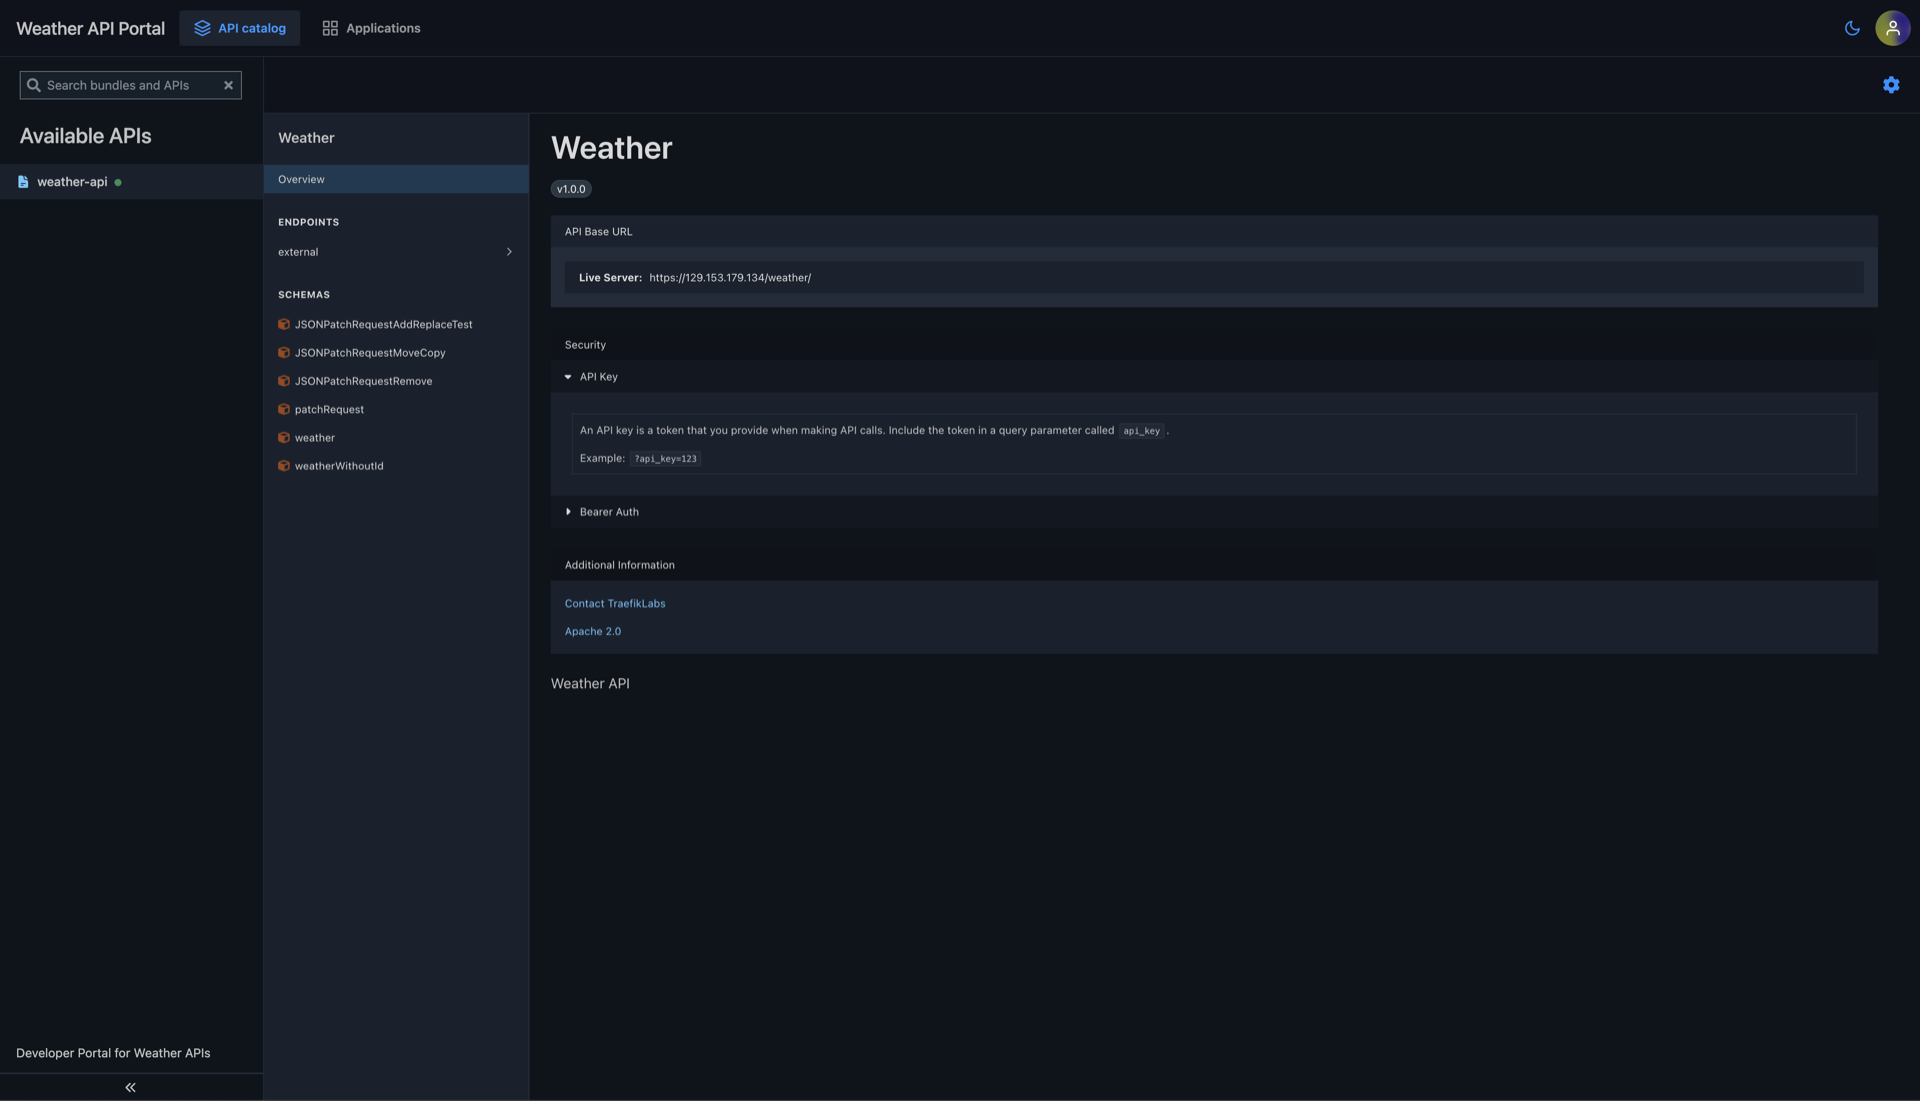
Step 2: View API Documentation
In the API Catalog section you can view the OpenAPI specification of your API. You can also explore API plans, managed subscription, endpoints, request/response schemas, and examples
Step 3: Test the API
- Use the built-in UI to test the API endpoints
- Generate an API key for your application from the API Portal
- Use the API key in your requests:
Step 4: Verify API Plans and Subscriptions
You can also verify your API plans and subscription from the Traefik Hub Online Dashboard.
That's it! You've successfully deployed Traefik Hub API Management in your OCI Kubernetes Engine cluster and verified its functionality with a sample API.
Stack Sources
The deployment stack is built using Terraform and is available on GitHub: https://github.com/traefik/oci-traefiklabs-stacks
Next Steps
- For production-ready Redis deployment and advanced options, see the Distribute Rate Limit docs.
- To obtain valid TLS certificates, configure an ACME resolver with Let's Encrypt: see Let's Encrypt TLS docs.
- Explore additional features and configuration patterns in the Traefik Hub documentation.
